How to add sub theme to API Manager jaggery applications - API Manager store/publisher customization

In API Manager we can add sub themes and change look and feel of jaggery applications. Here in this post i will provide high level instructions for that. Customize the existing theme and, add the new theme as a "sub theme" to the store and publisher.

(1) Navigate to "/repository/deployment/server/jaggeryapps/store/site/themes/fancy/subthemes" directory.
(2) Create a directory with the name of your subtheme. For example "test".
(3) Copy the "/repository/deployment/server/jaggeryapps/store/site/themes/fancy/css/styles-layout.css" to the new subtheme location "repository/deployment/server/jaggeryapps/store/site/themes/fancy/subthemes/test/css/styles-layout.css".
(4) At the end of the copied file add the css changes in [a].
(5) Edit "/repository/deployment/server/jaggeryapps/store/site/conf/site.json" file as below in order to make the new sub theme as the default theme.
        "theme" : {
               "base" : "fancy",
               "subtheme" : "test"
        }


Add custom css to new sub theme

.link-to-user {
  max-width: 100px;
  white-space: nowrap;
  overflow: hidden;
  text-overflow: ellipsis;
}
@media only screen and (max-width:1200px){
    .navbar .nav.pull-right.login-sign-up{
        width: 100%;
        text-align:right;
float:left;
border-left:solid 1px #292e38;
border-bottom:solid 1px #292e38;
    }
.menu-content .navbar .nav.pull-right.login-sign-up > li{
        float:left;
 }
 .menu-content .navbar .nav.pull-right.login-sign-up > li.dropdown > a , .menu-content .navbar .nav.pull-right.login-sign-up > li.dropdown.open > a{
        color:#000 !important;
 }
 .search-section-custom{
         margin-top:62px;
 }
 #wrap > div.header + div.clearfix + .container-fluid{
padding-right:0;
 }
}

WSO2 API Manager - Troubleshoot common deployment issues

 Here are some of useful tips when you work on deployment related issues.

-Dsetup doesn't work for usage tables. Usage table definitions are not there in setup scripts.
In WSO2 API Manager and BAM deployment we need user manager database, registry database and api manager database. We do have setup scripts for those database under db scripts folder of product distribution.  There is no need to create any tables in stats database(manually or using setup script) as API Manager toolbox(deployed in BAM) will create them when hive queries get executed. -Dsetup option will not apply to the hive scripts inside toolbox deployed in BAM.

Understand connectivity between components in distributed API manager deployment.
This is important when you work on issues related to distributed API Manager deployment. Following steps to explain connectivity between components. It would be useful to listed them here.

1. Changed the admin password
2. Tried to log in to publisher and got the insufficient privilege error
3. Then changed the admin password in authManager element in api-manager.xml
4. Restarted and I was able to login to API publisher. Then I created an API and tried to publish. Got a permission error again.
5. Then, I changed password under API Gateway element in api-manager.xml
6. Restarted and published the API. Then, tried to invoke an API using an existing key. Got the key validation error.
7. Then, I changed the admin password in KeyManager element in api-manager.xml and all issues got resolved.

Thrift key validation does not work when we have load balancer fronted key manager.
Reason for this is most of load balancers not capable of routing traffic in session aware manner. So in such cases its always recommend to use WS key validation client.

Usage data related issues.
When you work with usage data related issues first we should check data source configurations in BAM and API Manager. Then we need to check created tables in usage database. Most of reported issues are due to configuration issues.  Same applies to billing sample as well.

WSO2 API Manager - How to customize API Manager using extension points

Here in this article i will discuss about common extensions available in API Manager and how we can use them.


WSO2 API Manager visibiity, subscription availability and relation between them

When we create APIs we need to aware about API visibility and subscriptions. Normally API visibility directly couple with subscription availability(simply because you cannot subscribe to something you dont see in store). See following diagram for more information about relationship between them.

Visibility - we can contorl how other users can see our APIS

Subscription availability - How other users can subscribe to APIs created by us


How to get custom error messages for authentication faliures in WSO2 API Manager 1.8.0

Here in this post i will discuss how we can generate custom error messages for auth failures. If you need to retrieve message in application/vnd.error+json format you need to add following parameter to _auth_failure_handler_.xml sequence file.

 <property name="error_message_type" value="application/vnd.error+json"/> 

And also we need to have message builders/formatter defined in axis2.xml file to map this message type. If you plan to use JSON formatter please use following configuration(assume you create message according to given template).
<messageFormatter contentType="application/vnd.error+json" 
class="org.apache.axis2.json.JSONMessageFormatter"/> 

How to use two layer throttling in WSO2 API Manager

Create new tier definitions


Here in this post i will discuss how we can use two throttling policies at a given time for single API.When we have complex use cases we might need to apply different policies at same time.
Below table shows how throttling policies are defined.

Tier
throttle-l1
throttling-l2
Free
300 per month
5 per 3 min
Silver
2000 per month
1 per 5 sec
Gold - Unlimited
unlimited
unlimited


As we need to engage two throttling layers, we will add two throttling tier definitions and and engage them to the API.
In order to do that edit (API definition synapse configuration file)

Ex: AM_HOME/repository/deployment/server/synapse-configs/default/api/admin--animal_v1.0.0.xml file to with the following content

<api xmlns="http://ws.apache.org/ns/synapse" name="admin--animal" context="/animal" version="1.0.0" version-type="url">
   .
   .
   .
   .
          <handlers>
<handler class="org.wso2.carbon.apimgt.gateway.handlers.security.APIAuthenticationHandler"/>
   <handler class="org.wso2.carbon.apimgt.gateway.handlers.throttling.APIThrottleHandler">
           <property name="id" value="B"/>
           <property name="policyKey" value="gov:/apimgt/applicationdata/throttling-l2.xm"/>
               </handler>
       <handler class="org.wso2.carbon.apimgt.gateway.handlers.throttling.APIThrottleHandler">
           <property name="id" value="A"/>
           <property name="policyKey" value="gov:/apimgt/applicationdata/tiers.xml"/>
               </handler>
   .
   .
   .
   .
       </handlers>
   .
   .
   .
   </api>


Two layer Throttling
Here we will use two layer throttling to achieve 2 policies for each role(free, silver, gold). Then we will engage them to API with different keys. So both of them will execute in runtime sequentially. In this case you need to replace tiers.xml file in gov:/apimgt/applicationdata/tiers.xml path of gov registry.


1) Copy throttling-l1.xml(create file with following contents) to GOV_REG/apimgt/applicationdata/tiers.xml
2) Copy throttling-l2.xml(create file with following contents) to GOV_REG/apimgt/applicationdata/throttling-l2.xml

(NOTE : GOV_REG is the governance registry root in Carbon console )

Throttling configurations - Policy 01(throttling-l1.xml)

<wsp:Policy xmlns:wsp="http://schemas.xmlsoap.org/ws/2004/09/policy"
           xmlns:throttle="http://www.wso2.org/products/wso2commons/throttle">
   <throttle:MediatorThrottleAssertion>
       <wsp:Policy>
           <throttle:ID throttle:type="ROLE">Gold</throttle:ID>
           <wsp:Policy>
               <throttle:Control>
                   <wsp:Policy>
                       <throttle:MaximumCount>20</throttle:MaximumCount>
                       <throttle:UnitTime>60000</throttle:UnitTime>
                   </wsp:Policy>
               </throttle:Control>
           </wsp:Policy>
       </wsp:Policy>
       <wsp:Policy>
           <throttle:ID throttle:type="ROLE">Silver</throttle:ID>
           <wsp:Policy>
               <throttle:Control>
                   <wsp:Policy>
                       <throttle:MaximumCount>2000</throttle:MaximumCount>
                       <throttle:UnitTime>2592000000</throttle:UnitTime>
                   </wsp:Policy>
               </throttle:Control>
           </wsp:Policy>
       </wsp:Policy>
       <wsp:Policy>
           <throttle:ID throttle:type="ROLE">free</throttle:ID>
           <wsp:Policy>
               <throttle:Control>
                   <wsp:Policy>
                       <throttle:MaximumCount>300</throttle:MaximumCount>
                       <throttle:UnitTime>2592000000</throttle:UnitTime>
                   </wsp:Policy>
               </throttle:Control>
           </wsp:Policy>
       </wsp:Policy>
       <wsp:Policy>
           <throttle:ID throttle:type="ROLE">Unauthenticated</throttle:ID>
           <wsp:Policy>
               <throttle:Control>
                   <wsp:Policy>
                       <throttle:MaximumCount>60</throttle:MaximumCount>
                       <throttle:UnitTime>60000</throttle:UnitTime>
                   </wsp:Policy>
               </throttle:Control>
           </wsp:Policy>
       </wsp:Policy>
   </throttle:MediatorThrottleAssertion>
</wsp:Policy>


Policy 02(throttling-l2.xml)

<wsp:Policy xmlns:wsp="http://schemas.xmlsoap.org/ws/2004/09/policy"
           xmlns:throttle="http://www.wso2.org/products/wso2commons/throttle">
   <throttle:MediatorThrottleAssertion>
       <wsp:Policy>
           <throttle:ID throttle:type="ROLE">Gold</throttle:ID>
           <wsp:Policy>
               <throttle:Control>
                   <wsp:Policy>
                       <throttle:MaximumCount>20</throttle:MaximumCount>
                       <throttle:UnitTime>60000</throttle:UnitTime>
                   </wsp:Policy>
               </throttle:Control>
           </wsp:Policy>
       </wsp:Policy>
       <wsp:Policy>
           <throttle:ID throttle:type="ROLE">Silver</throttle:ID>
           <wsp:Policy>
               <throttle:Control>
                   <wsp:Policy>
                       <throttle:MaximumCount>1</throttle:MaximumCount>
                       <throttle:UnitTime>5000</throttle:UnitTime>
                   </wsp:Policy>
               </throttle:Control>
           </wsp:Policy>
       </wsp:Policy>
       <wsp:Policy>
           <throttle:ID throttle:type="ROLE">Free</throttle:ID>
           <wsp:Policy>
               <throttle:Control>
                   <wsp:Policy>
                       <throttle:MaximumCount>5</throttle:MaximumCount>
                       <throttle:UnitTime>180000</throttle:UnitTime>
                   </wsp:Policy>
               </throttle:Control>
           </wsp:Policy>
       </wsp:Policy>
       <wsp:Policy>
           <throttle:ID throttle:type="ROLE">Unauthenticated</throttle:ID>
           <wsp:Policy>
               <throttle:Control>
                   <wsp:Policy>
                       <throttle:MaximumCount>60</throttle:MaximumCount>
                       <throttle:UnitTime>60000</throttle:UnitTime>
                   </wsp:Policy>
               </throttle:Control>
           </wsp:Policy>
       </wsp:Policy>
   </throttle:MediatorThrottleAssertion>
</wsp:Policy>


How to implement custom JWT generator and custom claim retriever and link them in WSO2 API Manager 1.8.0

Here in this post we will discuss how to use custom code for JWT generation and Claims retrieve logic. I have explained custom JWT generation with API Manager 1.8.0 in this post(http://sanjeewamalalgoda.blogspot.com/2014/12/how-to-generate-custom-jwt-in-wso2-api.html). Moving forward we will see how we can call custom claim retrieve method from JWT generator implementation. Once everything configured properly you will see JWT similar to below.

{"iss":"wso2.org/products/am","exp":"1418619165375","http://wso2.org/claims/subscriber":"admin","http://wso2.org/claims/applicationid":"2","http://wso2.org/claims/applicationname":"DefaultApplication","http://wso2.org/claims/applicationtier":"Unlimited","http://wso2.org/claims/apicontext":"/testam/sanjeewa","http://wso2.org/claims/version":"1.0.0","http://wso2.org/claims/tier":"Bronze","http://wso2.org/claims/keytype":"PRODUCTION","http://wso2.org/claims/usertype":"APPLICATION_USER","http://wso2.org/claims/enduser":"admin","http://wso2.org/claims/enduserTenantId":"-1234","current_timestamp":"1418618265391","messge":"This is custom JWT"}

As you can see current_timestamp and message properties will be there in JWT with customized JWT generator code.

public Map populateCustomClaims(APIKeyValidationInfoDTO keyValidationInfoDTO, String apiContext, String version, String accessToken)
            throws APIManagementException {
        Long time = System.currentTimeMillis();
        String text = "This is custom JWT";
        Map map = new HashMap();
        map.put("current_timestamp", time.toString());
        map.put("messge" , text);
//If need you can generate access token based claims and embedded them to map.
return map;
}

Also if need to generate custom claims based on access token you can extend org.wso2.carbon.apimgt.impl.token.ClaimsRetriever class and implement method for that as follows.

 public SortedMap getClaims(String endUserName, String accessToken) throws APIManagementException {
 //you implementation should go here
 }

Then call it inside populateCustomClaims as follows.

   public Map populateCustomClaims(APIKeyValidationInfoDTO keyValidationInfoDTO, String apiContext, String version, String accessToken)
            throws APIManagementException {
        CustomClaimsRetriever claimsRetriever = (CustomClaimsRetriever)getClaimsRetriever();
        if (claimsRetriever != null) {
            String tenantAwareUserName = keyValidationInfoDTO.getEndUserName();

            if (MultitenantConstants.SUPER_TENANT_ID == APIUtil.getTenantId(tenantAwareUserName)) {
                tenantAwareUserName = MultitenantUtils.getTenantAwareUsername(tenantAwareUserName);
            }

            try {
                //Call getClaims method implemented in custom claim retriever class
                return claimsRetriever.getClaims(tenantAwareUserName,accessToken);

            } catch (Exception e) {
            }
        }
        return null;
    }
You can download complete sample from this URL(Sample Code).

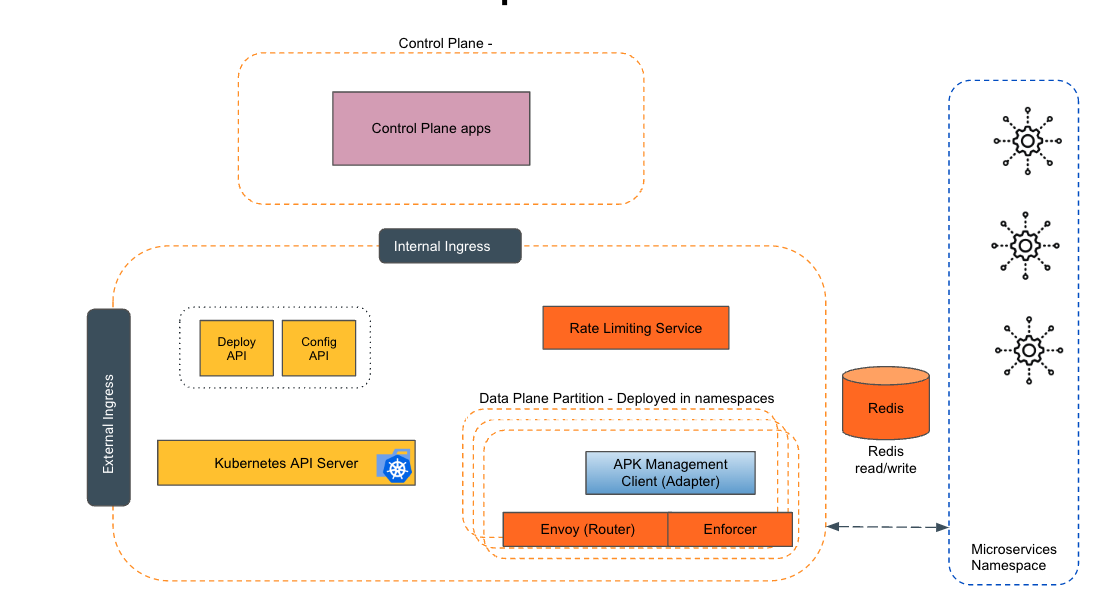
Empowering the Future of API Management: Unveiling the Journey of WSO2 API Platform for Kubernetes (APK) Project and the Anticipated Alpha Release

  Introduction In the ever-evolving realm of API management, our journey embarked on the APK project eight months ago, and now, with great a...