How to write test case using wiremock and test Mutual SSL enabled Backend Service invocation

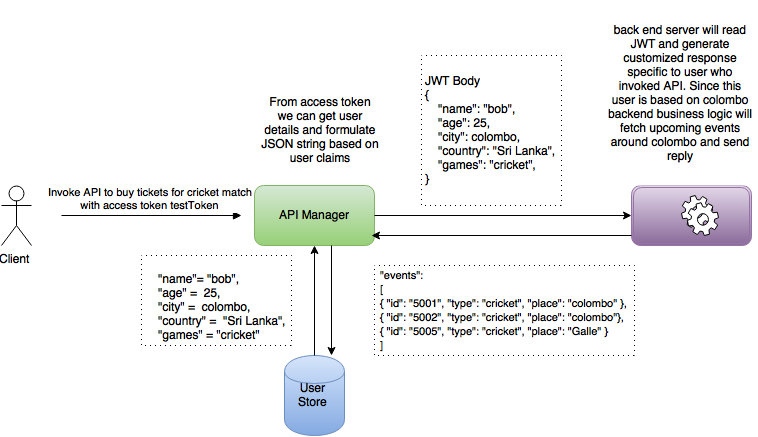
Add following dependencies to the pom file so we can use wiremock for testing. I specifically added below slf4j versions to dependency as they required. Also I excluded some of the components as they started sending errors. Same way if you get any errors just type mvn dependency:tree and get all dependencies. Then you can exclude problematic components.

<dependency>

             <groupId>org.slf4j</groupId>
             <artifactId>slf4j-log4j12</artifactId>
             <version>1.7.7</version>
             <scope>test</scope>
         </dependency>
         <dependency>
             <groupId>org.slf4j</groupId>
             <artifactId>slf4j-api</artifactId>
             <version>1.7.7</version>
             <scope>test</scope>
         </dependency>
         <dependency>
             <groupId>org.hamcrest</groupId>
             <artifactId>hamcrest-all</artifactId>
             <version>1.3</version>
             <scope>test</scope>
        </dependency>
         <dependency>
                     <groupId>com.github.tomakehurst</groupId>
                     <artifactId>wiremock</artifactId>
                     <version>2.5.0</version>
                     <exclusions>
                         <exclusion>
                             <groupId>org.slf4j</groupId>
                             <artifactId>slf4j-jdk14</artifactId>
                         </exclusion>
                         <exclusion>
                             <groupId>org.slf4j</groupId>
                             <artifactId>jcl-over-slf4j</artifactId>
                         </exclusion>
                         <exclusion>
                             <groupId>org.slf4j</groupId>
                             <artifactId>log4j-over-slf4j</artifactId>
                         </exclusion>
                         <exclusion>
                             <groupId>com.fasterxml.jackson.core</groupId>
                             <artifactId>jackson-annotations</artifactId>
                         </exclusion>
                         <exclusion>
                             <groupId>com.fasterxml.jackson.core</groupId>
                             <artifactId>jackson-core</artifactId>
                         </exclusion>
                     </exclusions>
        </dependency>

Following is my test class.

package org.test.testpkg;
import jdk.nashorn.internal.objects.NativeObject;
import org.apache.commons.logging.Log;
import org.apache.commons.logging.LogFactory;
import org.junit.Assert;
import org.junit.Rule;
import org.junit.Test;
import com.github.tomakehurst.wiremock.junit.WireMockRule;
import static com.github.tomakehurst.wiremock.client.WireMock.*;
import static com.github.tomakehurst.wiremock.core.WireMockConfiguration.wireMockConfig;
import java.io.File;
public class MutualSSLTest {
    private static final Log log = LogFactory.getLog(MutualSSLTest.class);
    //Key store and client trustore paths and passwords
    private static final String KEYSTORE_FILE_PATH =
            "src" + File.separator + "test" + File.separator + "resources" + File.separator + "security"
                    + File.separator + "server" + File.separator + "wso2carbon.jks";
    private static final String TRUSTSTORE_FILE_PATH =
            "src" + File.separator + "test" + File.separator + "resources" + File.separator + "security"
                    + File.separator + "server" + File.separator + "client-truststore.jks";
    private static final String KEYSTORE_FILE_PATH_CLIENT =
             "src" + File.separator + "test" + File.separator + "resources" + File.separator + "security"
                    + File.separator + "client" + File.separator + "wso2carbon.jks";
    private static final String TRUSTSTORE_FILE_PATH_CLIENT =
             "src" + File.separator + "test" + File.separator + "resources" + File.separator + "security"
                    + File.separator + "client" + File.separator + "client-truststore.jks";
    public void testAPIProvider() {
    }
    @Rule
    public WireMockRule wireMockRule;
    @Test
    public void testMutualSSLEnabledBackend() {
//Create wiremock rule by providing SSL configuratios. Here we need to pass keystore/trustore, port and other required information.
        wireMockRule = new WireMockRule(wireMockConfig()
                .httpsPort(8081)
                .needClientAuth(true)
                .trustStoreType("JKS")
                .keystoreType("JKS")
                .keystorePath(KEYSTORE_FILE_PATH)
                .trustStorePath(TRUSTSTORE_FILE_PATH)
                .trustStorePassword("wso2carbon")
                .keystorePassword("wso2carbon"));
        wireMockRule.start();
        // Mock service for test endpoint. This will return 200 for http head method.
        wireMockRule.stubFor(head(urlEqualTo("/test"))
                .willReturn(aResponse()
                        .withStatus(200)
                        .withBody("{success}")
                        .withHeader("Content-Type", "application/json")
                ));
        try {
   //Then i will set keystore and client trustore to system properties.
            System.setProperty("javax.net.ssl.keyStoreType", "JKS");
            System.setProperty("javax.net.ssl.keyStore", KEYSTORE_FILE_PATH_CLIENT);
            System.setProperty("javax.net.ssl.keyStorePassword", "wso2carbon");
            System.setProperty("javax.net.ssl.trustStore", TRUSTSTORE_FILE_PATH_CLIENT);
            System.setProperty("javax.net.ssl.trustStorePassword", "wso2carbon");
   //Now i will invoke my utility method and call created service
            org.mozilla.javascript.NativeObject obj =
                    HostObjectUtils.sendHttpHEADRequest("https://localhost:8081/test",
                            "404");
            //Then i will assert response.
   Assert.assertEquals("success", obj.get("response"));
        } catch (Exception e) {
            e.printStackTrace();
        }
        wireMockRule.resetAll();
        wireMockRule.stop();
    }
}

In my utility class i have following method to call HTTP service and get response.

    /**
     * Validate the backend by sending HTTP HEAD
     *
     * @param urlVal - backend URL
     * @param invalidStatusCodesRegex - Regex for the invalid status code
     * @return - status of HTTP HEAD Request to backend
     */
    public static NativeObject sendHttpHEADRequest(String urlVal, String invalidStatusCodesRegex) {
        boolean isConnectionError = true;
        String response = null;
        NativeObject data = new NativeObject();
        //HttpClient client = new DefaultHttpClient();
        HttpHead head = new HttpHead(urlVal);
        //Change implementation to use http client as default http client do not work properly with mutual SSL.
        org.apache.commons.httpclient.HttpClient clientnew = new org.apache.commons.httpclient.HttpClient();
        // extract the host name and add the Host http header for sanity
        head.addHeader("Host", urlVal.replaceAll("https?://", "").replaceAll("(/.*)?", ""));
        clientnew.getParams().setParameter("http.socket.timeout", 4000);
        clientnew.getParams().setParameter("http.connection.timeout", 4000);
        HttpMethod method = new HeadMethod(urlVal);
        if (System.getProperty(APIConstants.HTTP_PROXY_HOST) != null &&
                System.getProperty(APIConstants.HTTP_PROXY_PORT) != null) {
            if (log.isDebugEnabled()) {
                log.debug("Proxy configured, hence routing through configured proxy");
            }
            String proxyHost = System.getProperty(APIConstants.HTTP_PROXY_HOST);
            String proxyPort = System.getProperty(APIConstants.HTTP_PROXY_PORT);
            clientnew.getParams().setParameter(ConnRoutePNames.DEFAULT_PROXY,
                    new HttpHost(proxyHost, Integer.parseInt(proxyPort)));
        }
        try {
            int statusCodeNew = clientnew.executeMethod(method);
            //Previous implementation
            // HttpResponse httpResponse = client.execute(head);
            String statusCode = String.valueOf(statusCodeNew);//String.valueOf(httpResponse.getStatusLine().getStatusCode());
            String reasonPhrase = String.valueOf(statusCodeNew);//String.valueOf(httpResponse.getStatusLine().getReasonPhrase());
            //If the endpoint doesn't match the regex which specify the invalid status code, it will return success.
            if (!statusCode.matches(invalidStatusCodesRegex)) {
                if (log.isDebugEnabled() && statusCode.equals(String.valueOf(HttpStatus.SC_METHOD_NOT_ALLOWED))) {
                    log.debug("Endpoint doesn't support HTTP HEAD");
                }
                response = "success";
                isConnectionError = false;
            } else {
                //This forms the real backend response to be sent to the client
                data.put("statusCode", data, statusCode);
                data.put("reasonPhrase", data, reasonPhrase);
                response = "";
                isConnectionError = false;
            }
        } catch (IOException e) {
            // sending a default error message.
            log.error("Error occurred while connecting to backend : " + urlVal + ", reason : " + e.getMessage(), e);
            String[] errorMsg = e.getMessage().split(": ");
            if (errorMsg.length > 1) {
                response = errorMsg[errorMsg.length - 1]; //This is to get final readable part of the error message in the exception and send to the client
                isConnectionError = false;
            }
        } finally {
            method.releaseConnection();
        }
        data.put("response", data, response);
        data.put("isConnectionError", data, isConnectionError);
        return data;
    }
}


Now we have successfully implemented mutual ssl test case. You can run test and verify this behavior. If you need to test negative impact then comment keystore password in client.
Then you will see errors in logs.

How to do zero downtime migration - WSO2 API Manager

Here in this post i will explain how we can do zero downtime migration in deployment.

Test Migration
First we can take backup of running system and create setup locally. Then we can perform migration and identify if there are any issues. Usually dump restore and setup take sometime based on deployment.

Then after that we can test APIs, resources etc. Also we can test extension points, integrations etc. 

Then after we completed above we can come up with exact steps on migrating. So we can run same in deployment backup(or staging deployment). Ideally it should work without issues. Then we can repeat this to verify exact steps.

Following steps need to follow(if need they can automate that)
  • Create dump of current running setup
  • Restore it to lower environment.
  • Perform migration.
  • Do sanity check

Then we need to analyze traffic pattern of the deployment for about one week or more to identify time slot for migration. After some analysis we can identify time window with minimum user interaction.

Then we need to perform all above mentioned steps in production server. But at this time we should test all use cases end to end.

Also we need to create one way synchup script to synchronize tokens to new deployment(tokens created within maintain window).
Real migration
Then comes real migration,
  • Make API Manager store and publisher read only for maintain window(say 3 hours).
  • Perform creating dump and restore to new environment.
  • Do migration in new envirionment.
  • Run synchup script to update new tokens created in original deployment.
  • Then test functionalities using automated tests and manual tests.
  • Once we are 100% confident we can do DNS switch.
  • If everything works fine open traffic for store/publisher as well.
If you wish to do gradual traffic movement to new deployment it may bit different from above above mention approach. In that case we may need 2 way synch up scripts as tokens can created in both deployments.

How to run WSO2 API Manager with MSSQL using docker

First you need to install docker on you local machine.

Then run following to install mssql docker image in your local machine. You can follow this article[https://hub.docker.com/r/microsoft/mssql-server-linux/ ] for more information.

docker run -e 'ACCEPT_EULA=Y' -e 'SA_PASSWORD=Password#123' -p 1433:1433 -d microsoft/mssql-server-linux

Then type following and verify your instance is up and running>>docker ps


CONTAINER ID        IMAGE                          COMMAND                  CREATED             STATUS              PORTS                                      NAMES03ebf2498a20        microsoft/mssql-server-linux   "/bin/sh -c /opt/mssq"   23 minutes ago      Up 23 minutes       0.0.0.0:1433->1433/tcp    


docker exec -it /opt/mssql-tools/bin/sqlcmd -S localhost -U sa -P Password#123

Download and copy the sqljdbc4 Microsoft SQL JDBC driver file to the WSO2 product's /repository/components/lib/ directory

Edit the default datasource configuration in the /repository/conf/datasources/m aster-datasources.xml file as shown below.


<datasource>

            <name>WSO2AM_DB</name>
            <description>The datasource used for API Manager database</description>
            <jndiConfig>
                <name>jdbc/WSO2AM_DB</name>
            </jndiConfig>
            <definition type="RDBMS">
           <configuration>
              <url>jdbc:sqlserver://0.0.0.0:1433;databaseName=TestDB</url>
              <username>sa</username>
              <password>Password#123</password>
              <driverClassName>com.microsoft.sqlserver.jdbc.SQLServerDriver</driverClassName>
              <maxActive>80</maxActive>
              <maxWait>60000</maxWait>
              <testOnBorrow>true</testOnBorrow>
              <validationQuery>SELECT 1</validationQuery>
              <validationInterval>30000</validationInterval>
              <defaultAutoCommit>false</defaultAutoCommit>
           </configuration>
            </definition>
        </datasource>


Now start server with following command.
sh wso2server.sh -Dsetup 

Best practices we should follow when we create API.

Best practices we should follow when we create API.

Create API for dedicated back end service. For each of the resources the HTTP methods used to perform the required application functions have to be decided. This includes the use of applicable HTTP headers.
Special behavior required by the application (e.g. concurrency control, long running requests) has to be decided.
Finally, potential error situations have to be identified and corresponding error messages have to be designed.

Proper Naming

It's important to have proper name for service and service paths. For example when we create some API related to camera related operations we can name API and resources with camera specific terms. For example we can name API as camera-api. Then when we create new resource we can create resource like capture-image, delete-image etc.
Resources must be named properly by means of URIs (Uniform Resource Identifiers). Proper naming of resources is key for an API to be easily understandable by clients.
Following are some of the guidelines for design proper API/Resource paths and names. These are not mandatory rules but whenever possible we should these best practices.

Atomic resources, collection resources and composite resources should be named as nouns because they represent "things", not "actions" (actions would lean more towards verbs as names of resources).
  • Processing function resources and controller resources should be named as verbs because they in fact represent "actions".
  • Processing function resources and controller resources should not be sub-resources of individual other resources.
  • Lower case characters should be used in names only because the rules about which URI element names are case sensitive and which are not may cause confusion.
  • If multiple words are used to name a resource, these words should be separated by dashes (i.e. "-") or some other separator.
  • Singular nouns should be used for naming atomic resources.
  • Names of collections should be "pluralized", i.e. named by the plural noun of the grouped concept (atomic resource or composite resource).
  • Use forward slashes (i.e. "/") to specify hierarchical relations between resources. A forward slash will separate the names of the hierarchically structured resources. The parent name will immediately precede the name of its immediate children.

Proper Versioning

The version of an API is specified as part of its URI. Usually this version is specified as a pair of integers (separated by a dot) referred to as the major and the minor number of the version, preceded by the lowercase letter "v". E.g. a valid version string in the base path would be v2.1 indicating the first minor version of the second major version of the corresponding API.

Proper versioning strategy for API will helpful for all API users and client to communicate with API easily and effectively. In WSO2 API Manager we do have API versioning support. Also we can copy existing API and create new version of same API. When you need to create new version of running API recommended approach is create new version from existing API API and modify it. Then before we publish new version we need to test all the functionalities of this API.
Following are some of the guidelines we need to follow when we version APIs. Again these are not mandatory rules. But it's good to follow these rules whenever possible.

In general, a version number following the semantic versioning concept has the structure major.minor.patch and the significance in terms of client impact is increasing from left to right:
  • An incremental patch number means that the underlying modification to the API cannot even be noticed by a client - thus, the patch number is omitted from the version string. Only the internal implementation of the API has been changed while the signature of the API is unchanged. From the perspective of the API developer, a new patch number indicates a bug fix, a minor internal modification, etc.
  • An incremented minor number indicates that new features have been added to the API, but this addition must be backward compatible: the client can use the old API without failing. For example, the API may add new optional parameters or a completely new request.
  • An incremented major number signals changes that are not backward compatible: for example, new mandatory parameters have been added, former parameters have been dropped, or complete former requests are no longer available.
It is best practice to support the current major version as well as at least one major version back. In case new versions are released frequently (e.g. every few months) more major versions back have to be supported. Otherwise, clients will break (too fast).

Use of Proper HTTP Methods

Manipulation of resources in the REST style is done by create, retrieve, update, and delete operations (so-called CRUD operations), that map to the HTTP methods POST, GET, PUT, PATCH and DELETE.
A request that can be used without producing any side-effect is called a safe request. A request that can be used multiple times and that is always producing the same effect as the first invocation is called idempotent.

Get

GET is in HTTP as well as in the REST style specified as a safe and idempotent request. Thus, an API using the GET method must not produce any side-effects. Retrieving an atomic resource  or a composite resource is done by performing a GET on the URI identifying the resource to be retrieved.

Put

PUT substitutes the resource identified by the URI. Thus, the body of the corresponding PUT message provides the modified but complete representation of a resource that will completely substitute the existing resource: parts of the resource that have not changed must be included in the modified resource of the message body. Especially, a PUT request must not be used for a partial update.

Post

POST is neither safe nor idempotent. The main usages of POST are the creation of new resource, and the initiation of functions, i.e. to interact with processing function resources as well as controller resources.
In order to create a new resource, a POST request is used with the URI of the collection resource to which the new resource should be added.

Delete

A resource is deleted by means of the DELETE request on the URI of the resource. Once a DELETE request returned successfully with a "200 OK" response, following DELETE requests on the same URI will result in a "404 Not Found" response because there is no resource available with the URI of the deleted resource.

Patch

Usually HTTP Patch request will use to do partial update on resources. For example if you do not change entire resource and just changes some of the attributes you can use patch method. Unlike Put method we can use this for partial update for resources.

How WSO2 API Manager timeouts and suspension works

Address and WSDL endpoints can be suspended if they are detected as failed endpoints. When an endpoint is in in suspended state for a specified time duration following a failure, it cannot process any new messages. Please find the WSO2 ESB document[1] which explains those properties and their usage(even APIM and ESB are different products they do share same synapse runtime and these properties will effect in same manner).

errorCode - A comma separated error code list which can be returned by the endpoint.This parameter is used to specify one or more error codes which can cause the endpoint to be suspended when they are returned from the endpoint. Multiple error codes can be specified, separated by commas.

initialDuration - The number of milliseconds after which the endpoint should be suspended when it is being suspended for the first time.

maximumDuration -The maximum duration (in milliseconds) to suspend the endpoint.

progressionFactor  - The progression factor for the geometric series. See the above formula for a more detailed description.

When endpoint suspension happens, it will work as follows.
For the suspend duration after the first failure, this equation does not applies. Also when endpoint changed from active to suspend state, suspension duration will be exactly initial duration.
This equation only applies when endpoint already in suspended state and suspension duration expired.

next suspension time period = Min (Initial suspension duration * Progression Factor , Max suspend time).

[1]https://docs.wso2.com/display/ESB481/Address+Endpoint

Also in API Manager we do have different timeouts. So if some endpoint timed out then we will notice that as faulty endpoint and consider for suspension

1. Global timeout defined in synapse.properties (API_HOME\repository\conf) file. This will decide the maximum time that a callback is waiting in the APIM for a response for a particular request. If APIM does not get any response from Back End, it will drop the message and clears out the callback. This is a global level parameter which affects all the endpoints configured in APIM.
The default is 120000 milliseconds (2 minutes).

2. Socket timeout defined in the passthru-http.properties (APIM_HOME\repository\conf) file. This parameter will decide on the timeout which a particular http request is waiting for a response. If APIM does not receive any response from the Back End during this period, HTTP connection get timed out and that will eventually throw timeout error in the APIM side and fault handlers will be hit.
The default value is 60000 milliseconds (1 minute).

3. You can define timeouts on the endpoint configuration such that it will affect only that particular endpoint in an API. This will be a better option if you need to configure timeouts per API endpoint for different Backend services. You can also define the action upon the timeout.
Below example configuration will set the endpoint to timeout in 120000 milliseconds (2 minutes) and then execute the fault handler.

How to run MSF4J micro services within WSO2 Enterprise Integrator (EI)

WSO2 EI is designed to run MSF4J services as separate run time. But this is not limited to one MSF4J service. You can start run time and deploy/ re-deploy services while server is running. So unlike in fat jar mode we can run multiple services within same container without spawning JVM per service.

We do have sample for that. Please refer below instructions.

First go to /samples/msf4j/stockquote

From this directory, run
mvn clean install

Go to the /wso2/msf4j/bin directory
Then run the following command to start the MSF4J profile.
./carbon.sh

The copy the target/msf4j-sample-StockQuoteService.jar to wso2/msf4j/deployment/microservices directory of MSF4J profile.
Then the jar will be automatically deployed to the server runtime.

How to test the sample
curl http://localhost:9090/stockquote/IBM


How to setup WSO2 API Manager with Oracle 11g using

In this post i will explain how you can setup WSO2 API Manager analytucs with oracle 11g using docker container. First you need to install docker on your machine. You can use same commands for any server to configure with oracle.

First run following command.

docker run -d -p 49160:22 -p 49161:1521 -e ORACLE_ALLOW_REMOTE=true wnameless/oracle-xe-11g
docker ps
CONTAINER ID        IMAGE                     COMMAND                  CREATED             STATUS              PORTS                                                      NAMES
5399cedca43c        wnameless/oracle-xe-11g   "/bin/sh -c '/usr/sbi"   2 minutes ago       Up 2 minutes        8080/tcp, 0.0.0.0:49160->22/tcp, 0.0.0.0:49161->1521/tcp   grave_hugle

Now Lets log into oracle and create
>>ssh root@localhost -p 49160
>>admin as password.
su oracle
sqlplus / as sysdba
SQL> create user testamdb identified by testamdb account unlock;
SQL> grant create session, dba to testamdb;
SQL> commit;
SQL> connect testamdb;

Now we have successfully connected to created database. Now lets add master-datasource config to api manager instance and analytics instance as follows. When analytics node run it will create required tables automatically. If you have schema you can create tables by yourself as well.

Data source
<datasource>
 <name>WSO2AM_STATS_DB</name>
 <description>The datasource used for setting statistics to API Manager</description>
 <jndiConfig>
   <name>jdbc/WSO2AM_STATS_DB</name>
   </jndiConfig>
 <definition type="RDBMS">
 <configuration>
 <url>jdbc:oracle:thin:@127.0.0.1:49161/xe</url>
 <username>testamdb</username>
 <password>testamdb</password>  <driverClassName>oracle.jdbc.driver.OracleDriver</driverClassName>
 <maxActive>50</maxActive>
 <maxWait>60000</maxWait>
 <testOnBorrow>true</testOnBorrow>
 <validationQuery>SELECT 1</validationQuery>
 <validationInterval>30000</validationInterval>
 <defaultAutoCommit>false</defaultAutoCommit>
 </configuration>
   </definition>
</datasource>

Explanation about load balance endpoints and endpoint suspension

In this post i will provide explanation about load balance endpoints and endpoint suspension. If we have 2 endpoints in load balanced manner then it will behave as below.
If both endpoints are in working condition.
Requests with route to endpoint_1 and then next request will go to endpoint_2. Likewise it will repeat.
If endpoint_1 failed to serve requests.
If endpoint_1 failed to serve requests when load balanced endpoints used it will detect endpoint_1 failure and then route request to endpoint_2. You can see details in following log. It says it detect one endpoint failure and endpoint suspended for 30 seconds.
[2017-05-30 23:08:26,152] WARN - ConnectCallback Connection refused or failed for : /172.17.0.1:8081
[2017-05-30 23:08:26,153] WARN - EndpointContext Endpoint : admin--CalculatorAPI_APIproductionEndpoint_0_0 will be marked SUSPENDED as it failed
[2017-05-30 23:08:26,154] WARN - EndpointContext Suspending endpoint : admin--CalculatorAPI_APIproductionEndpoint_0_0 - last suspend duration was : 30000ms and current suspend duration is : 30000ms - Next retry after : Tue May 30 23:08:56 IST 2017
[2017-05-30 23:08:26,154] WARN - LoadbalanceEndpoint Endpoint [admin--CalculatorAPI_APIproductionEndpoint_0] Detect a Failure in a child endpoint : Endpoint [admin--CalculatorAPI_APIproductionEndpoint_0_0]
After you see above log in output it will not route requests to endpoint_1 for 30 seconds(30000ms). Then if you send request after 30 seconds it will again route to endpoint_1 and since its not available request will go to endpoint_2. Same cycle repeats until endpoint_1 available to serve requests.
If both endpoint_1 and endpoint_2 failed.
Then it will go to endpoint_1 and once failure detect it will go to endpoint_2. Then once it realized all endpoint belong to that load balanced endpoint it will not accept further requests and send error message. It will not go into loop and it will go through all endpoints onetime and stop processing request(by sending proper error). Please see below logs.
Detect first endpoint_1 failure
[2017-05-30 23:41:58,643] WARN - ConnectCallback Connection refused or failed for : /172.17.0.1:8081
[2017-05-30 23:41:58,646] WARN - EndpointContext Endpoint : admin--CalculatorAPI_APIproductionEndpoint_0_0 will be marked SUSPENDED as it failed
[2017-05-30 23:41:58,648] WARN - EndpointContext Suspending endpoint : admin--CalculatorAPI_APIproductionEndpoint_0_0 - last suspend duration was : 70000ms and current suspend duration is : 70000ms - Next retry after : Tue May 30 23:43:08 IST 2017
[2017-05-30 23:41:58,648] WARN - LoadbalanceEndpoint Endpoint [admin--CalculatorAPI_APIproductionEndpoint_0] Detect a Failure in a child endpoint : Endpoint [admin--CalculatorAPI_APIproductionEndpoint_0_0]

 
Detect endpoint_2 failure
[2017-05-30 23:41:58,651] WARN - ConnectCallback Connection refused or failed for : /172.17.0.1:8080
[2017-05-30 23:41:58,654] WARN - EndpointContext Endpoint : admin--CalculatorAPI_APIproductionEndpoint_0_1 will be marked SUSPENDED as it failed
[2017-05-30 23:41:58,656] WARN - EndpointContext Suspending endpoint : admin--CalculatorAPI_APIproductionEndpoint_0_1 - current suspend duration is : 30000ms - Next retry after : Tue May 30 23:42:28 IST 2017
[2017-05-30 23:41:58,657] WARN - LoadbalanceEndpoint Endpoint [admin--CalculatorAPI_APIproductionEndpoint_0] Detect a Failure in a child endpoint : Endpoint [admin--CalculatorAPI_APIproductionEndpoint_0_1]

Once it realized both load balanced endpoint failed it will print error saying no child endpoints to process requests.
[2017-05-30 23:41:58,657] WARN - LoadbalanceEndpoint Loadbalance endpoint : admin--CalculatorAPI_APIproductionEndpoint_0 - no ready child endpoints
[2017-05-30 23:41:58,667] INFO - LogMediator STATUS = Executing default 'fault' sequence, ERROR_CODE = 101503, ERROR_MESSAGE = Error connecting to the back end

When endpoint suspension happens, it will work as follows.
For the suspend duration after the first failure, this equation does not applies. Also when endpoint changed from active to suspend state, suspension duration will be exactly initial duration.

This equation only applies when endpoint already in suspended state and suspension duration expired.

next suspension time period = Min (Initial suspension duration * Progression Factor , Max suspend time).

How we can update swagger definition selectively and push that change to API gateway

In this post i will explain how we can update swagger definition selectively and push that change to API gateway with API Manager 1.10.

If we update swagger definition which is sub resource of the API resource it will work fine. And that operation is successful and you will see API definition updated in UI. But to reflect any change to API gateway(to update synapse API definition) we need to do complete API resource update as it will handle API gateway deployment process.


Obtain Access token to view APIs with both apim:api_create, apim:api_view scope. We need apim:api_create scope because we are going to update API and it need to done with token obtained for apim:api_create scope.

curl -k -d "grant_type=password&username=admin&password=admin&scope=apim:api_create apim:api_view" -H "Authorization: Basic cmpPeWZMTDRaMkhUVmVncnZUbERhRkFmeGZnYTpKUFJRVV9iNEM3WjY1RlBjUmhvQTJPWHh2dkFh" https://127.0.0.1:8243/token
{"access_token":"9f4553dc3c40abb81cf23c8a009821a2","refresh_token":"4db87bf23981e60b22c731aa42dcc6a8","scope":"apim:api_create apim:api_view","token_type":"Bearer","expires_in":3600}

Then get APIs available in the system.

curl -k -H "Authorization: Bearer 9f4553dc3c40abb81cf23c8a009821a2" https://127.0.0.1:9443/api/am/publisher/v0.9/apis

Now select correct ID associated with the API you need to access.

curl -k -H "Authorization: Bearer 9f4553dc3c40abb81cf23c8a009821a2" https://127.0.0.1:9443/api/am/publisher/v0.9/apis/8f8d859e-867e-45da-853b-23de80a44133

{"sequences":[],"tiers":["Unlimited"],"thumbnailUrl":null,"visibility":"PUBLIC","visibleRoles":[],"visibleTenants":[],"cacheTimeout":300,"endpointConfig":"{\"production_endpoints\":{\"url\":\"https://localhost:9443/am/sample/calculator/v1/api\",\"config\":null},\"sandbox_endpoints\":{\"url\":\"https://localhost:9443/am/sample/calculator/v1/api\",\"config\":null},\"implementation_status\":\"managed\",\"endpoint_type\":\"http\"}","subscriptionAvailability":null,"subscriptionAvailableTenants":[],"destinationStatsEnabled":"Disabled","apiDefinition":"{\"paths\":{\"\\/*\":{\"get\":{\"x-auth-type\":\"Application\",\"responses\":{\"200\":{\"description\":\"OK\"}},\"x-throttling-tier\":\"Unlimited\"}}},\"x-wso2-security\":{\"apim\":{\"x-wso2-scopes\":[]}},\"swagger\":\"2.0\",\"info\":{\"contact\":{\"name\":\"xx\",\"email\":\"xx@ee.com\"},\"description\":\"Verify a phone number\",\"title\":\"PhoneVerification\",\"version\":\"1.0.0\"}}","responseCaching":"Disabled","isDefaultVersion":false,"gatewayEnvironments":"Production and Sandbox","businessInformation":{"technicalOwner":null,"technicalOwnerEmail":null,"businessOwner":null,"businessOwnerEmail":null},"tags":["calculator"],"transport":["http","https"],"provider":"admin","version":"1.0","description":"Simple calculator API to perform addition, subtraction, multiplication and division.","status":"PUBLISHED","name":"CalculatorAPI","context":"/calc","id":"8f8d859e-867e-45da-853b-23de80a44133"}

Now update swagger content as follows with the token you obtained from previous step. I'm changing http verb get to put as follows.

curl -k -H "Authorization:Bearer 9f4553dc3c40abb81cf23c8a009821a2" -F apiDefinition="{\"paths\":{\"\\/*\":{\"put\":{\"x-auth-type\":\"Application\",\"responses\":{\"200\":{\"description\":\"OK\"}},\"x-throttling-tier\":\"Unlimited\"}}},\"x-wso2-security\":{\"apim\":{\"x-wso2-scopes\":[]}},\"swagger\":\"2.0\",\"info\":{\"contact\":{\"name\":\"xx\",\"email\":\"xx@ee.com\"},\"description\":\"Verify a phone number\",\"title\":\"PhoneVerification\",\"version\":\"1.0.0\"}}" -X PUT "https://127.0.0.1:9443/api/am/publisher/v0.9/apis/8f8d859e-867e-45da-853b-23de80a44133/swagger"

You will see below response.

{"paths":{"\/*":{"put":{"x-auth-type":"Application","responses":{"200":{"description":"OK"}},"x-throttling-tier":"Unlimited"}}},"x-wso2-security":{"apim":{"x-wso2-scopes":[]}},"swagger":"2.0","info":{"contact":{"name":"xx","email":"xx@ee.com"},"description":"Verify a phone number","title":"PhoneVerification","version":"1.0.0"}}

Now again get API and see your swagger changes are updated API properly. To do that you can make following API call.

curl -k -H "Authorization: Bearer 9f4553dc3c40abb81cf23c8a009821a2" https://127.0.0.1:9443/api/am/publisher/v0.9/apis/8f8d859e-867e-45da-853b-23de80a44133

You will get complete API definition as below.

{"sequences":[],"tiers":["Unlimited"],"thumbnailUrl":null,"visibility":"PUBLIC","visibleRoles":[],"visibleTenants":[],"cacheTimeout":300,"endpointConfig":"{\"production_endpoints\":{\"url\":\"https://localhost:9443/am/sample/calculator/v1/api\",\"config\":null},\"sandbox_endpoints\":{\"url\":\"https://localhost:9443/am/sample/calculator/v1/api\",\"config\":null},\"implementation_status\":\"managed\",\"endpoint_type\":\"http\"}","subscriptionAvailability":null,"subscriptionAvailableTenants":[],"destinationStatsEnabled":"Disabled","apiDefinition":"{\"paths\":{\"\\/*\":{\"put\":{\"x-auth-type\":\"Application\",\"responses\":{\"200\":{\"description\":\"OK\"}},\"x-throttling-tier\":\"Unlimited\"}}},\"x-wso2-security\":{\"apim\":{\"x-wso2-scopes\":[]}},\"swagger\":\"2.0\",\"info\":{\"contact\":{\"name\":\"xx\",\"email\":\"xx@ee.com\"},\"description\":\"Verify a phone number\",\"title\":\"PhoneVerification\",\"version\":\"1.0.0\"}}","responseCaching":"Disabled","isDefaultVersion":false,"gatewayEnvironments":"Production and Sandbox","businessInformation":{"technicalOwner":null,"technicalOwnerEmail":null,"businessOwner":null,"businessOwnerEmail":null},"tags":["calculator"],"transport":["http","https"],"provider":"admin","version":"1.0","description":"Simple calculator API to perform addition, subtraction, multiplication and division.","status":"PUBLISHED","name":"CalculatorAPI","context":"/calc","id":"8f8d859e-867e-45da-853b-23de80a44133"}

Up to this point we can see all UI elements and swagger file updated but it is not reflected to synapse configuration. Now you need to update API(not a swagger update but complete API update) using the exact same payload you obtained from previous step. So i will create data.json file and copy response of my previous step. Then invoke following operation.

curl -k -H "Authorization: Bearer 9f4553dc3c40abb81cf23c8a009821a2" -H "Content-Type: application/json" -X PUT -d @data.json https://127.0.0.1:9443/api/am/publisher/v0.9/apis/8f8d859e-867e-45da-853b-23de80a44133

You will see below response.

{"sequences":[],"tiers":["Unlimited"],"thumbnailUrl":null,"visibility":"PUBLIC","visibleRoles":[],"visibleTenants":[],"cacheTimeout":300,"endpointConfig":"{\"production_endpoints\":{\"url\":\"https://localhost:9443/am/sample/calculator/v1/api\",\"config\":null},\"sandbox_endpoints\":{\"url\":\"https://localhost:9443/am/sample/calculator/v1/api\",\"config\":null},\"implementation_status\":\"managed\",\"endpoint_type\":\"http\"}","subscriptionAvailability":null,"subscriptionAvailableTenants":[],"destinationStatsEnabled":"Disabled","apiDefinition":"{\"paths\":{\"\\/*\":{\"put\":{\"x-auth-type\":\"Application\",\"responses\":{\"200\":{\"description\":\"OK\"}},\"x-throttling-tier\":\"Unlimited\"}}},\"x-wso2-security\":{\"apim\":{\"x-wso2-scopes\":[]}},\"swagger\":\"2.0\",\"info\":{\"contact\":{\"name\":\"xx\",\"email\":\"xx@ee.com\"},\"description\":\"Verify a phone number\",\"title\":\"PhoneVerification\",\"version\":\"1.0.0\"}}","responseCaching":"Disabled","isDefaultVersion":false,"gatewayEnvironments":"Production and Sandbox","businessInformation":{"technicalOwner":null,"technicalOwnerEmail":null,"businessOwner":null,"businessOwnerEmail":null},"tags":["calculator"],"transport":["http","https"],"provider":"admin","version":"1.0","description":"Simple calculator API to perform addition, subtraction, multiplication and division.","status":"PUBLISHED","name":"CalculatorAPI","context":"/calc","id":"8f8d859e-867e-45da-853b-23de80a44133"}

Then go to repository/deployment/server/synapse-configs/default/api directory and see your API definition. Now you will see API definition updated properly. 

How to expose sensitive services to outside as APIs

APIM 2.0.0 supports oauth 2.0.0 based security for APIs(with JWT support) out of the box and we can utilize that for secure services. Let me explain how we can use it. Lets consider how mobile client application can use those secured APIs. 
  • User logs into system(using multi step authentication including OTP etc ). If we are using SAML SSO then we need browser based redirection from native  application.
  • Then once user authenticated we can use same SAML assertion and obtain OAuth 2.0.0 access token on behalf of logged in user and application(which authenticate both user and client application).
  • Then we can use this token for all subsequent calls(service calls). 
  • Then when requests come to API gateway we will fetch user information from token and send them to back end.
  • Also at gateway we can do resource permission validation.
  • If we need extended permission validation we can do that as well before request routed to core services.
  • So internal service can invoke only if user is authenticated and authorized to invoke that particular API.
This complete flow can be implement using WSO2 API Manager and Identity server.

JWT token and its usage in WSO2 API Manager

JSON Web Token (JWT) represents claims to be transferred between two parties. The claims in a JWT are encoded as a JavaScript Object Notation (JSON) object that is used as the payload of a JSON Web Signature (JWS) structure or as the plain text of a JSON Web Encryption (JWE) structure, enabling the claims to be digitally signed. A JWToken is self-­contained, so when we create one, it will have all the necessary pieces needed inside it.

To authenticate end users, the API manager passes attributes of the API invoker to the back-end API implementation. JWT is used to represent claims that are transferred between the end user and the backend. A claim is an attribute of the user that is mapped to the underlying user store. A set of claims are called a dialect (e.g. http://wso2.org/claims). The general format of a JWT is {token infor}.{claims list}.{signature}. The API implementation uses information, such as logging, content filtering, and authentication/authorization that is stored in this token. The token is Base64-encoded and sent to the API implementation in a HTTP header variable. The JWT header will contain three main components.

What are those pieces? The JWT token string can be divided into three parts.
A header
A payload
A signature

We will discuss about these parts later and understand them.

First let's consider very simple use case to understand the usage of API Manager JWT use case.
Let's say we have shopping cart web application. And user is invoking some web services associated with that application through API Manager. In such cases we may need to pass user details to backend service. So as discussed above we may use JWT to pass that information to backend.

Lets think we have 2 users named Bob and frank.
  • Bob is 25 years old and he is enjoying watching cricket. He based on colombo, sri lanka.
  • Frank is 52 years old and he enjoys watching football.He is living in frankfurt germany


They both realized coming weekend is free for them and then decided to go out to watch game.
Both Bob and Frank installed find
They both will call find ticket for games API from their mobile devices. Each time they invoke APIs we cannot ask them to send their details. They will only send access token which is mandatory for their security.
When request come to API Manager it will first validate token. Then if user is authenticated to call service we will follow up with next steps.
From access token we can get username of the user.Then we can get user attributes and create JSON payload with it.
Then API Management server will send user details as JSON payload in transport header.
So when request reach backend server they can get user details from JWT message. Then back end server will generate customized response for each user.
Bob will get response with cricket events happens around colombo area while Frank is getting response with football events happen in germany.

This is one of the most common use case of JWT.
.

JWT_USECASE (1).png


In most production deployments, service calls go through the API manager or a proxy service. If we enable JWT generation in WSO2 API Manager, then each API request will carry a JWT to the back-end service. When the request goes through the API manager, we can append the JWT as a transport header to the outgoing message. So, the back-end service can fetch JWT and retrieve required information about the user, application, or token. There are two kinds of access tokens we use to invoke APIs in WSO2 API Manager.

Application access token: Generate as application owner and there is no associated user for this token (the actual user will be the application owner). In this case, all information will be fetched from the application owner, so the JWT will not have real meaning/usage when we use the application access token.
User access token: User access tokens are always bound to the user who generated token. So, when you access the API with user access token, the JWT will generate user details. On the back-end server side, we can use this to fetch user details.
Sample JWT message

{
"iss":"wso2.org/products/am","exp":1407285607264,
"http://wso2.org/claims/subscriber":"xxx@xxx.xxx",
"http://wso2.org/claims/applicationid":"2",
"http://wso2.org/claims/applicationname":"DefaultApplication",
"http://wso2.org/claims/applicationtier":"Unlimited",
"http://wso2.org/claims/apicontext":"/t/xxx.xxx/aaa/bbb",
"http://wso2.org/claims/version":"1.0.0",
"http://wso2.org/claims/tier":"Unlimited",
"http://wso2.org/claims/keytype":"PRODUCTION",
"http://wso2.org/claims/usertype":"APPLICATION",
"http://wso2.org/claims/enduser":"anonymous",
"http://wso2.org/claims/enduserTenantId":"1",
"http://wso2.org/claims/emailaddress":"sanjeewa@wso2.com",
"http://wso2.org/claims/fullname":"xxx",
"http://wso2.org/claims/givenname":"xxx",
"http://wso2.org/claims/lastname":"xxx",
"http://wso2.org/claims/role":"admin,subscriber,Internal/everyone"  
}
As you can see JWT contain claims associated with User (end user TenantId, full name, given name, last name, role, email address, user type) API (API context, version, tier), Subscription (keytype, subscriber)
Application (application ID, application name, application tier)

However, in some production deployments, we might need to generate custom attributes and embedded to the JWT.

SMS OTP Two Factor Authentication for WSO2 API Manager publisher


In this post, I will explain how to use SMS OTP multi factor authenticator through WSO2 Identity server. We will be using Twilio SMS Provider which was used to send the OTP code via SMS at the time authentication happens. For this solution we will 2 WSO2 API Manager(2.1.0) and Identity server(5.3.0). Please note that we need to set port offset as 1 in carbon.xml configuration file available with identity server. So it will be running on https 9444 port.

First to to https://www.twilio.com and create account there. Then provide your mobile number and register that.

Then generate mobile number from twilio. Then it will give you new number for you to use.

curl -X POST 'https://api.twilio.com/2010-04-01/Accounts/({Account-Sid}/SMS/Messages.json'  --data-urlencode 'To={Sender SMS}' --data-urlencode 'From={generated MobileNumber from Twilio}' --data-urlencode 'Body=enter this code'  -H 'Authorization: Basic {base64Encoded(Account SId:Auth Token)}'

Please see the sample below.

curl -X POST 'https://api.twilio.com/2010-04-01/Accounts/fsdfdfdsfdfdsfdfsdfdsfdfdfdf/SMS/Messages.json'  --data-urlencode 'To=+94745345779' --data-urlencode 'From=+1454543535' --data-urlencode 'Body=enter this code'  -H 'Authorization: Basic LKJADJAD:ADJLJDJ:LAJDJDJJJJJJL::LMMIYGBNJN=='

Now it should send you message to your mobile number provided.

Now login to identity server and create new identity provider. When you do that provide following inputs in user interface.
Screenshot from 2017-03-09 15-09-17.png

Then go to federated authenticator section and add SMS OTP Configuration as follows. Provide basic authentication credentials like we did for CuRL request.

Please fill following fields as below.
SMS URL: https://api.twilio.com/2010-04-01/Accounts/ACd5ac7ff9sdsad3232432414b/SMS/Messages.json   HTTP Method: POST    HTTP Headers: Authorization: Basic QUNkNWFjN2ZmOTNTNmNjMzOWMwMjBkZQ==HTTP Payload: Body=$ctx.msg&To=$ctx.num&From=+125145435333434

Screenshot from 2017-03-09 15-10-01.png


Then let's add service provider as follows. Provide service provider name as follows.

Screenshot from 2017-03-09 15-29-50.png


Then go to SAML2 web SSO configuration and provide following configurations. Then save it and move forward.


Screenshot from 2017-03-09 15-30-08.png

Now save this service provider and come back to identity server UI. Then we need to configure local and outbound authentication steps as follows. We need to configure advanced authentication configuration as we are going to configure multi step authentication.

Screenshot from 2017-03-09 16-47-42.png

Then add username and password based local authentication as first steps and add out SMS otp as second authentication step. Now we can save this configuration and move forward.

Screenshot from 2017-03-09 16-48-12.png

Also add following configuration to wso2is-5.3.0/repository/conf/identity/application-authentication.xml file and restart server.


<AuthenticatorConfig name="SMSOTP" enabled="true">
             <Parameter name="SMSOTPAuthenticationEndpointURL">https://localhost:9444/smsotpauthenticationendpoint/smsotp.jsp</Parameter>
             <Parameter name="SMSOTPAuthenticationEndpointErrorPage">https://localhost:9444/smsotpauthenticationendpoint/smsotpError.jsp</Parameter>
             <Parameter name="RetryEnable">true</Parameter>
             <Parameter name="ResendEnable">true</Parameter>
             <Parameter name="BackupCode">false</Parameter>
             <Parameter name="EnableByUserClaim">false</Parameter>
             <Parameter name="MobileClaim">true</Parameter>
             <Parameter name="enableSecondStep">true</Parameter>
             <Parameter name="SMSOTPMandatory">true</Parameter>
             <Parameter name="usecase">association</Parameter>
             <Parameter name="secondaryUserstore">primary</Parameter>
             <Parameter name="screenUserAttribute">http://wso2.org/claims/mobile</Parameter>
             <Parameter name="noOfDigits">4</Parameter>
             <Parameter name="order">backward</Parameter>
       </AuthenticatorConfig>


Now it's time to configure API publisher to configure, so it can work with identity server to do authentication based on SSO. Add following configuration to /wso2am-2.1.0/repository/deployment/server/jaggeryapps/publisher/site/conf/site.js file.

 "ssoConfiguration" : {
       "enabled" : "true",
       "issuer" : "apipublisher",
       "identityProviderURL" : "https://localhost:9444/samlsso",
       "keyStorePassword" : "",
       "identityAlias" : "",
       "verifyAssertionValidityPeriod":"true",
       "timestampSkewInSeconds":"300",
       "audienceRestrictionsEnabled":"true",
       "responseSigningEnabled":"false",
       "assertionSigningEnabled":"true",
       "keyStoreName" :"",
       "signRequests" : "true",
       "assertionEncryptionEnabled" : "false",
       "idpInit" : "false",
    }

Now go to API publisher URL and you will be directed to identity server login page. There you will see following window and you have to enter user name and password there.


Then once you completed it you will get SMS to number you have mentioned in your user profile. If you havent already added mobile number to your user profile please add by login to identity server. You can go to users and roles window and select user profile from there. Then edit it as follows.


Then enter the OTP you obtain in next window.


Empowering the Future of API Management: Unveiling the Journey of WSO2 API Platform for Kubernetes (APK) Project and the Anticipated Alpha Release

  Introduction In the ever-evolving realm of API management, our journey embarked on the APK project eight months ago, and now, with great a...