Trust all hosts when send https request – How to avoid SSL error when we connect https service

Sometimes when we write client applications we might need to communicate with services exposed over SSL. Some scenarios we might need to skip certificate check from client side. This is bit risky but if we know server and we can trust it we can skip certificate check. Also we can skip host name verification. So basically we are going to trust all certs. See following sample code.

//Connect to Https service     
HttpsURLConnection  conHttps = (HttpsURLConnection) new URL(urlVal).openConnection();
                conHttps.setRequestMethod("HEAD");
                //We will skip host name verification as this is just testing endpoint. This verification skip
                //will be limited only for this connection
                conHttps.setHostnameVerifier(DO_NOT_VERIFY);
                //call trust all hosts method then we will trust all certs
                trustAllHosts();
                if (conHttps.getResponseCode() == HttpURLConnection.HTTP_OK) {
                    return "success";

               }
//Required utility methods
static HostnameVerifier DO_NOT_VERIFY = new HostnameVerifier() {
    public boolean verify(String hostname, SSLSession session) {
        return true;
    }
};

private static void trustAllHosts() {
    // Create a trust manager that does not validate certificate chains
    TrustManager[] trustAllCerts = new TrustManager[] { new X509TrustManager() {
        public java.security.cert.X509Certificate[] getAcceptedIssuers() {
            return new java.security.cert.X509Certificate[] {};
        }

        public void checkClientTrusted(X509Certificate[] chain,
                                       String authType) throws CertificateException {
        }

        public void checkServerTrusted(X509Certificate[] chain,
                                       String authType) throws CertificateException {
        }
    } };

    // Install the all-trusting trust manager
    try {
        SSLContext sc = SSLContext.getInstance("TLS");
        sc.init(null, trustAllCerts, new java.security.SecureRandom());
        HttpsURLConnection
                .setDefaultSSLSocketFactory(sc.getSocketFactory());
    } catch (Exception e) {
        e.printStackTrace();
    }
}

How to skip Host name verification when we do http request over SSL


Sometimes we need to skip host name verification when we do Https call to external server. Most of the cases you will get error saying host name verification failed. In such cases we should implement host name verifier and  return true from verify method.  See following sample code.

HttpsURLConnection conHttps = (HttpsURLConnection) new URL(urlVal).openConnection();

conHttps.setRequestMethod("HEAD");

//We will skip host name verification as this is just testing endpoint. This verification skip

//will be limited only for this connection

conHttps.setHostnameVerifier(DO_NOT_VERIFY);

if (conHttps.getResponseCode() == HttpURLConnection.HTTP_OK) {

//Connection was successful

}

static HostnameVerifier DO_NOT_VERIFY = new HostnameVerifier() {

public boolean verify(String hostname, SSLSession session) {

            return true;

        }

  };

How to build and access message body from custom handler – WSO2 API Manager

From API Manager 1.3.0 onward we will be using pass-through transport inside API Manager. Normally in passthrough we do not build message body. When we use pass-through you need to build message inside handler to access message body. But please note that this is bit costly operations when we compare it with the default mediation. Actually we introduced pass-through transport to improve performance of gateway. There we do not build or touch message body. Add followings to your handler to see message body.


Add following dependency to your handler implementation project


       <dependency>
           <groupId>org.apache.synapse</groupId>
           <artifactId>synapse-nhttp-transport</artifactId>
           <version>2.1.2-wso2v5</version>
       </dependency>


Then import RelayUtils to handler as follows.
import org.apache.synapse.transport.passthru.util.RelayUtils;

Then build message before process message body as follows(add try catch blocks when needed).
RelayUtils.buildMessage(((Axis2MessageContext)messageContext).getAxis2MessageContext());


Then you will be able to access message body as follows.
<soapenv:Body><test>sanjeewa</test></soapenv:Body>

How to clear token cache in gateway nodes – API Manager 1.7.0 distributed deployment


In API Manager deployments we need to clear gateway cache when we regenerate application tokens from API store user interface(or calling revoke API).  So we added new configuration for that in API Manager 1.7.0. Lets see how we can apply it and use.

01. If we generate new application access token from ui old tokens remain as active in gateway cache.

02. If we use revoke API deployed in gateway it will clear only super tenants cache.

To address these issues recently we introduced new parameter named RevokeAPIURL. In distributed deployment we need to configure this parameter in API key manager node. Then it will call API pointed by RevokeAPIURL parameter. RevokeAPIURL parameter should be pointed to revoke API deployed API gateway node. If it is gateway clustered we can point to one node. So from this release(1.7.0) on ward all revoke requests will route to oauth service through revoke API deployed in API manager. When revoke response route through revoke API cache clear handler will invoke. Then it will extract relevant information form transport headers and clear associated cache entries. In distributed deployment we should configure followings.

01. In key manager node, point gateway API revoke end point as follows.

<!-- This the API URL for revoke API. When we revoke tokens revoke requests should go through this

             API deployed in API gateway. Then it will do cache invalidations related to revoked tokens.

    In distributed deployment we should configure this property in key manager node by pointing

    gateway https url. Also please note that we should point gateway revoke service to key manager-->

<RevokeAPIURL>https://${carbon.local.ip}:${https.nio.port}/revoke</RevokeAPIURL>

02. In API gateway revoke API should be pointed to oauth application deployed in key manager node.

  <api name="_WSO2AMRevokeAPI_" context="/revoke">

        <resource methods="POST" url-mapping="/*" faultSequence="_token_fault_">

            <inSequence>

                <send>

                    <endpoint>

                        <address uri="https://keymgt.wso2.com:9445/oauth2/revoke"/>

                    </endpoint>

                </send>

            </inSequence>

            <outSequence>

                <send/>

            </outSequence>

        </resource>

        <handlers>

            <handler class="org.wso2.carbon.apimgt.gateway.handlers.ext.APIManagerCacheExtensionHandler"/>

        </handlers>

    </api>

Fix oracle database connecting issue due to missing time zone -java.sql.SQLException: ORA-00604: error occurred at recursive SQL level 1 ORA-01882: timezone region not found


When you connect web server or application to external oracle database you need to add certain configurations. But sometimes we might get following error due to missing time zone value.

[2014-04-03 10:57:43,128] ERROR - DatabaseUtil Database Error - ORA-00604: error occurred at recursive SQL level 1
ORA-01882: timezone region  not found
java.sql.SQLException: ORA-00604: error occurred at recursive SQL level 1
ORA-01882: timezone region  not found

We will be able to fix this issue by setting time zone as JVM parameter. You can add following to your java code running script.

-Duser.timezone=IST

Then issue will fix as it passes time zone.

Fixing issue in WSO2 API Manager due to matching resource found or API authentication failure for a API call with valid access token


No matching resource found error or authentication failure can happen due to few reasons. Here we will discuss about errors can happen due to resource define

Here in this article we will see how resource mapping work in WSO2 API Manager. When you create API with resource we will store them in API Manager database and synapse configuration. When some request comes to gateway it will first look for matching resource and then dispatch to inside that. For this scenario resource is as follows.

/resource1/*

In this configuration * means you can have any string(in request url) after that point. If we take your first resource sample then matching request would be something like this.

http://gatewayhostname:8280/t/test.com/apicontext/resource1/

Above request is the minimum matching request. In addition to that following requests also will map to this resource.

http://gatewayhostname:8280/t/test.com/apicontext/resource1/data?name=value

http://gatewayhostname:8280/t/test.com/apicontext/resource1/data?name=value&id=97

And following requests will not map properly to this resource. The reason for this is we specifically expecting /resource1/ in the request(* means you can have any string after that point).

http://gatewayhostname:8280/t/test.com/apicontext/resource1?name=value&id=97

From the web service call you will get following error response.

<am:fault xmlns:am="403Status'>http://wso2.org/apimanager"><am:code>403</am:code><am:type>Status report</am:type><am:message>Runtime Error</am:message><am:description>No matching resource found in the API for the given request</am:description></am:fault>

If you sent request to t/test.com/apicontext/1.0/resource1?id=97&Token=cd it will not work. Because unfortunately there is no matching resource for that. Because as i explained earlier you resource definition is having  /resource1/*. Then request will not map to any resource and you will get no matching resource found error and auth failure(because trying to authenticate against none existing resource).

Solution for this issue would be something like this.

In API Manager we do support both uri-template and url mapping support. If you create API from API Publisher user interface then it will create url-mapping based definition. From API Manager 1.7.0 on wards we will support both options from UI level. Normally when we need to do some kind of complex pattern matching we use uri-template. So here we will update synapse configuration to use uri-template instead of url-mapping. For this edit wso2admin-AT-test.com--apicontext_v1.0.xml file as follows.

Replace <resource methods="GET" url-mapping="/resource1/*"> with <resource methods="GET" uri-template="/resource1?*">

Hope this will help you to to understand how resource mapping work. You will find more information from this link[1]

[1]http://charithaka.blogspot.com/2014/03/common-mistakes-to-avoid-in-wso2-api.html

How to configure WSO2 API Manager to access by multiple devices(from single user and token) at the same time


This would be very useful when we setup production kind of deployments and use it by many users. According to current architecture if logged out from one device and revoke key then all other call made with that token will get authentication failures. In that case application should be smart enough to detect authentication failure and request for new token. Once user log into application, that user might want to provide user name and password. So we can use that information and consumer/ secret keys to retrieve new token once detect authentication failure. In our honest opinion we should handle this from client application side. If we allowed users to have multiple tokens at the same time. And that will cause to security related issues and finally users will end up with thousands of tokens that user cannot maintain. Also this might be problem when it comes to usage metering and statistics.

 
So recommended solution for this issue is having one active user token at a given time. And make client application aware about error responses send by API Manager gateway. Also you should consider refresh token approach for this application. When you request user token you will get refresh token along with the token response so you can use that for refresh access token.

How this should work

Lets assume same user logged in form desktop and tablet. Client should provide user name and password both when they log into desktop and tablet apps. At that time we can generate token request with username, password and consumer key, secret pair. So we can keep this request in memory until user close or logout from application(we do not persist this data to anywhere then there is no security issue) 

then when they logout from the desktop or the application on the desktop decides to refresh the OAuth Token first, then the user will be prompted for their username and password on the tablet since the tablet has a revoked or inactivated OAuth Token.  But here we should not prompt username password as client is already provided them and we have token request in memory. Once we detect auth failure from tablet app it will immediately send token generation request and get new token. User will not aware about what happen underline.

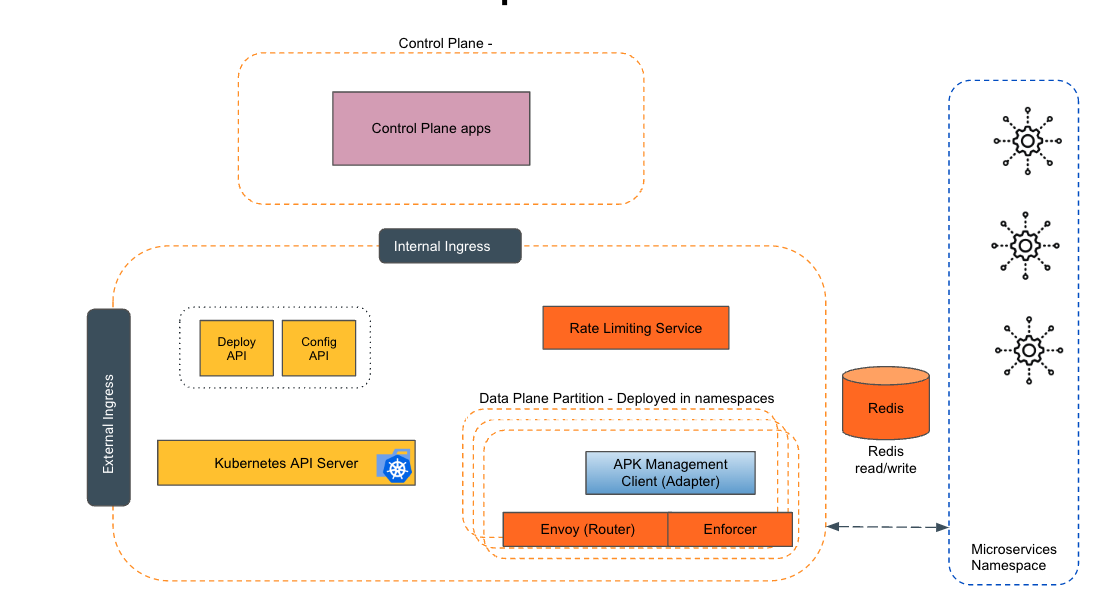
Empowering the Future of API Management: Unveiling the Journey of WSO2 API Platform for Kubernetes (APK) Project and the Anticipated Alpha Release

  Introduction In the ever-evolving realm of API management, our journey embarked on the APK project eight months ago, and now, with great a...