APIs have become the top-most asset for an organization’s digital transformation initiatives, empowering employees, partners, customers, and other stakeholders to access applications, data, and business functions across its digital ecosystem. According to a recent report [1] from Akamai, 83% of web traffic today is now API driven. At the same time, hackers have increased their waves of attacks against these critical enterprise assets. Unfortunately, it looks like the problem will only worsen. Gartner has predicted [2] that, “By 2022, API abuses will be the most-frequent attack vector resulting in data breaches for enterprise web applications.”
One API security breach can ruin an organization’s reputation within hours. For example, JustDial is an online directory for services and also offers facilities such as bill payments and bookings for restaurants, cabs, and tickets. In 2019, while implementing multi-factor authentication, they found four old APIs with leaky endpoints. Those API were left forgotten for many years and they were exposing company data outside and millions of user identities were exposed through this. Also within the past year, an API key was discovered in a public GitHub repository that allowed anyone to access Starbucks’ JumpCloud API. The researcher who found the key demonstrated how someone can utilize such keys to take full control of Starbucks’ AWS accounts. If this happened, it would have allowed hackers to execute commands on systems and add or remove users (source - [3]).
Many enterprises have responded by implementing API management solutions that provide mechanisms, such as authentication, authorization, and throttling. These are must-have capabilities for controlling who access APIs across an API ecosystem—and how often. However, in building their internal and external API strategies, organizations also need to address the growth of more sophisticated attacks on APIs by implementing more dynamic and smart security. Let's examine different security measures related to APIs and how they help to implement a successful security strategy.
Rule- and Policy-Based Security Measures
Rule-based and policy-based security checks, which can be performed in a static or dynamic manner, are mandatory parts of any API management solution. API gateways serve as the main entry point for API access and, therefore, typically handle policy enforcement by inspecting incoming requests against policies and rules related to security, rate limits, throttling, etc.
Static security checks do not depend on the request volume or any previous request data since they usually validate message data against a predefined set of rules or policies. Different static security scans are performed in gateways to block SQL injection, cohesive parsing attacks, entity expansion attacks, and schema poisoning, among others. Meanwhile, static policy checks can be applied to payload scanning, header inspection, access pattern checks, etc. For example, SQL injection is a common type of attack users perform using payloads.
Dynamic security checks, in contrast with static security scans, are always checking against something that varies over time. It usually validates request data with some decisions made with already available data. Dynamic checks are performed for access token validation, anomaly detection, and throttling, among others. While rule and policy-based security address most of the common security requirements, there can be more sophisticated attacks that cannot be caught by them. Next, let's analyze them and see possible solutions for these as well.
Beyond Traditional API Security
Policy-based approaches around authentication, authorization, rate limiting, and throttling are effective tools, but they still leave cracks through which hackers can exploit APIs. Notably, API gateways front multiple web services, and the APIs they manage are frequently loaded with a high number of sessions. Even if we analyzed all those sessions using policies and processes, it would be difficult for a gateway to inspect every request without additional computation power.
Additionally, each API has its own access pattern. So, a legitimate access pattern for one API could indicate malicious activity for a different API. For example, when someone buys items through an online shopping application, they will conduct multiple searches before making the purchase. So, a single user sending 5 to 10 requests to a search API within a short period of time can be a legitimate access pattern for a search API. However, if the same user sends multiple requests to the buying API, the access pattern could indicate malicious activity, such as a hacker trying to withdraw as much as possible using a stolen credit card. Therefore, each API access pattern needs to be analyzed separately to determine the correct response.
To fill the cracks left by policy-based API protections, modern security teams need artificial intelligence-based API security that can detect and respond to dynamic attacks and the unique vulnerabilities of each API. By applying AI models to continuously inspect and report on all API activity, enterprises can automatically discover anomalous API activity and threats across API infrastructures that traditional methods often miss.
When you select an API management solution for your organization, you will have to pay close attention to security and the level of support. The solution should allow you to expose your APIs to the outside world in a secure manner. While it is mandatory to support standard policy and rule-based security, it also needs to be equipped with additional security measurements such as payload scanning, schema validation, and AI-based security and analysis. Community-driven open-source projects are well-known for their security strengths. Most of the time, an open-source API management solution’s code can be accessed by a wide range of users, and, hence, it will be battle-tested against possible security threats.
[1]https://www.akamai.com/us/en/multimedia/documents/state-of-the-internet/state-of-the-internet-security-retail-attacks-and-api-traffic-report-2019.pdf
[2]https://www.gartner.com/en/documents/3834704/how-to-build-an-effective-api-security-strategy
[3]https://www.bleepingcomputer.com/news/security/starbucks-devs-leave-api-key-in-github-public-repo/
How WSO2 API Manager caches work with ditribute mode.
I'm adding small note on cache that helps anyone to understand how cluster caches work in WSO2 API Manager. Please note this is applicable for only WUM updated API Manager 2.1.0 and later versions and API Manager 3.0.0 or later versions by default.
Cache invalidation can happen in the following three ways.
Cache invalidation can happen in the following three ways.
- Ones that get synced with other nodes in all cases (add, update, delete)
- Ones that get synced with other nodes only on updates & deletes.
- Ones that does not get synced with other nodes and only depend on the cache timeout.
We have three types of configs related to this,
a. ForceLocalCache config in carbon xml
Enabling this will do two things,
(i) Change all caches in the server to act as local caches(II) Enable cache invalidation listener
b. IsDistributed flag in respective cache configs
Setting this value to false will just make that specific cache to act as a local cache.
c. Clustering configuration in axis2.xml
Having clustering enabled with the respective cluster configuration is needed to
When we have ForceLocalCache set as true (If we have ForceLocalCache set as true OOTB) and,
- when the clustering correctly in place all the caches will work as #2.
- when the clustering not configured all the caches will work as #3.
When we have ForceLocalCache set as false (Older versions of IS products have the ForceLocalCache set as false OOTB) and,
- When the clustering correctly in place,
- For caches marked as IsDistributed true will work as #1
- For caches marked as IsDistributed false will work as #3
- When the clustering not configured all the caches will work as #3 regardless of isDistributed true or false.
Different Token Types and their Usages - WSO2 API Manage
Different token types and their usages
In this section of this document we have discussed about different token types and their usages in detail. Whenever users create applications to consume APIs they have choice to select application type. Application type can be JWT or OAuth 2.0. Based on the requirements users can select app types.
JWT token retrieval process and use for API invocation
WSO2 API Manager 3.0.0 have the possibility to use JWT Authentication as an alternative to invoke APIs. WSO2 API Manager supports the use of self-contained and signed JWT formatted access tokens as API credentials. When an API is secured using the OAuth2 security scheme, the JWT tokens that are issued for the users from the Developer Portal can be used to invoke APIs.

Figure - Security Flow
You need to first get a JWT token from the WSO2 identity server(or API Manager) by using the token endpoint with the password grant type. You can use the below mentioned curl command to get a JWT token
Here you need to replace the
OAuth 2.0 token retrieval process and use for API invocation
OAuth 2 (Open Authorization) is an open standard for access delegation. It is used for token-based authentication and authorization. This standard is used by many technology providers, such as Google, Facebook, and Twitter. By using OAuth 2, it is possible to grant access to a secured resource (with an access token) for a specific period of time. Once the lifetime of that access token expires, the consumer has to refresh the token to obtain a new token.
By default, WSO2 API Manager’s key manager component is responsible for handling token-related operations. The key manager properly decouples operations to create OAuth applications and validate access tokens in OAuth 2.0 scenario. As a result, we can plug in a third-party authorization server for key validations if needed (e.g. WSO2 Identity Server or any other server which supports standard OAuth 2.0 protocol).
By default, WSO2 API Manager’s key manager component is responsible for handling token-related operations. The key manager properly decouples operations to create OAuth applications and validate access tokens in OAuth 2.0 scenario. As a result, we can plug in a third-party authorization server for key validations if needed (e.g. WSO2 Identity Server or any other server which supports standard OAuth 2.0 protocol).

Figure - API Gateway processing flow
When a request comes to the API Gateway (i.e. when consuming an API), it will be validated with the key manager; access token validation occurs at this stage. The request is allowed to reach the backend endpoint only if the token is a valid token. This ensures that services exposed via APIs can only be consumed by authorized parties.
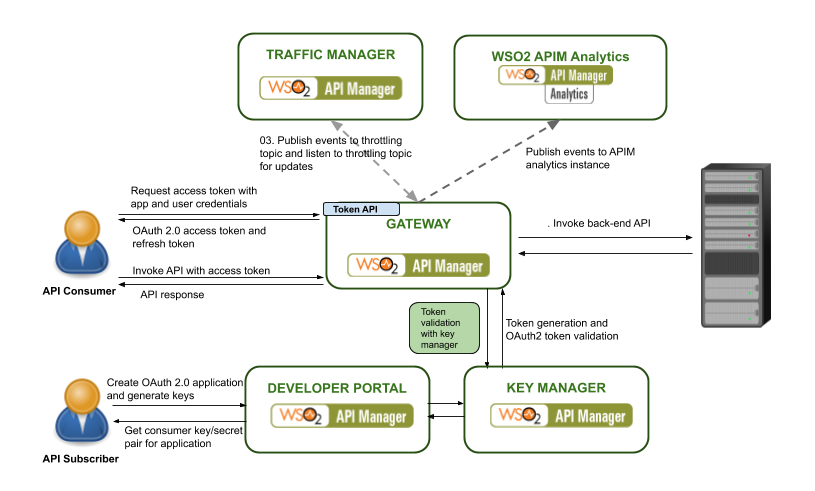
Figure - Security Flow
From API Manager 3.0.0 onward JWT token will be returned as default token. Before APIM 3.0.0 it was opaque OAuth 2.0 token. In below table we have listed features of both token types and their usages.
WSO2 API Manager Microgateway and Gateway Feature comparison - API Gateway vs. Microgateway 3.0.1
API gateway and microgateway can be compared in different aspects. Decision to select either of the gateways can be hugely depend on the architecture, design and deployment. Both of the gateways have most similar features and functionalities, but underlying works in a different manner in order to cater the purpose it was designed to. In this article we will discuss about different features supported by by each gateway type. Please note this comparison applicable for API Manager 3.0.1 version only.
Design and deployment comparison
API Gateway and microgateway both support different security mechanisms.
Feature Comparison
How to Run WSO2 API Manager with MicroK8s on MacOS
MicroK8s is a local deployment of Kubernetes. In this post im going to explain how to run MicroK8s in MacOS and run WSO2 API Manager within that. Easiest way to get an Ubuntu VM on MacOS is with multipass.Goto to the releases page and grab the latest package. Installing it is as simple as double-clicking on the .pkg file.
Then execute following commands to create microk8s VM in you machine.
multipass launch --name microk8s-vm --mem 4G --disk 40G
multipass exec microk8s-vm -- sudo snap install microk8s --classic
multipass exec microk8s-vm -- sudo iptables -P FORWARD ACCEPT
Then from this point onward you can start and stop instance as required.
multipass start microk8s-vm
multipass stop microk8s-vm
You can login to created instance with below command.
multipass shell microk8s-vm
Then to check running VM detains enter following command.
>>multipass list
Name State IPv4 Image
microk8s-vm Running 192.168.64.2 Ubuntu 18.04 LTS
If you want to do complete cleanup then you may execute following command to do that.multipass
delete microk8s-vm
multipass purge
Then execute following command
>>multipass exec microk8s-vm -- sudo /snap/bin/microk8s.status
microk8s is running
addons:
cilium: disabled
dashboard: disabled
dns: disabled
fluentd: disabled
gpu: disabled
helm: disabled
ingress: disabled
istio: disabled
jaeger: disabled
juju: disabled
knative: disabled
kubeflow: disabled
linkerd: disabled
metallb: disabled
metrics-server: disabled
prometheus: disabled
rbac: disabled
registry: disabled
storage: disabled
To start microk8s run following command on VM you created
>>sudo microk8s.start
Now we can login to VM created and install kubectl there. To install kubectl on VM you can follow this article(https://kubernetes.io/docs/tasks/tools/install-kubectl/) too.
To check installation happened successfully enter following command.
>>sudo microk8s.kubectl version
Now we need to copy API Manager artifacts to VM from host machine. To do that we can use following command.
>>multipass copy-files ~/Downloads/api-k8s-crds-1.0.1.zip microk8s-vm:
Now login to VM and unzip copied file. Then go to api-k8s-crds-1.0.1 directory and
>>sudo microk8s.kubectl apply -f k8s-artifacts/api-portal
namespace/wso2 created
configmap/apim-conf created
deployment.apps/wso2apim created
service/wso2apim created
You can check the status of started server with following command.
>>sudo microk8s.kubectl get pods -n wso2
NAME READY STATUS RESTARTS AGE
wso2apim-54f8f59546-qlwgm 1/1 Running 0 8m16s
Now our server is up and running in microk8s deployed in ubuntu VM. Now we can access that from host machine. First we need to add /etc/hosts entry to map host name. Please check VM instance IP address and add etc host entry mapping to that.
From host machine when you enter following command it will give host machines IP.
multipass list
Name State IPv4 Image
microk8s-vm Running 192.168.64.2 Ubuntu 18.04 LTS
Now we need to add /etc/hosts entry to map host name as follows.
192.168.64.2 wso2apim
Now you can enter URL in browser and access API developer portal.
>>https://wso2apim:32001/devportal/
Batch API - API chaining scenario
In this example, we have two backend services and one proxy service. WSDLs for the
examples can be found in the zip file attached. This service is in the WSO2 API manager and it is exposed to customers. This service accepts
an ID and a credit amount for its credit operation. A request coming to this service is served by
two backend services.
PersonInfoService
The PersonInfoService provides the name and address information about a requestor when the
ID is given. So, this is the first service being called by the CreditProxy service deployed in the API
The CreditService is the actual service that does the crediting. It is called by the CreditProxy
after getting the required information from the PersonInfoService.
The zip file attached which contains all the necessary configurations for the scenario. The
scenario needs WSO2 API Manager and WSO2 Application Server. The files in the zip should
be copied or deployed into these servers. Now, let's look at the contents of the zip file and
how to use them to create the scenario.
Please use this[1] link to download all resources for this example.
[1]https://drive.google.com/file/d/0B3OmQJfm2Ft8ZWRxRlUxd1VTeXM/edit?usp=sharing
Back-End services
Deploy the esb-samples-1.0-SNAPSHOT.jar as a jar service in to the WSO2 App Server. This
jar has two POJO services. If you need to try this with your backend services you can try
that as well. The required classes that need to be exposed as web services are
● org.wso2.esb.samples.CreditService
● org.wso2.esb.samples.PersonInfoService
API Manager Configuration
1. Copy the contents of following folders in the sample zip to the
repository/deployment/server/synapse-configs/default/ of WSO2 API manager pack.
/localentries/xslt.xml
/proxyservices/CreditProxy.xml
/endpoints/CreditEpr.xml
/endpoints/PersonInfoEpr.xml
/sequences/creditSeq.xml
/sequences/personInfoSeq.xml
Here i have attached API configs as well. But i recommend you to create 2 APIs for
services using API publisher UI. Both of them should be pointed to actual services hosted in
WSO2 Application Server.
2. Copy the personToCredit.xslt in the sample zip to wso2am-1.6.0/resources/
directory of WSO2 API Manager.
3. Copy the CreditProxy.wsdl in the sample zip to the wso2am-1.6.0/resources/
directory of the WSO2 API Manager.
4. If you are running the WSO2 API Manager in the sample machine as the WSO2
Application Server, change the ports of the WSO2 API Manager in
respository/conf/transport-mgt.xml. Otherwise there will be port conflicts.
Now we have the complete configuration for the scenario, let's go through the API Manager
configuration step by step to understand how it works.
Here we have one main entry point(credit Proxy or credit API).
● Receive a request with only credit amount and ID of the requestor.
● Send the id to the PersonInfoService to get the Address and Name of the requestor
● Use the credit amount, ID, address and name to create a request to the credit service
and call the CreditService
The request to the proxy service is:
<soapenv:Envelope xmlns:soapenv="http://schemas.xmlsoap.org/soap/envelope/"
xmlns:sam="http://samples.esb.wso2.org">
<soapenv:Body>
<sam:credit>
<sam:id>99990000</sam:id>
<sam:amount>1000</sam:amount>
</sam:credit>
</soapenv:Body>
</soapenv:Envelope>
The information in the original request is required to call the two backend services. When we do
the first request, the information from the original request will be lost if we don’t preserve it. So,
we need to store the required information from the original request in the message context. In
this case, we are only going to store the ID and the credit amount in the message context. But, it
is possible to store any part of the message in the context. For example, in some scenarios, the
whole message is stored.
We store the request ID and amount by extracting them using property mediator with XPath.
<property xmlns:sam="http://samples.esb.wso2.org" name="ORG_ID"
expression="//sam:credit/sam:id"/>
<property xmlns:sam="http://samples.esb.wso2.org" name="ORG_AMOUNT"
expression="//sam:credit/sam:amount"/>
After this step, the ID and the credit amount are available in the Message Context properties
named ORG_ID and ORG_AMOUNT respectively.
Now, we are ready to do the first request to the PersonInfoService. We need the XML for this
request and, so, will insert it into the message using the Enrich Mediator.
<source type="inline" clone="true">
<sam:get xmlns:sam="http://samples.esb.wso2.org">
<sam:id>?</sam:id>
</sam:get>
<target type="body"/>
Then we will log message details and send request to PersonInfoEpr end point. Also please note
that we have set receive sequence here. Then response will directly goto mentioned
sequence(personInfoSeq). See following configuration.
<log level="full">
<property name="sequence" value="inSequence request for PersonInfoService"/>
Send request to PersonInfoEpr
<send receive="personInfoSeq">
<endpoint key="PersonInfoEpr"/>
</send>
Here you will see personInfoSeq configuration. There we have used xslt transformation to
convert message to desired format for credit service. There also you will noticed that response
will direct to creditSeq. If you need to do some change for final response message you are free
<sequence name="personInfoSeq">
<xslt key="xslt">
<property name="amount" expression="getproperty('ORG_AMOUNT')"/>
<property name="Action" value="urn:credit"/>
<send receive="creditSeq">
<endpoint key="CreditEpr"/>
Here is the creditSeq configuration. There we log message and send response to client directly.
<sequence name="creditSeq">
<log level="full"/>
So this will cover complete service chaining scenario using batch API. According to your specific
scenarios you might have to add more complex logics. I have tested this scenario with WSO2
API Manager 1.5.0 and Application Server 5.2.1.
When you invoke this proxy service create 2 APIs to credit service and personal information
service. Then subscribe both of them to single Application.
Then generate tokens for that application and invoke proxy service with that(for this example i
used proxy service if you need create API for that).
Inside proxy service we will extract auth headers and store it inside message context then we
use that token to each and every following API calls. See following configuration.
<property name="Auth" expression="getproperty('transport','Authorization')"/>
We used above to extract auth header and store it for following API calls. This is how we inject
auth headers for each API call.
<property name="Authorization" expression="getproperty('Auth')" scope="transport"
type="STRING"/>
If you enabled API manager wire logs you will see following complete logs for each incoming and
outgoing messages. When you try this sample always set your API urls to eprs and use them
inside your configuration. Then once you changed API with newer version or url do don't have to
change all the places.
[20140205 15:38:45,775] INFO SequenceDeployer Sequence: main has been updated from the file:
/home/sanjeewa/work/workflow/wso2am1.6.01/repository/deployment/server/synapseconfigs/default/sequences/main.xml
[20140205 15:38:46,684] DEBUG wire >> "POST /services/CreditProxy.CreditProxyHttpSoap12Endpoint HTTP/1.1[\r][\n]"
[20140205 15:38:46,684] DEBUG wire >> "ContentType: application/soap+xml; charset=UTF8; action="urn:credit"[\r][\n]"
[20140205 15:38:46,684] DEBUG wire >> "Cookie: menuPanel=visible; menuPanelType=main;
region2_humantask_menu=visible; region2_bpel_instances_menu=visible; region3_registry_menu=none; i18next=enUS;
JSESSIONID=1579A304FBF0FE9AA2BEE6B9A7C9F85A;
requestedURI="../../carbon/servicemgt/index.jsp?region=region1&item=services_list_menu";
currentbreadcrumb=manage_menu%2Cservices_menu%2Cservices_list_menu%23;
MSG13915816906030.6012256733392928=true; region1_configure_menu=none; region4_monitor_menu=none;
region5_tools_menu=none[\r][\n]"
[20140205 15:38:46,684] DEBUG wire >> "UserAgent: Axis2[\r][\n]"
[20140205 15:38:46,684] DEBUG wire >> "Host: sanjeewaThinkPadT530:8280[\r][\n]"
[20140205 15:38:46,685] DEBUG wire >> "TransferEncoding: chunked[\r][\n]"
[20140205 15:38:46,685] DEBUG wire >> "[\r][\n]"
[20140205 15:38:46,685] DEBUG wire >> "130[\r][\n]"
[20140205 15:38:46,685] DEBUG wire >> "<?xml version="1.0" encoding="UTF8"?><soapenv:Envelope
xmlns:soapenv="http://www.w3.org/2003/05/soapenvelope"><soapenv:Body><p:credit
xmlns:p="http://samples.esb.wso2.org"><!0 to 1 occurrence><p:id>33</p:id><!0 to 1
occurrence><p:amount>2</p:amount></p:credit></soapenv:Body></soapenv:Envelope>[\r][\n]"
[20140205 15:38:46,685] DEBUG wire >> "0[\r][\n]"
[20140205 15:38:46,685] DEBUG wire >> "[\r][\n]"
[20140205 15:38:46,688] INFO LogMediator To: /services/CreditProxy.CreditProxyHttpSoap12Endpoint, WSAction: urn:credit,
SOAPAction: urn:credit, MessageID: urn:uuid:4f418b82d7394cc8bce1f1fbd54659b3, Direction: request, sequence =
inSequence request for CreditProxy, Envelope: <?xml version="1.0" encoding="utf8"?><soapenv:Envelope
xmlns:soapenv="http://www.w3.org/2003/05/soapenvelope"><soapenv:Body><p:credit
xmlns:p="http://samples.esb.wso2.org"><!0 to 1 occurrence><p:id>33</p:id><!0 to 1
occurrence><p:amount>2</p:amount></p:credit></soapenv:Body></soapenv:Envelope>
[20140205 15:38:46,690] INFO LogMediator To: /services/CreditProxy.CreditProxyHttpSoap12Endpoint, WSAction: urn:credit,
SOAPAction: urn:credit, MessageID: urn:uuid:4f418b82d7394cc8bce1f1fbd54659b3, Direction: request, sequence =
inSequence request for PersonInfoService, Envelope: <?xml version="1.0" encoding="utf8"?><soapenv:Envelope
xmlns:soapenv="http://www.w3.org/2003/05/soapenvelope"><soapenv:Body><sam:get
xmlns:sam="http://samples.esb.wso2.org">
<sam:id>33</sam:id>
</sam:get></soapenv:Body></soapenv:Envelope>
[20140205 15:38:46,691] DEBUG wire << "POST /services/PersonInfoService/ HTTP/1.1[\r][\n]"
[20140205 15:38:46,692] DEBUG wire << "Cookie: menuPanel=visible; menuPanelType=main;
region2_humantask_menu=visible; region2_bpel_instances_menu=visible; region3_registry_menu=none; i18next=enUS;
JSESSIONID=1579A304FBF0FE9AA2BEE6B9A7C9F85A;
requestedURI="../../carbon/servicemgt/index.jsp?region=region1&item=services_list_menu";
currentbreadcrumb=manage_menu%2Cservices_menu%2Cservices_list_menu%23;
MSG13915816906030.6012256733392928=true; region1_configure_menu=none; region4_monitor_menu=none;
region5_tools_menu=none[\r][\n]"
[20140205 15:38:46,692] DEBUG wire << "ContentType: application/soap+xml; charset=UTF8; action="urn:credit"[\r][\n]"
[20140205 15:38:46,692] DEBUG wire << "TransferEncoding: chunked[\r][\n]"
[20140205 15:38:46,692] DEBUG wire << "Host: localhost:9764[\r][\n]"
[20140205 15:38:46,692] DEBUG wire << "Connection: KeepAlive[\r][\n]"
[20140205 15:38:46,692] DEBUG wire << "UserAgent: SynapsePTHttpComponentsNIO[\r][\n]"
[20140205 15:38:46,692] DEBUG wire << "[\r][\n]"
[20140205 15:38:46,692] DEBUG wire << "124[\r][\n]"
[20140205 15:38:46,692] DEBUG wire << "<?xml version="1.0" encoding="UTF8"?><soapenv:Envelope
xmlns:soapenv="http://www.w3.org/2003/05/soapenvelope"><soapenv:Body><sam:get
xmlns:sam="http://samples.esb.wso2.org">[\n]"
[20140205 15:38:46,692] DEBUG wire << " <sam:id>33</sam:id>[\n]"
[20140205 15:38:46,692] DEBUG wire << " </sam:get></soapenv:Body></soapenv:Envelope>[\r][\n]"
[20140205 15:38:46,692] DEBUG wire << "0[\r][\n]"
[20140205 15:38:46,692] DEBUG wire << "[\r][\n]"
[20140205 15:38:46,695] DEBUG wire >> "HTTP/1.1 200 OK[\r][\n]"
[20140205 15:38:46,695] DEBUG wire >> "ContentType: application/soap+xml;charset=UTF8[\r][\n]"
[20140205 15:38:46,695] DEBUG wire >> "TransferEncoding: chunked[\r][\n]"
[20140205 15:38:46,695] DEBUG wire >> "Date: Wed, 05 Feb 2014 10:08:46 GMT[\r][\n]"
[20140205 15:38:46,695] DEBUG wire >> "Server: WSO2 Carbon Server[\r][\n]"
[20140205 15:38:46,695] DEBUG wire >> "[\r][\n]"
[20140205 15:38:46,695] DEBUG wire >> "200[\r][\n]"
[20140205 15:38:46,696] DEBUG wire >> "<?xml version="1.0" encoding="UTF8"?><soapenv:Envelope
xmlns:soapenv="http://www.w3.org/2003/05/soapenvelope"><soapenv:Body><ns:getResponse
xmlns:ns="http://samples.esb.wso2.org"><ns:return xmlns:ax2461="http://samples.esb.wso2.org/xsd"
xmlns:xsi="http://www.w3.org/2001/XMLSchemainstance" xsi:type="ax2461:PersonInfo"><ax2461:address>59, Flower Road,
Lanka</ax2461:address><ax2461:id>33</ax2461:id><ax2461:name>WSO2</ax2461:name></ns:return></ns:getResponse></soa
penv:Body></soapenv:Envelope>[\r][\n]"
[20140205 15:38:46,697] DEBUG wire >> "0[\r][\n]"
[20140205 15:38:46,697] DEBUG wire >> "[\r][\n]"
[20140205 15:38:46,706] DEBUG wire << "POST /services/CreditService/ HTTP/1.1[\r][\n]"
[20140205 15:38:46,706] DEBUG wire << "ContentType: application/soap+xml;charset=UTF8[\r][\n]"
[20140205 15:38:46,707] DEBUG wire << "TransferEncoding: chunked[\r][\n]"
[20140205 15:38:46,707] DEBUG wire << "Host: localhost:9764[\r][\n]"
[20140205 15:38:46,707] DEBUG wire << "Connection: KeepAlive[\r][\n]"
[20140205 15:38:46,707] DEBUG wire << "UserAgent: SynapsePTHttpComponentsNIO[\r][\n]"
[20140205 15:38:46,708] DEBUG wire << "[\r][\n]"
[20140205 15:38:46,708] DEBUG wire << "200[\r][\n]"
[20140205 15:38:46,708] DEBUG wire << "<?xml version="1.0" encoding="UTF8"?><soapenv:Envelope
xmlns:soapenv="http://www.w3.org/2003/05/soapenvelope"><soapenv:Body><sam:credit
xmlns:sam="http://samples.esb.wso2.org" xmlns:xsd="http://samples.esb.wso2.org/xsd"
xmlns:ax21="http://samples.esb.wso2.org/xsd">[\n]"
[20140205 15:38:46,708] DEBUG wire << "<sam:info>[\n]"
[20140205 15:38:46,708] DEBUG wire << "<xsd:amount>2</xsd:amount>[\n]"
[20140205 15:38:46,708] DEBUG wire << "<xsd:personInfo>[\n]"
[20140205 15:38:46,709] DEBUG wire << "<xsd:address>59, Flower Road, Colombo 07, Sri Lanka</xsd:address>[\n]"
[20140205 15:38:46,709] DEBUG wire << "<xsd:id>33</xsd:id>[\n]"
[20140205 15:38:46,709] DEBUG wire << "<xsd:name>WSO2</xsd:name>[\n]"
[20140205 15:38:46,709] DEBUG wire << "</xsd:personInfo>[\n]"
[20140205 15:38:46,709] DEBUG wire << "</sam:info>[\n]"
[20140205 15:38:46,709] DEBUG wire << "</sam:credit></soapenv:Body></soapenv:Envelope>[\r][\n]"
[20140205 15:38:46,709] DEBUG wire << "0[\r][\n]"
[20140205 15:38:46,710] DEBUG wire << "[\r][\n]"
[20140205 15:38:46,712] DEBUG wire >> "HTTP/1.1 200 OK[\r][\n]"
[20140205 15:38:46,712] DEBUG wire >> "ContentType: application/soap+xml;charset=UTF8[\r][\n]"
[20140205 15:38:46,712] DEBUG wire >> "TransferEncoding: chunked[\r][\n]"
[20140205 15:38:46,712] DEBUG wire >> "Date: Wed, 05 Feb 2014 10:08:46 GMT[\r][\n]"
[20140205 15:38:46,712] DEBUG wire >> "Server: WSO2 Carbon Server[\r][\n]"
[20140205 15:38:46,712] DEBUG wire >> "[\r][\n]"
[20140205 15:38:46,712] DEBUG wire >> "109[\r][\n]"
[20140205 15:38:46,713] DEBUG wire >> "<?xml version="1.0" encoding="UTF8"?><soapenv:Envelope
xmlns:soapenv="http://www.w3.org/2003/05/soapenvelope"><soapenv:Body><ns:creditResponse
xmlns:ns="http://samples.esb.wso2.org"><ns:return>true</ns:return></ns:creditResponse></soapenv:Body></soapenv:Envelope
[20140205 15:38:46,713] DEBUG wire >> "0[\r][\n]"
[20140205 15:38:46,713] DEBUG wire >> "[\r][\n]"
[20140205 15:38:46,714] INFO LogMediator To: http://www.w3.org/2005/08/addressing/anonymous, WSAction: ,
SOAPAction: , MessageID: urn:uuid:10f1394623dc49e097aba369c2101a9e, Direction: response, Envelope: <?xml
version="1.0" encoding="utf8"?><soapenv:Envelope
xmlns:soapenv="http://www.w3.org/2003/05/soapenvelope"><soapenv:Body><ns:creditResponse
xmlns:ns="http://samples.esb.wso2.org"><ns:return>true</ns:return></ns:creditResponse></soapenv:Body></soapenv:Envelope
[20140205 15:38:46,717] DEBUG wire << "HTTP/1.1 200 OK[\r][\n]"
[20140205 15:38:46,717] DEBUG wire << "ContentType: application/soap+xml;charset=UTF8[\r][\n]"
[20140205 15:38:46,717] DEBUG wire << "Date: Wed, 05 Feb 2014 10:08:46 GMT[\r][\n]"
[20140205 15:38:46,717] DEBUG wire << "Server: WSO2PassThroughHTTP[\r][\n]"
[20140205 15:38:46,717] DEBUG wire << "TransferEncoding: chunked[\r][\n]"
[20140205 15:38:46,717] DEBUG wire << "[\r][\n]"
[20140205 15:38:46,718] DEBUG wire << "109[\r][\n]"
[20140205 15:38:46,718] DEBUG wire << "<?xml version="1.0" encoding="UTF8"?><soapenv:Envelope
xmlns:soapenv="http://www.w3.org/2003/05/soapenvelope"><soapenv:Body><ns:creditResponse
xmlns:ns="http://samples.esb.wso2.org"><ns:return>true</ns:return></ns:creditResponse></soapenv:Body></soapenv:Envelope
[20140205 15:38:46,718] DEBUG wire << "0[\r][\n]"
[20140205 15:38:46,718] DEBUG wire << "[\r][\n]"
[20140205 15:38:47,786] INFO SequenceDeployer Sequence: fault has been updated from the file:
/home/sanjeewa/work/workflow/wso2am1.6.01/repository/deployment/server/synapseconfigs/default/sequences/fault.xml
How to avoid getting empty response to client due to slowness in key validation call - WSO2 API Manager
Users may get empty response due to slowness in key validation call due to the possibility of timeout gateway to key manager service call. These timeouts can happen in many different ways like below.
01. Connection timeout happen during establishment phase.
We can address this using axis2 client configuration change. Default connection timeout is 60 seconds and we can change that using below property.
Connection Timeout - the time to establish a connection with the remote host
We can address this using axis2 client configuration change. Default connection timeout is 60 seconds and we can change that using below property.
Connection Timeout - the time to establish a connection with the remote host
"CONNECTION_TIMEOUT"
02. Socket timeout due to inactivity to wait packets to arrive.
We can configure this value as well through axis2 client configuration change. Default value of this property is 60 seconds and we can change that as required.
Socket Timeout - this is the time of inactivity to wait for packets to arrive
We can configure this value as well through axis2 client configuration change. Default value of this property is 60 seconds and we can change that as required.
Socket Timeout - this is the time of inactivity to wait for packets to arrive
"SO_TIMEOUT"
03. Delay due to slow healthy connection .
In this case connection establishment and packet sending happens as usual. But data transfer between server and client getting delayed. In this case what happens is http client keep sending data to server till it accepts them. We can recreate this by adding slow proxy or something like that. Here important thing is if we notice this type of delay then all UI operations including logging, token retrieval, update etc will also effect. We do not have specific property to override this waiting time from http client level. After 2 minutes this throws error. But before that after 1 minute source handler getting timeout and user will get empty response as it breaks connection.
In this case connection establishment and packet sending happens as usual. But data transfer between server and client getting delayed. In this case what happens is http client keep sending data to server till it accepts them. We can recreate this by adding slow proxy or something like that. Here important thing is if we notice this type of delay then all UI operations including logging, token retrieval, update etc will also effect. We do not have specific property to override this waiting time from http client level. After 2 minutes this throws error. But before that after 1 minute source handler getting timeout and user will get empty response as it breaks connection.
To send some sort of error to client source handler should wait more than 2 minutes without getting timeout. So if we increase passthrough level socket timeout to 3 mins or so then it will wait till key manager error comes due to data send error. Then key validation handler will send proper unclassified authentication error with error code. Increasing passthrough socket timeout will effect all APIs deployed in the system as its transport level property. But most of the cases proper clients will have timeout values in client level so they will not effect due to this changes. If some client waits forever without having timeout then they will get error like below.
{"fault":{"code":900900,"message":"Unclassified Authentication Failure","description":"Error while accessing backend services for API key validation"}}
To set socket timeout please edit following property in passthru-http.properties.
http.socket.timeout=180000
Please refer this[1] document to understand more about client properties.
[1]http://hc.apache.org/httpclient-3.x/preference-api.html#HTTP_connection_parameters
Subscribe to:
Posts (Atom)
Empowering the Future of API Management: Unveiling the Journey of WSO2 API Platform for Kubernetes (APK) Project and the Anticipated Alpha Release
Introduction In the ever-evolving realm of API management, our journey embarked on the APK project eight months ago, and now, with great a...
-
 Here i'm explaining solution for manage multiple API Manager environments and external key management server to build central API r...
 -
When we increase timeout value in API Manager we have to set 3 properties. 1) Global timeout defined in synapse.properties (\repository\...
-
You can add thread.sleep by using script mediator. See following synapse configuration block. You can add it to between your operations. ...