How to run MSF4J micro services within WSO2 Enterprise Integrator (EI)

WSO2 EI is designed to run MSF4J services as separate run time. But this is not limited to one MSF4J service. You can start run time and deploy/ re-deploy services while server is running. So unlike in fat jar mode we can run multiple services within same container without spawning JVM per service.

We do have sample for that. Please refer below instructions.

First go to /samples/msf4j/stockquote

From this directory, run
mvn clean install

Go to the /wso2/msf4j/bin directory
Then run the following command to start the MSF4J profile.
./carbon.sh

The copy the target/msf4j-sample-StockQuoteService.jar to wso2/msf4j/deployment/microservices directory of MSF4J profile.
Then the jar will be automatically deployed to the server runtime.

How to test the sample
curl http://localhost:9090/stockquote/IBM


How to setup WSO2 API Manager with Oracle 11g using

In this post i will explain how you can setup WSO2 API Manager analytucs with oracle 11g using docker container. First you need to install docker on your machine. You can use same commands for any server to configure with oracle.

First run following command.

docker run -d -p 49160:22 -p 49161:1521 -e ORACLE_ALLOW_REMOTE=true wnameless/oracle-xe-11g
docker ps
CONTAINER ID        IMAGE                     COMMAND                  CREATED             STATUS              PORTS                                                      NAMES
5399cedca43c        wnameless/oracle-xe-11g   "/bin/sh -c '/usr/sbi"   2 minutes ago       Up 2 minutes        8080/tcp, 0.0.0.0:49160->22/tcp, 0.0.0.0:49161->1521/tcp   grave_hugle

Now Lets log into oracle and create
>>ssh root@localhost -p 49160
>>admin as password.
su oracle
sqlplus / as sysdba
SQL> create user testamdb identified by testamdb account unlock;
SQL> grant create session, dba to testamdb;
SQL> commit;
SQL> connect testamdb;

Now we have successfully connected to created database. Now lets add master-datasource config to api manager instance and analytics instance as follows. When analytics node run it will create required tables automatically. If you have schema you can create tables by yourself as well.

Data source
<datasource>
 <name>WSO2AM_STATS_DB</name>
 <description>The datasource used for setting statistics to API Manager</description>
 <jndiConfig>
   <name>jdbc/WSO2AM_STATS_DB</name>
   </jndiConfig>
 <definition type="RDBMS">
 <configuration>
 <url>jdbc:oracle:thin:@127.0.0.1:49161/xe</url>
 <username>testamdb</username>
 <password>testamdb</password>  <driverClassName>oracle.jdbc.driver.OracleDriver</driverClassName>
 <maxActive>50</maxActive>
 <maxWait>60000</maxWait>
 <testOnBorrow>true</testOnBorrow>
 <validationQuery>SELECT 1</validationQuery>
 <validationInterval>30000</validationInterval>
 <defaultAutoCommit>false</defaultAutoCommit>
 </configuration>
   </definition>
</datasource>

Explanation about load balance endpoints and endpoint suspension

In this post i will provide explanation about load balance endpoints and endpoint suspension. If we have 2 endpoints in load balanced manner then it will behave as below.
If both endpoints are in working condition.
Requests with route to endpoint_1 and then next request will go to endpoint_2. Likewise it will repeat.
If endpoint_1 failed to serve requests.
If endpoint_1 failed to serve requests when load balanced endpoints used it will detect endpoint_1 failure and then route request to endpoint_2. You can see details in following log. It says it detect one endpoint failure and endpoint suspended for 30 seconds.
[2017-05-30 23:08:26,152] WARN - ConnectCallback Connection refused or failed for : /172.17.0.1:8081
[2017-05-30 23:08:26,153] WARN - EndpointContext Endpoint : admin--CalculatorAPI_APIproductionEndpoint_0_0 will be marked SUSPENDED as it failed
[2017-05-30 23:08:26,154] WARN - EndpointContext Suspending endpoint : admin--CalculatorAPI_APIproductionEndpoint_0_0 - last suspend duration was : 30000ms and current suspend duration is : 30000ms - Next retry after : Tue May 30 23:08:56 IST 2017
[2017-05-30 23:08:26,154] WARN - LoadbalanceEndpoint Endpoint [admin--CalculatorAPI_APIproductionEndpoint_0] Detect a Failure in a child endpoint : Endpoint [admin--CalculatorAPI_APIproductionEndpoint_0_0]
After you see above log in output it will not route requests to endpoint_1 for 30 seconds(30000ms). Then if you send request after 30 seconds it will again route to endpoint_1 and since its not available request will go to endpoint_2. Same cycle repeats until endpoint_1 available to serve requests.
If both endpoint_1 and endpoint_2 failed.
Then it will go to endpoint_1 and once failure detect it will go to endpoint_2. Then once it realized all endpoint belong to that load balanced endpoint it will not accept further requests and send error message. It will not go into loop and it will go through all endpoints onetime and stop processing request(by sending proper error). Please see below logs.
Detect first endpoint_1 failure
[2017-05-30 23:41:58,643] WARN - ConnectCallback Connection refused or failed for : /172.17.0.1:8081
[2017-05-30 23:41:58,646] WARN - EndpointContext Endpoint : admin--CalculatorAPI_APIproductionEndpoint_0_0 will be marked SUSPENDED as it failed
[2017-05-30 23:41:58,648] WARN - EndpointContext Suspending endpoint : admin--CalculatorAPI_APIproductionEndpoint_0_0 - last suspend duration was : 70000ms and current suspend duration is : 70000ms - Next retry after : Tue May 30 23:43:08 IST 2017
[2017-05-30 23:41:58,648] WARN - LoadbalanceEndpoint Endpoint [admin--CalculatorAPI_APIproductionEndpoint_0] Detect a Failure in a child endpoint : Endpoint [admin--CalculatorAPI_APIproductionEndpoint_0_0]

 
Detect endpoint_2 failure
[2017-05-30 23:41:58,651] WARN - ConnectCallback Connection refused or failed for : /172.17.0.1:8080
[2017-05-30 23:41:58,654] WARN - EndpointContext Endpoint : admin--CalculatorAPI_APIproductionEndpoint_0_1 will be marked SUSPENDED as it failed
[2017-05-30 23:41:58,656] WARN - EndpointContext Suspending endpoint : admin--CalculatorAPI_APIproductionEndpoint_0_1 - current suspend duration is : 30000ms - Next retry after : Tue May 30 23:42:28 IST 2017
[2017-05-30 23:41:58,657] WARN - LoadbalanceEndpoint Endpoint [admin--CalculatorAPI_APIproductionEndpoint_0] Detect a Failure in a child endpoint : Endpoint [admin--CalculatorAPI_APIproductionEndpoint_0_1]

Once it realized both load balanced endpoint failed it will print error saying no child endpoints to process requests.
[2017-05-30 23:41:58,657] WARN - LoadbalanceEndpoint Loadbalance endpoint : admin--CalculatorAPI_APIproductionEndpoint_0 - no ready child endpoints
[2017-05-30 23:41:58,667] INFO - LogMediator STATUS = Executing default 'fault' sequence, ERROR_CODE = 101503, ERROR_MESSAGE = Error connecting to the back end

When endpoint suspension happens, it will work as follows.
For the suspend duration after the first failure, this equation does not applies. Also when endpoint changed from active to suspend state, suspension duration will be exactly initial duration.

This equation only applies when endpoint already in suspended state and suspension duration expired.

next suspension time period = Min (Initial suspension duration * Progression Factor , Max suspend time).

How we can update swagger definition selectively and push that change to API gateway

In this post i will explain how we can update swagger definition selectively and push that change to API gateway with API Manager 1.10.

If we update swagger definition which is sub resource of the API resource it will work fine. And that operation is successful and you will see API definition updated in UI. But to reflect any change to API gateway(to update synapse API definition) we need to do complete API resource update as it will handle API gateway deployment process.


Obtain Access token to view APIs with both apim:api_create, apim:api_view scope. We need apim:api_create scope because we are going to update API and it need to done with token obtained for apim:api_create scope.

curl -k -d "grant_type=password&username=admin&password=admin&scope=apim:api_create apim:api_view" -H "Authorization: Basic cmpPeWZMTDRaMkhUVmVncnZUbERhRkFmeGZnYTpKUFJRVV9iNEM3WjY1RlBjUmhvQTJPWHh2dkFh" https://127.0.0.1:8243/token
{"access_token":"9f4553dc3c40abb81cf23c8a009821a2","refresh_token":"4db87bf23981e60b22c731aa42dcc6a8","scope":"apim:api_create apim:api_view","token_type":"Bearer","expires_in":3600}

Then get APIs available in the system.

curl -k -H "Authorization: Bearer 9f4553dc3c40abb81cf23c8a009821a2" https://127.0.0.1:9443/api/am/publisher/v0.9/apis

Now select correct ID associated with the API you need to access.

curl -k -H "Authorization: Bearer 9f4553dc3c40abb81cf23c8a009821a2" https://127.0.0.1:9443/api/am/publisher/v0.9/apis/8f8d859e-867e-45da-853b-23de80a44133

{"sequences":[],"tiers":["Unlimited"],"thumbnailUrl":null,"visibility":"PUBLIC","visibleRoles":[],"visibleTenants":[],"cacheTimeout":300,"endpointConfig":"{\"production_endpoints\":{\"url\":\"https://localhost:9443/am/sample/calculator/v1/api\",\"config\":null},\"sandbox_endpoints\":{\"url\":\"https://localhost:9443/am/sample/calculator/v1/api\",\"config\":null},\"implementation_status\":\"managed\",\"endpoint_type\":\"http\"}","subscriptionAvailability":null,"subscriptionAvailableTenants":[],"destinationStatsEnabled":"Disabled","apiDefinition":"{\"paths\":{\"\\/*\":{\"get\":{\"x-auth-type\":\"Application\",\"responses\":{\"200\":{\"description\":\"OK\"}},\"x-throttling-tier\":\"Unlimited\"}}},\"x-wso2-security\":{\"apim\":{\"x-wso2-scopes\":[]}},\"swagger\":\"2.0\",\"info\":{\"contact\":{\"name\":\"xx\",\"email\":\"xx@ee.com\"},\"description\":\"Verify a phone number\",\"title\":\"PhoneVerification\",\"version\":\"1.0.0\"}}","responseCaching":"Disabled","isDefaultVersion":false,"gatewayEnvironments":"Production and Sandbox","businessInformation":{"technicalOwner":null,"technicalOwnerEmail":null,"businessOwner":null,"businessOwnerEmail":null},"tags":["calculator"],"transport":["http","https"],"provider":"admin","version":"1.0","description":"Simple calculator API to perform addition, subtraction, multiplication and division.","status":"PUBLISHED","name":"CalculatorAPI","context":"/calc","id":"8f8d859e-867e-45da-853b-23de80a44133"}

Now update swagger content as follows with the token you obtained from previous step. I'm changing http verb get to put as follows.

curl -k -H "Authorization:Bearer 9f4553dc3c40abb81cf23c8a009821a2" -F apiDefinition="{\"paths\":{\"\\/*\":{\"put\":{\"x-auth-type\":\"Application\",\"responses\":{\"200\":{\"description\":\"OK\"}},\"x-throttling-tier\":\"Unlimited\"}}},\"x-wso2-security\":{\"apim\":{\"x-wso2-scopes\":[]}},\"swagger\":\"2.0\",\"info\":{\"contact\":{\"name\":\"xx\",\"email\":\"xx@ee.com\"},\"description\":\"Verify a phone number\",\"title\":\"PhoneVerification\",\"version\":\"1.0.0\"}}" -X PUT "https://127.0.0.1:9443/api/am/publisher/v0.9/apis/8f8d859e-867e-45da-853b-23de80a44133/swagger"

You will see below response.

{"paths":{"\/*":{"put":{"x-auth-type":"Application","responses":{"200":{"description":"OK"}},"x-throttling-tier":"Unlimited"}}},"x-wso2-security":{"apim":{"x-wso2-scopes":[]}},"swagger":"2.0","info":{"contact":{"name":"xx","email":"xx@ee.com"},"description":"Verify a phone number","title":"PhoneVerification","version":"1.0.0"}}

Now again get API and see your swagger changes are updated API properly. To do that you can make following API call.

curl -k -H "Authorization: Bearer 9f4553dc3c40abb81cf23c8a009821a2" https://127.0.0.1:9443/api/am/publisher/v0.9/apis/8f8d859e-867e-45da-853b-23de80a44133

You will get complete API definition as below.

{"sequences":[],"tiers":["Unlimited"],"thumbnailUrl":null,"visibility":"PUBLIC","visibleRoles":[],"visibleTenants":[],"cacheTimeout":300,"endpointConfig":"{\"production_endpoints\":{\"url\":\"https://localhost:9443/am/sample/calculator/v1/api\",\"config\":null},\"sandbox_endpoints\":{\"url\":\"https://localhost:9443/am/sample/calculator/v1/api\",\"config\":null},\"implementation_status\":\"managed\",\"endpoint_type\":\"http\"}","subscriptionAvailability":null,"subscriptionAvailableTenants":[],"destinationStatsEnabled":"Disabled","apiDefinition":"{\"paths\":{\"\\/*\":{\"put\":{\"x-auth-type\":\"Application\",\"responses\":{\"200\":{\"description\":\"OK\"}},\"x-throttling-tier\":\"Unlimited\"}}},\"x-wso2-security\":{\"apim\":{\"x-wso2-scopes\":[]}},\"swagger\":\"2.0\",\"info\":{\"contact\":{\"name\":\"xx\",\"email\":\"xx@ee.com\"},\"description\":\"Verify a phone number\",\"title\":\"PhoneVerification\",\"version\":\"1.0.0\"}}","responseCaching":"Disabled","isDefaultVersion":false,"gatewayEnvironments":"Production and Sandbox","businessInformation":{"technicalOwner":null,"technicalOwnerEmail":null,"businessOwner":null,"businessOwnerEmail":null},"tags":["calculator"],"transport":["http","https"],"provider":"admin","version":"1.0","description":"Simple calculator API to perform addition, subtraction, multiplication and division.","status":"PUBLISHED","name":"CalculatorAPI","context":"/calc","id":"8f8d859e-867e-45da-853b-23de80a44133"}

Up to this point we can see all UI elements and swagger file updated but it is not reflected to synapse configuration. Now you need to update API(not a swagger update but complete API update) using the exact same payload you obtained from previous step. So i will create data.json file and copy response of my previous step. Then invoke following operation.

curl -k -H "Authorization: Bearer 9f4553dc3c40abb81cf23c8a009821a2" -H "Content-Type: application/json" -X PUT -d @data.json https://127.0.0.1:9443/api/am/publisher/v0.9/apis/8f8d859e-867e-45da-853b-23de80a44133

You will see below response.

{"sequences":[],"tiers":["Unlimited"],"thumbnailUrl":null,"visibility":"PUBLIC","visibleRoles":[],"visibleTenants":[],"cacheTimeout":300,"endpointConfig":"{\"production_endpoints\":{\"url\":\"https://localhost:9443/am/sample/calculator/v1/api\",\"config\":null},\"sandbox_endpoints\":{\"url\":\"https://localhost:9443/am/sample/calculator/v1/api\",\"config\":null},\"implementation_status\":\"managed\",\"endpoint_type\":\"http\"}","subscriptionAvailability":null,"subscriptionAvailableTenants":[],"destinationStatsEnabled":"Disabled","apiDefinition":"{\"paths\":{\"\\/*\":{\"put\":{\"x-auth-type\":\"Application\",\"responses\":{\"200\":{\"description\":\"OK\"}},\"x-throttling-tier\":\"Unlimited\"}}},\"x-wso2-security\":{\"apim\":{\"x-wso2-scopes\":[]}},\"swagger\":\"2.0\",\"info\":{\"contact\":{\"name\":\"xx\",\"email\":\"xx@ee.com\"},\"description\":\"Verify a phone number\",\"title\":\"PhoneVerification\",\"version\":\"1.0.0\"}}","responseCaching":"Disabled","isDefaultVersion":false,"gatewayEnvironments":"Production and Sandbox","businessInformation":{"technicalOwner":null,"technicalOwnerEmail":null,"businessOwner":null,"businessOwnerEmail":null},"tags":["calculator"],"transport":["http","https"],"provider":"admin","version":"1.0","description":"Simple calculator API to perform addition, subtraction, multiplication and division.","status":"PUBLISHED","name":"CalculatorAPI","context":"/calc","id":"8f8d859e-867e-45da-853b-23de80a44133"}

Then go to repository/deployment/server/synapse-configs/default/api directory and see your API definition. Now you will see API definition updated properly. 

How to expose sensitive services to outside as APIs

APIM 2.0.0 supports oauth 2.0.0 based security for APIs(with JWT support) out of the box and we can utilize that for secure services. Let me explain how we can use it. Lets consider how mobile client application can use those secured APIs. 
  • User logs into system(using multi step authentication including OTP etc ). If we are using SAML SSO then we need browser based redirection from native  application.
  • Then once user authenticated we can use same SAML assertion and obtain OAuth 2.0.0 access token on behalf of logged in user and application(which authenticate both user and client application).
  • Then we can use this token for all subsequent calls(service calls). 
  • Then when requests come to API gateway we will fetch user information from token and send them to back end.
  • Also at gateway we can do resource permission validation.
  • If we need extended permission validation we can do that as well before request routed to core services.
  • So internal service can invoke only if user is authenticated and authorized to invoke that particular API.
This complete flow can be implement using WSO2 API Manager and Identity server.

JWT token and its usage in WSO2 API Manager

JSON Web Token (JWT) represents claims to be transferred between two parties. The claims in a JWT are encoded as a JavaScript Object Notation (JSON) object that is used as the payload of a JSON Web Signature (JWS) structure or as the plain text of a JSON Web Encryption (JWE) structure, enabling the claims to be digitally signed. A JWToken is self-­contained, so when we create one, it will have all the necessary pieces needed inside it.

To authenticate end users, the API manager passes attributes of the API invoker to the back-end API implementation. JWT is used to represent claims that are transferred between the end user and the backend. A claim is an attribute of the user that is mapped to the underlying user store. A set of claims are called a dialect (e.g. http://wso2.org/claims). The general format of a JWT is {token infor}.{claims list}.{signature}. The API implementation uses information, such as logging, content filtering, and authentication/authorization that is stored in this token. The token is Base64-encoded and sent to the API implementation in a HTTP header variable. The JWT header will contain three main components.

What are those pieces? The JWT token string can be divided into three parts.
A header
A payload
A signature

We will discuss about these parts later and understand them.

First let's consider very simple use case to understand the usage of API Manager JWT use case.
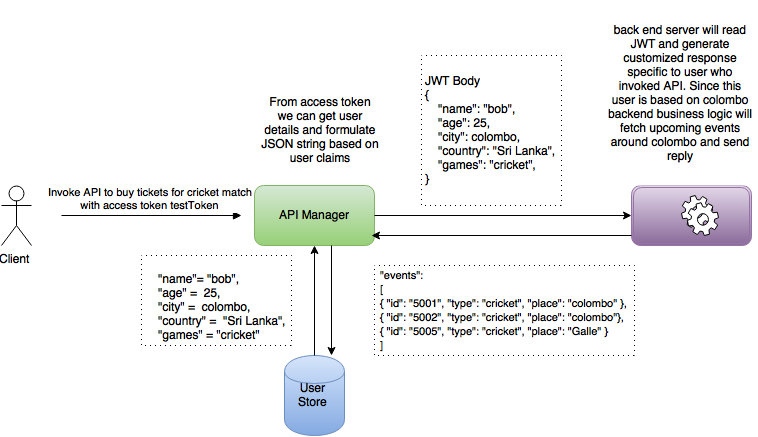
Let's say we have shopping cart web application. And user is invoking some web services associated with that application through API Manager. In such cases we may need to pass user details to backend service. So as discussed above we may use JWT to pass that information to backend.

Lets think we have 2 users named Bob and frank.
  • Bob is 25 years old and he is enjoying watching cricket. He based on colombo, sri lanka.
  • Frank is 52 years old and he enjoys watching football.He is living in frankfurt germany


They both realized coming weekend is free for them and then decided to go out to watch game.
Both Bob and Frank installed find
They both will call find ticket for games API from their mobile devices. Each time they invoke APIs we cannot ask them to send their details. They will only send access token which is mandatory for their security.
When request come to API Manager it will first validate token. Then if user is authenticated to call service we will follow up with next steps.
From access token we can get username of the user.Then we can get user attributes and create JSON payload with it.
Then API Management server will send user details as JSON payload in transport header.
So when request reach backend server they can get user details from JWT message. Then back end server will generate customized response for each user.
Bob will get response with cricket events happens around colombo area while Frank is getting response with football events happen in germany.

This is one of the most common use case of JWT.
.

JWT_USECASE (1).png


In most production deployments, service calls go through the API manager or a proxy service. If we enable JWT generation in WSO2 API Manager, then each API request will carry a JWT to the back-end service. When the request goes through the API manager, we can append the JWT as a transport header to the outgoing message. So, the back-end service can fetch JWT and retrieve required information about the user, application, or token. There are two kinds of access tokens we use to invoke APIs in WSO2 API Manager.

Application access token: Generate as application owner and there is no associated user for this token (the actual user will be the application owner). In this case, all information will be fetched from the application owner, so the JWT will not have real meaning/usage when we use the application access token.
User access token: User access tokens are always bound to the user who generated token. So, when you access the API with user access token, the JWT will generate user details. On the back-end server side, we can use this to fetch user details.
Sample JWT message

{
"iss":"wso2.org/products/am","exp":1407285607264,
"http://wso2.org/claims/subscriber":"xxx@xxx.xxx",
"http://wso2.org/claims/applicationid":"2",
"http://wso2.org/claims/applicationname":"DefaultApplication",
"http://wso2.org/claims/applicationtier":"Unlimited",
"http://wso2.org/claims/apicontext":"/t/xxx.xxx/aaa/bbb",
"http://wso2.org/claims/version":"1.0.0",
"http://wso2.org/claims/tier":"Unlimited",
"http://wso2.org/claims/keytype":"PRODUCTION",
"http://wso2.org/claims/usertype":"APPLICATION",
"http://wso2.org/claims/enduser":"anonymous",
"http://wso2.org/claims/enduserTenantId":"1",
"http://wso2.org/claims/emailaddress":"sanjeewa@wso2.com",
"http://wso2.org/claims/fullname":"xxx",
"http://wso2.org/claims/givenname":"xxx",
"http://wso2.org/claims/lastname":"xxx",
"http://wso2.org/claims/role":"admin,subscriber,Internal/everyone"  
}
As you can see JWT contain claims associated with User (end user TenantId, full name, given name, last name, role, email address, user type) API (API context, version, tier), Subscription (keytype, subscriber)
Application (application ID, application name, application tier)

However, in some production deployments, we might need to generate custom attributes and embedded to the JWT.

SMS OTP Two Factor Authentication for WSO2 API Manager publisher


In this post, I will explain how to use SMS OTP multi factor authenticator through WSO2 Identity server. We will be using Twilio SMS Provider which was used to send the OTP code via SMS at the time authentication happens. For this solution we will 2 WSO2 API Manager(2.1.0) and Identity server(5.3.0). Please note that we need to set port offset as 1 in carbon.xml configuration file available with identity server. So it will be running on https 9444 port.

First to to https://www.twilio.com and create account there. Then provide your mobile number and register that.

Then generate mobile number from twilio. Then it will give you new number for you to use.

curl -X POST 'https://api.twilio.com/2010-04-01/Accounts/({Account-Sid}/SMS/Messages.json'  --data-urlencode 'To={Sender SMS}' --data-urlencode 'From={generated MobileNumber from Twilio}' --data-urlencode 'Body=enter this code'  -H 'Authorization: Basic {base64Encoded(Account SId:Auth Token)}'

Please see the sample below.

curl -X POST 'https://api.twilio.com/2010-04-01/Accounts/fsdfdfdsfdfdsfdfsdfdsfdfdfdf/SMS/Messages.json'  --data-urlencode 'To=+94745345779' --data-urlencode 'From=+1454543535' --data-urlencode 'Body=enter this code'  -H 'Authorization: Basic LKJADJAD:ADJLJDJ:LAJDJDJJJJJJL::LMMIYGBNJN=='

Now it should send you message to your mobile number provided.

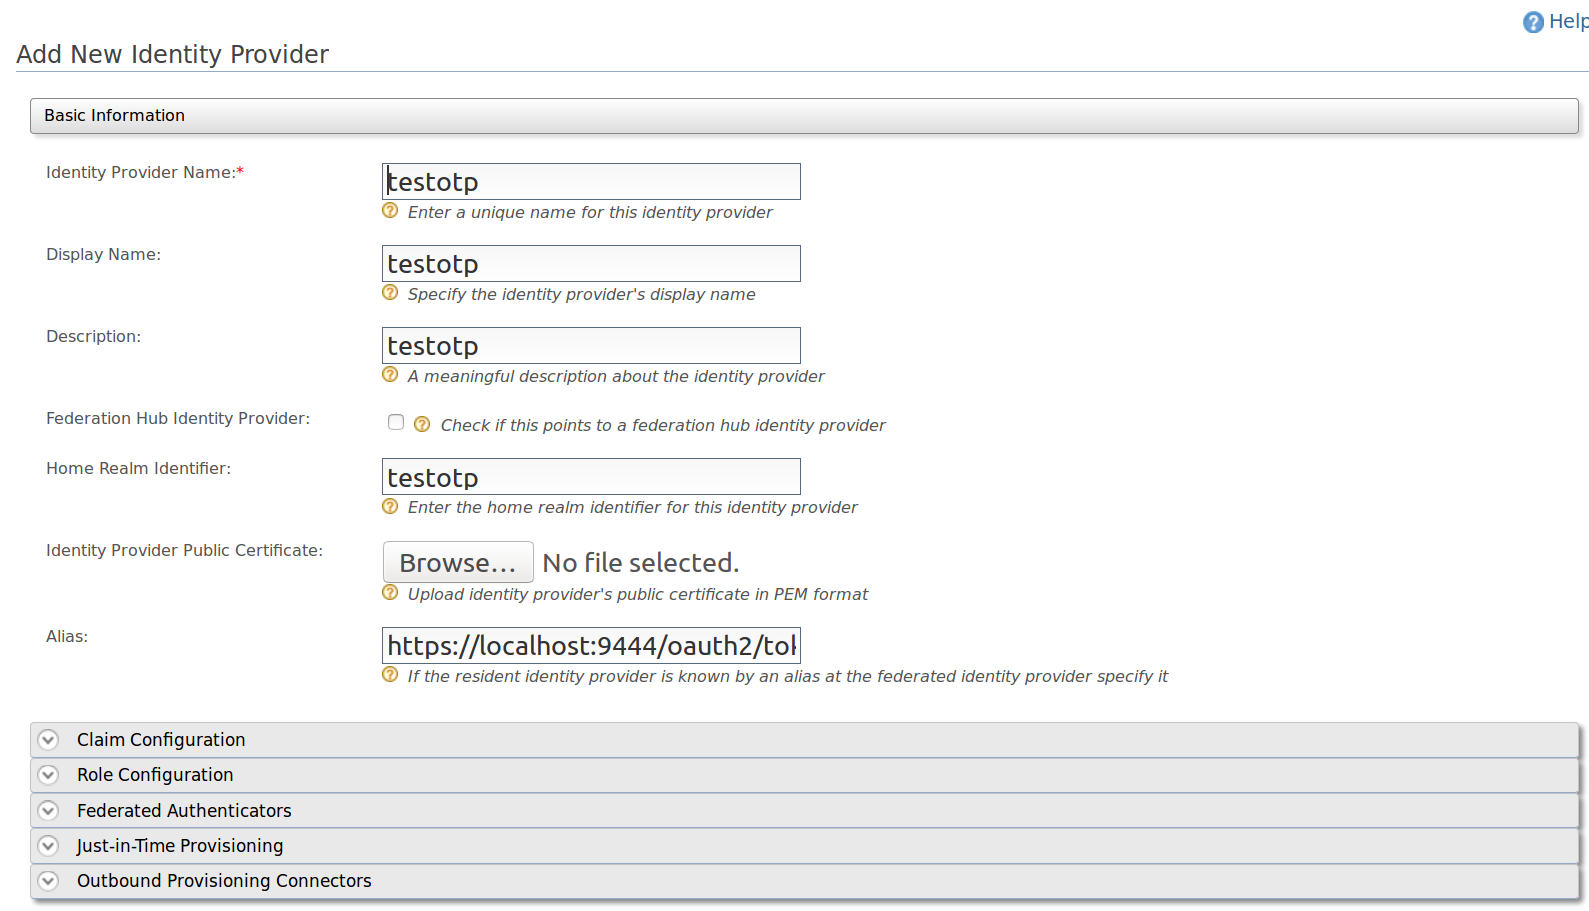
Now login to identity server and create new identity provider. When you do that provide following inputs in user interface.
Screenshot from 2017-03-09 15-09-17.png

Then go to federated authenticator section and add SMS OTP Configuration as follows. Provide basic authentication credentials like we did for CuRL request.

Please fill following fields as below.
SMS URL: https://api.twilio.com/2010-04-01/Accounts/ACd5ac7ff9sdsad3232432414b/SMS/Messages.json   HTTP Method: POST    HTTP Headers: Authorization: Basic QUNkNWFjN2ZmOTNTNmNjMzOWMwMjBkZQ==HTTP Payload: Body=$ctx.msg&To=$ctx.num&From=+125145435333434

Screenshot from 2017-03-09 15-10-01.png


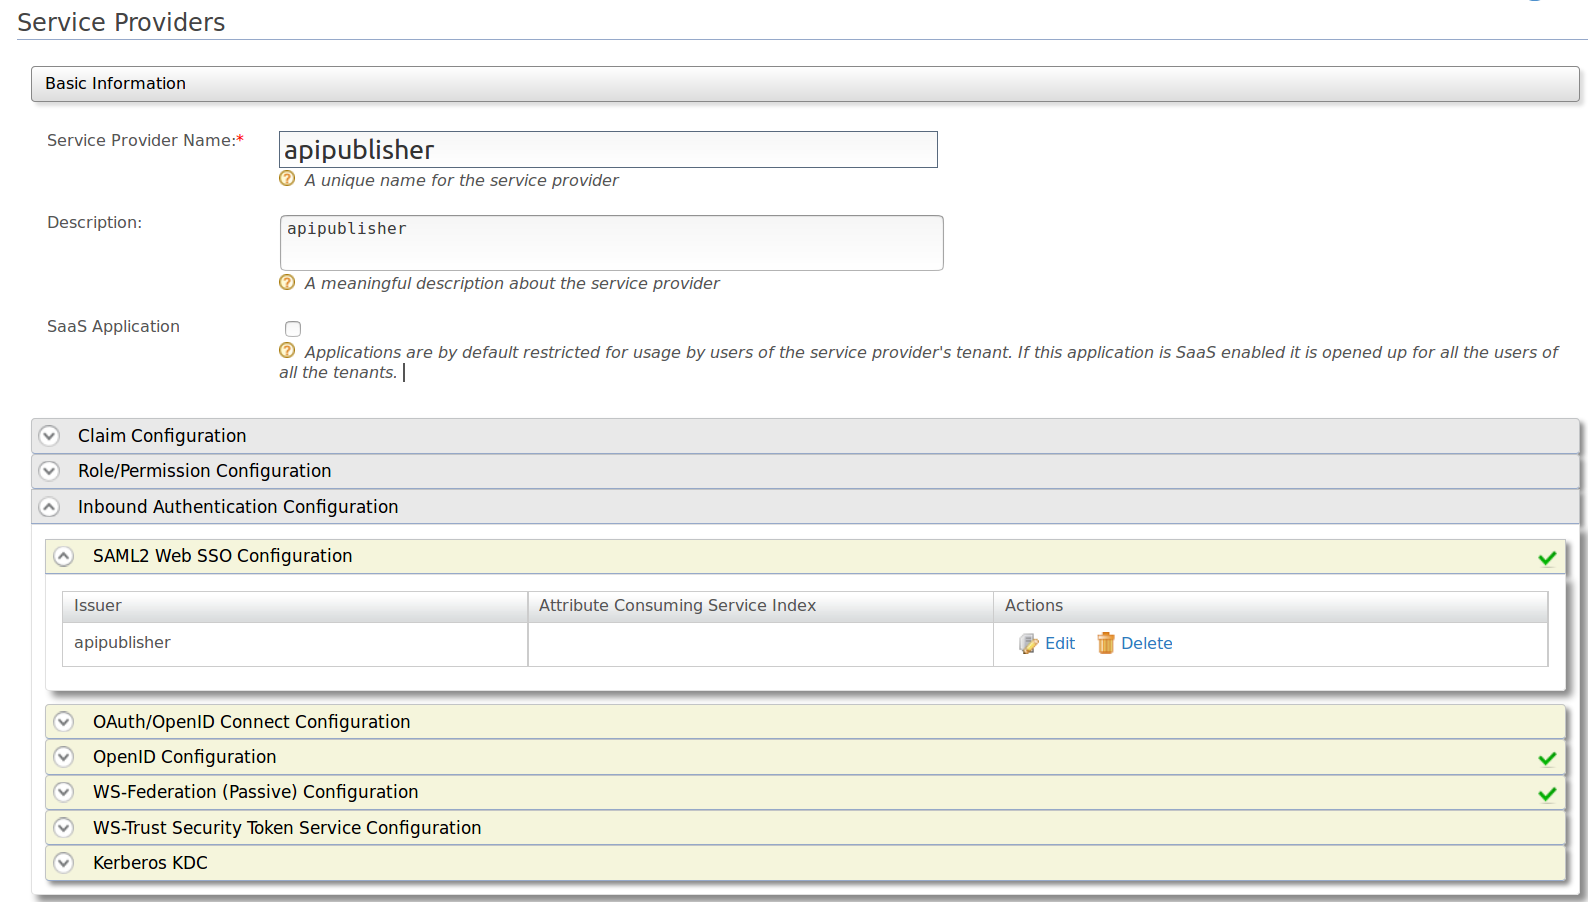
Then let's add service provider as follows. Provide service provider name as follows.

Screenshot from 2017-03-09 15-29-50.png


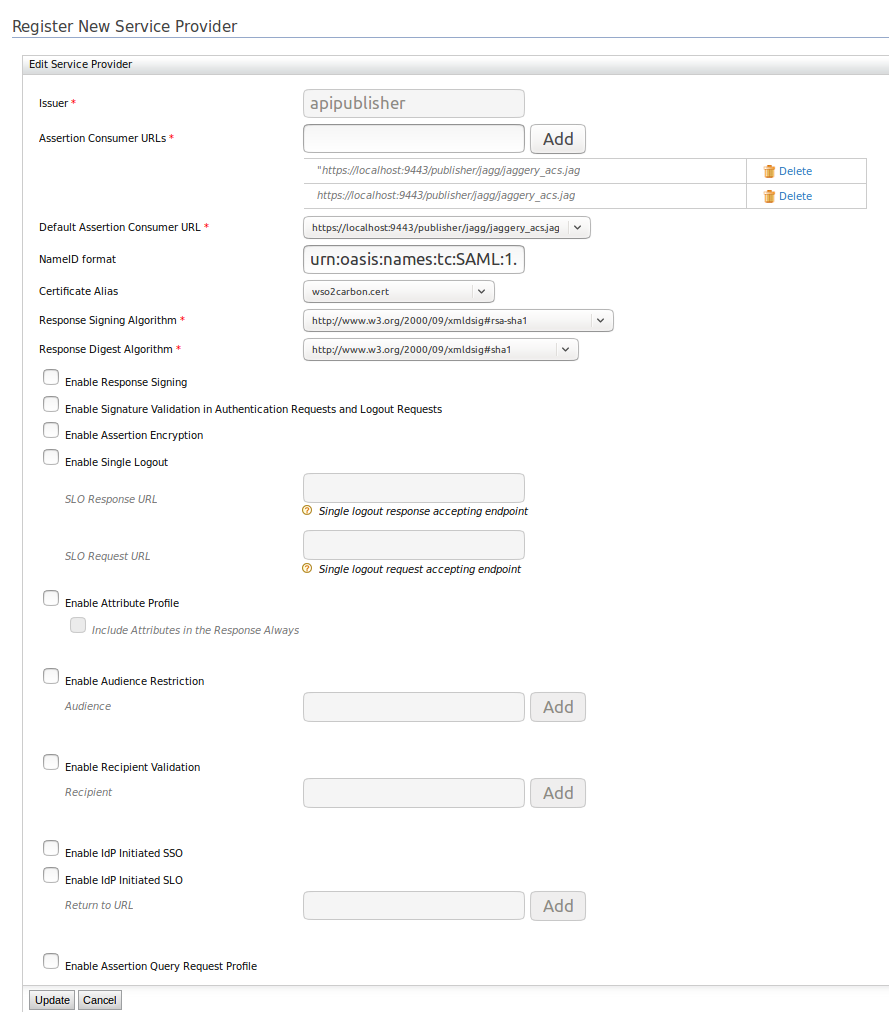
Then go to SAML2 web SSO configuration and provide following configurations. Then save it and move forward.


Screenshot from 2017-03-09 15-30-08.png

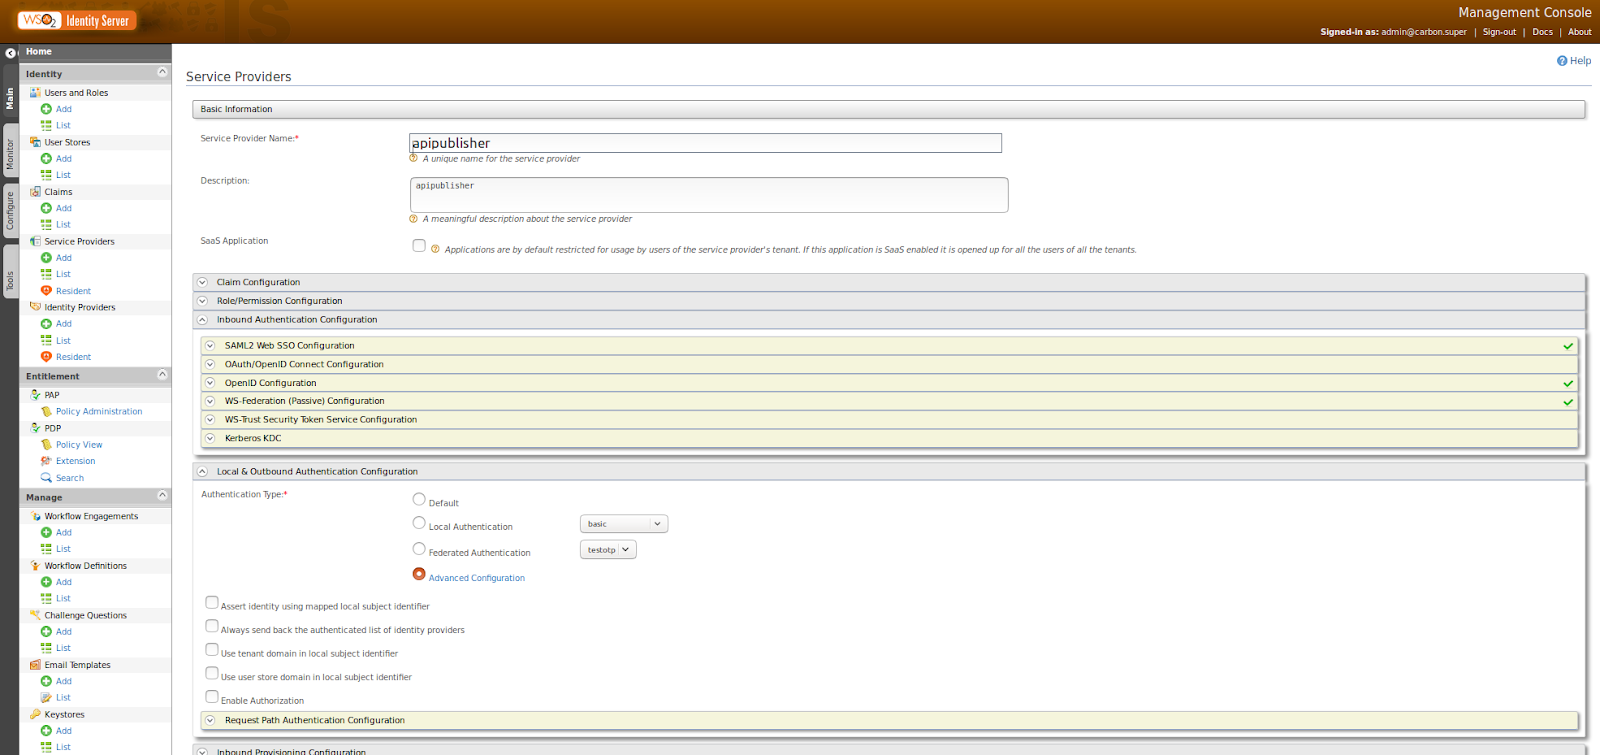
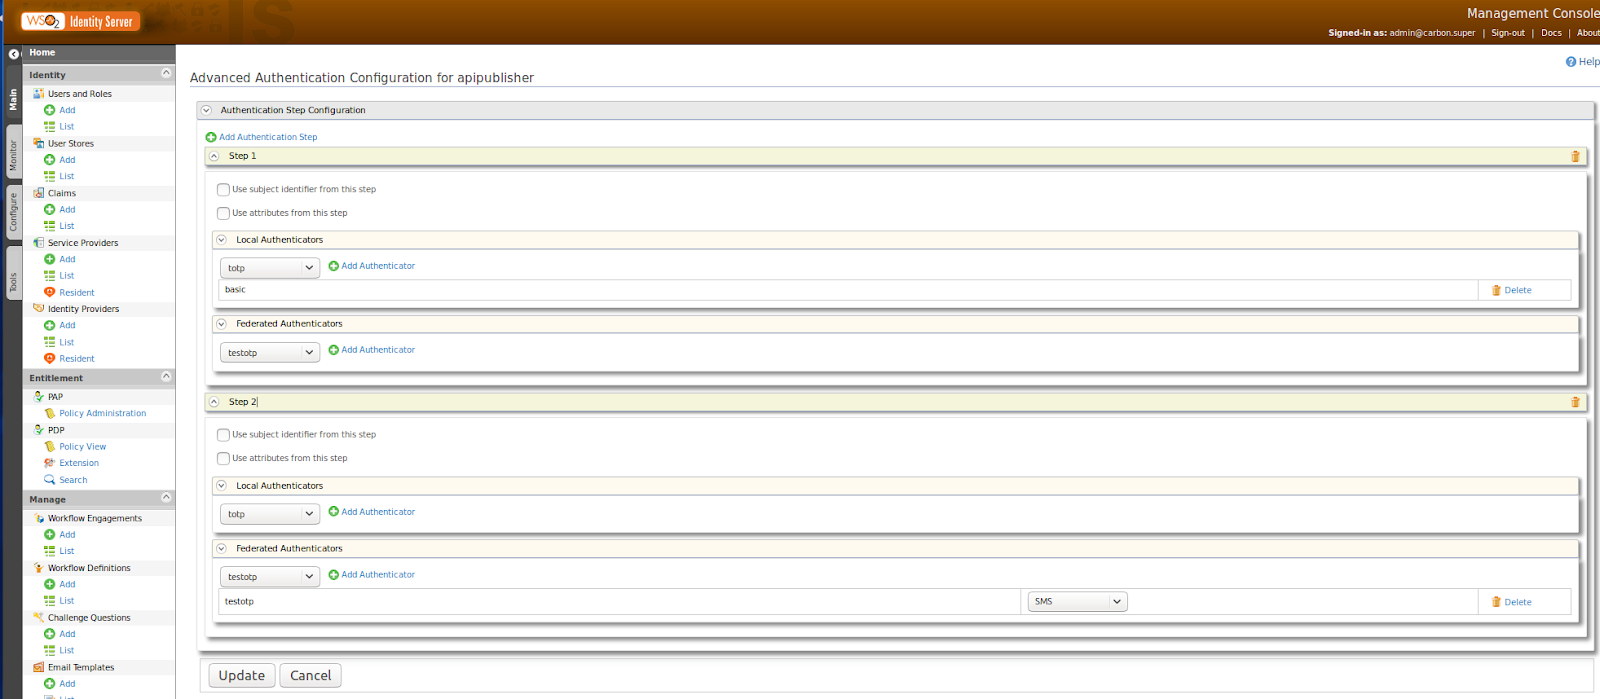
Now save this service provider and come back to identity server UI. Then we need to configure local and outbound authentication steps as follows. We need to configure advanced authentication configuration as we are going to configure multi step authentication.

Screenshot from 2017-03-09 16-47-42.png

Then add username and password based local authentication as first steps and add out SMS otp as second authentication step. Now we can save this configuration and move forward.

Screenshot from 2017-03-09 16-48-12.png

Also add following configuration to wso2is-5.3.0/repository/conf/identity/application-authentication.xml file and restart server.


<AuthenticatorConfig name="SMSOTP" enabled="true">
             <Parameter name="SMSOTPAuthenticationEndpointURL">https://localhost:9444/smsotpauthenticationendpoint/smsotp.jsp</Parameter>
             <Parameter name="SMSOTPAuthenticationEndpointErrorPage">https://localhost:9444/smsotpauthenticationendpoint/smsotpError.jsp</Parameter>
             <Parameter name="RetryEnable">true</Parameter>
             <Parameter name="ResendEnable">true</Parameter>
             <Parameter name="BackupCode">false</Parameter>
             <Parameter name="EnableByUserClaim">false</Parameter>
             <Parameter name="MobileClaim">true</Parameter>
             <Parameter name="enableSecondStep">true</Parameter>
             <Parameter name="SMSOTPMandatory">true</Parameter>
             <Parameter name="usecase">association</Parameter>
             <Parameter name="secondaryUserstore">primary</Parameter>
             <Parameter name="screenUserAttribute">http://wso2.org/claims/mobile</Parameter>
             <Parameter name="noOfDigits">4</Parameter>
             <Parameter name="order">backward</Parameter>
       </AuthenticatorConfig>


Now it's time to configure API publisher to configure, so it can work with identity server to do authentication based on SSO. Add following configuration to /wso2am-2.1.0/repository/deployment/server/jaggeryapps/publisher/site/conf/site.js file.

 "ssoConfiguration" : {
       "enabled" : "true",
       "issuer" : "apipublisher",
       "identityProviderURL" : "https://localhost:9444/samlsso",
       "keyStorePassword" : "",
       "identityAlias" : "",
       "verifyAssertionValidityPeriod":"true",
       "timestampSkewInSeconds":"300",
       "audienceRestrictionsEnabled":"true",
       "responseSigningEnabled":"false",
       "assertionSigningEnabled":"true",
       "keyStoreName" :"",
       "signRequests" : "true",
       "assertionEncryptionEnabled" : "false",
       "idpInit" : "false",
    }

Now go to API publisher URL and you will be directed to identity server login page. There you will see following window and you have to enter user name and password there.


Then once you completed it you will get SMS to number you have mentioned in your user profile. If you havent already added mobile number to your user profile please add by login to identity server. You can go to users and roles window and select user profile from there. Then edit it as follows.


Then enter the OTP you obtain in next window.


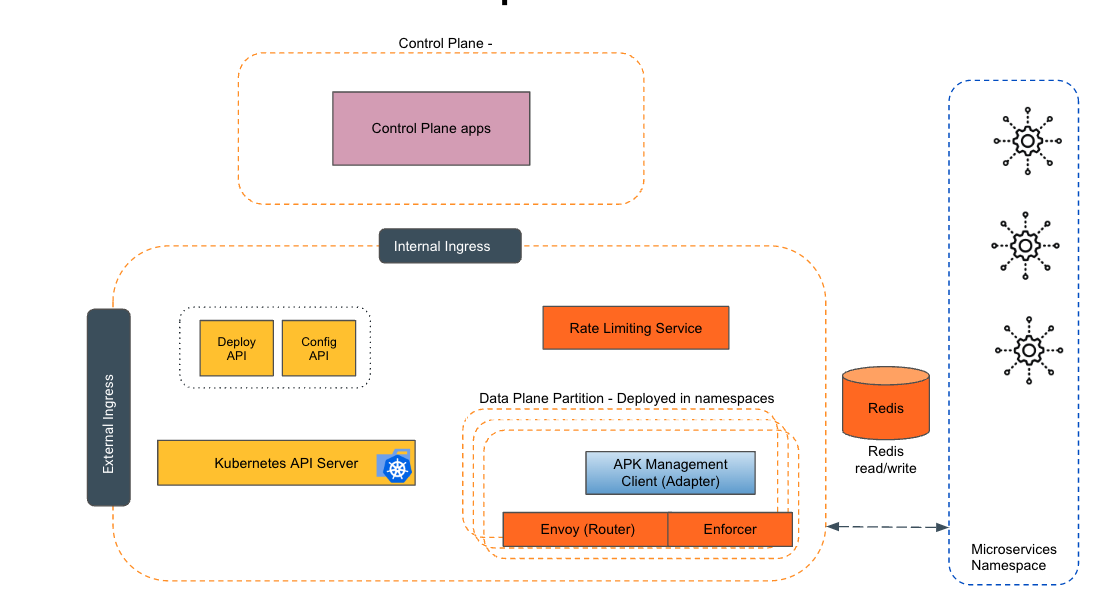
Empowering the Future of API Management: Unveiling the Journey of WSO2 API Platform for Kubernetes (APK) Project and the Anticipated Alpha Release

  Introduction In the ever-evolving realm of API management, our journey embarked on the APK project eight months ago, and now, with great a...