How to import, export APIs with WSO2 API Manager 1.9.0

API Manager 1.9.0 we have introduced API import/export capability. With that we will be able to to download API from one platform and export it to other platform.
With this feature we will retrieve all the required meta information and registry resources for the requested API and generate a zipped archive.
And then we can upload that to other API Manager server.

To try this first you need to get web application source code from this git repo(https://github.com/thilinicooray/api-import-export).

Then build and generate web application.
After that you have to deploy that in API Manager. For that you may use web application ui. Login to management console as admin user and go to this link.

Home     > Manage     > Applications     > Add     > Web Applications

Then add web application.
Zipped archive of API will consists of the following structure

-
|_ Meta Information
   |_ api.json
|_ Documents
   |_ docs.json
|_ Image
   |_ icon.
|_ WSDL
   |_ -.wsdl
|_ Sequences
   |_ In Sequence
      |_.xml
   |_ Out Sequence
      |_.xml
   |_ Fault Sequence
      |_.xml
API Import accepts the exported zipped archive and create an API in the imported environment.

This feature has been implemented as a RESTful API.

Please use following curl command to export API.
Here you need to provide basic auth headers for admin user.
And need to pass following parameters.

Name of the API as > name=test-sanjeewa
Version of API > version=1.0.0
Provider of API > provider=admin

curl -H "Authorization:Basic YWRtaW46YWRtaW4=" -X GET "https://localhost:9443/api-import-export/export-api?name=test-sanjeewa&version=1.0.0&provider=admin" -k > exportedApi.zip
Now you will see downloaded zip file in current directory.

Then you need to import downloaded zip file to other deployment.
See following sample command for that.

Here file is above downloaded archive file.
And service call should go to the server we need to import this API. Here i'm running my second server with port offset one. So url would be "https://localhost:9444"
curl -H "Authorization:Basic YWRtaW46YWRtaW4=" -F file=@"/home/sanjeewa/work/exportedApi.zip" -k -X POST "https://localhost:9444/api-import-export/import-api"
Now go to API publisher and change API life cycle to publish(by default imported APIs will be in created state once you imported).

Then go to API store and subscribe,use it :-)
Thanks thilini and chamin for getting this done.

Planning large scale API Management deployment with clustering - WSO2 API Manager

When we do capacity we need to consider several factors. Here i will take basic use case as scenario and explain production recommendations.

With default configuration we can have following TPS per gateway node.
Single gateway = 1000 TPS
Single gateway by adding 30% buffer = 1300

Normally following are mandatory for HA setup

WSO2 API Manager : Gateway - 1-active. 1-passive
WSO2 API Manager : Authentication - 1-active. 1-passive
WSO2 API Manager : Publisher - 1-active. 1-passive
WSO2 API Manager : Store - 1-active. 1-passive

You can compute exact instance count

Hardware Recommendation
Physical :
3GHz Dual-core Xeon/Opteron (or latest), 4 GB RAM (minimum : 2 GB for JVM and 2GB for the OS, 10GB free disk space (minimum) disk based on the expected storage requirements (calculate by considering the file uploads and the backup policies) . (e.g if 3 Carbon instances running in a machine, it requires 4 CPU, 8 GB RAM 30 GB free space)
Virtual Machine :
2 compute units minimum (each unit having 1.0-1.2 GHz Opteron/Xeon processor) 4 GB RAM 10GB free disk space. One cpu unit for OS and one for JVM. (e.g if 3 Carbon instances running require VM of 4 compute units 8 GB RAM 30 GB free space)
EC2 : c3.large instance to run one Carbon instance. (e.g if 3 Carbon instances EC2 Extra-Large instance) Note : based on the I/O performance of c3.large instance, it is recommended to run multiple instances in a Larger instance (c3.xlarge or c3.2xlarge).


When we setup clusters normally we will have gateway cluster, store-publisher cluster and key manager clusters separately.
Let me explain why we need this.
In API Manager all store and publisher clusters need to be in same cluster as they need to do cluster communications related to registry artifacts.
When you create API from publisher it should immediately appear in store node. For this registry cache should be shared between store and publisher.
To do that replication we need to have them in single cluster.

In the same way we need to have all gateway nodes in single cluster as they need to share throttle counts and other run time specific data.

And having few(10-15) gateway nodes in single cluster will not cause any issue.
Only thing we need to keep in mind is when node count increases(within cluster) cluster communication may take very small additional time.

So in production deployments normally we will not cluster all nodes together.
Instead we will cluster gateways, key managers, Store/publishers separately.

How to add API using curl commands using 3 steps in UI design/implement/manage

 Listing these instructions as it can help to anyone.

Create a API with the normal add api with design/implement/manage calls.
Execute following three commands so the API will be created, this is how we create API from the UI.

curl -F name="test-api" -F version="1.0" -F provider="admin" -F context="/test-apicontext" -F visibility="public" -F roles="" -F apiThumb="" -F description="" -F tags="testtag" -F action="design" -F swagger='{"apiVersion":"1.0","swaggerVersion":"1.2","authorizations":{"oauth2":{"scopes":[],"type":"oauth2"}},"apis":[{"index":0,"file":{"apiVersion":"1.0","basePath":"http://10.100.5.112:8280/test-apicontext/1.0","swaggerVersion":"1.2","resourcePath":"/test","apis":[{"index":0,"path":"/test","operations":[{"nickname":"get_test","auth_type":"Application & Application User","throttling_tier":"Unlimited","method":"GET","parameters":[{"dataType":"String","description":"AccessToken","name":"Authorization","allowMultiple":false,"required":true,"paramType":"header"},{"description":"RequestBody","name":"body","allowMultiple":false,"required":true,"type":"string","paramType":"body"}]},{"nickname":"options_test","auth_type":"None","throttling_tier":"Unlimited","method":"OPTIONS","parameters":[{"dataType":"String","description":"AccessToken","name":"Authorization","allowMultiple":false,"required":true,"paramType":"header"},{"description":"RequestBody","name":"body","allowMultiple":false,"required":true,"type":"string","paramType":"body"}]}]}]},"description":"","path":"/test"}],"info":{"title":"test-api","termsOfServiceUrl":"","description":"","license":"","contact":"","licenseUrl":""}}' -k -X POST -b cookies https://localhost:9443/publisher/site/blocks/item-design/ajax/add.jag


curl -F implementation_methods="endpoint" -F endpoint_type="http" -F endpoint_config='{"production_endpoints":{"url":"http://appserver/resource/ycrurlprod","config":null},"endpoint_type":"http"}' -F production_endpoints="http://appserver/resource/ycrurlprod" -F sandbox_endpoints="" -F endpointType="nonsecured" -F epUsername="" -F epPassword="" -F wsdl="" -F wadl="" -F name="test-api" -F version="1.0" -F provider="admin" -F action="implement" -F swagger='{"apiVersion":"1.0","swaggerVersion":"1.2","authorizations":{"oauth2":{"scopes":[],"type":"oauth2"}},"apis":[{"index":0,"file":{"apiVersion":"1.0","basePath":"http://10.100.5.112:8280/test-apicontext/1.0","swaggerVersion":"1.2","resourcePath":"/test","apis":[{"index":0,"path":"/test","operations":[{"nickname":"get_test","auth_type":"Application & ApplicationUser","throttling_tier":"Unlimited","method":"GET","parameters":[{"dataType":"String","description":"AccessToken","name":"Authorization","allowMultiple":false,"required":true,"paramType":"header"},{"description":"RequestBody","name":"body","allowMultiple":false,"required":true,"type":"string","paramType":"body"}]},{"nickname":"options_test","auth_type":"None","throttling_tier":"Unlimited","method":"OPTIONS","parameters":[{"dataType":"String","description":"AccessToken","name":"Authorization","allowMultiple":false,"required":true,"paramType":"header"},{"description":"RequestBody","name":"body","allowMultiple":false,"required":true,"type":"string","paramType":"body"}]}]}]},"description":"","path":"/test"}],"info":{"title":"test-api","termsOfServiceUrl":"","description":"","license":"","contact":"","licenseUrl":""}}' -k -X POST -b cookies https://localhost:9443/publisher/site/blocks/item-design/ajax/add.jag


curl -F default_version_checked="" -F tier="Unlimited" -F transport_http="http" -F transport_https="https" -F inSequence="none" -F outSequence="none" -F faultSequence="none" -F responseCache="disabled" -F cacheTimeout="300" -F subscriptions="current_tenant" -F tenants="" -F bizOwner="" -F bizOwnerMail="" -F techOwner="" -F techOwnerMail="" -F name="test-api" -F version="1.0" -F provider="admin" -F action="manage" -F swagger='{"apiVersion":"1.0","swaggerVersion":"1.2","authorizations":{"oauth2":{"scopes":[],"type":"oauth2"}},"apis":[{"index":0,"file":{"apiVersion":"1.0","basePath":"http://10.100.5.112:8280/test-apicontext/1.0","swaggerVersion":"1.2","resourcePath":"/test","apis":[{"index":0,"path":"/test","operations":[{"nickname":"get_test","auth_type":"Application & ApplicationUser","throttling_tier":"Unlimited","method":"GET","parameters":[{"dataType":"String","description":"AccessToken","name":"Authorization","allowMultiple":false,"required":true,"paramType":"header"},{"description":"RequestBody","name":"body","allowMultiple":false,"required":true,"type":"string","paramType":"body"}]},{"nickname":"options_test","auth_type":"None","throttling_tier":"Unlimited","method":"OPTIONS","parameters":[{"dataType":"String","description":"AccessToken","name":"Authorization","allowMultiple":false,"required":true,"paramType":"header"},{"description":"RequestBody","name":"body","allowMultiple":false,"required":true,"type":"string","paramType":"body"}]}]}]},"description":"","path":"/test"}],"info":{"title":"test-api","termsOfServiceUrl":"","description":"","license":"","contact":"","licenseUrl":""}}' -F outSeq="" -F faultSeq="json_fault" -F tiersCollection="Unlimited" -k -X POST -b cookies https://localhost:9443/publisher/site/blocks/item-design/ajax/add.jag

Deploy WSO2 API Manager across multiple datacenters - High availability for API Manager

Here in this post i will discuss how we can deploy WSO2 API Manager across multiple data centers.


Problems with normal clustered deployment across multiple data centers.
  • The databases are accessed (by the gateway node on Secondary data center) over two regions. (This will slow down the server startup as there are multiple DB calls get invoked)
  • Publishing API to gateway is done through web-service calls across data centers.
  • Since the Gateway at Secondary site uses the KayManager node at Master site (Please correct us, if we have mistaken this), API access token validation is done through web-service calls across data centers.
  • As we observed gateways in both deployments will not be synced-up properly.
  • Throttle counts will be maintain per data center.
So this will not be scalable solution as servers need to communicate across data centers.
Large number of database calls and web service calls may cause extreme slowness and in future that may cause to lot of other issues.
In this this kind of situations ideal solution would be having one master data center and few read only data centers.
Still we will not be able to overcome issues happen due to missing cluster communicate across nodes. But we will be able to perform basic tasks across all data centers.

Master data center.
API store, publisher, gateway, key manager will be deployed here and all are connected to read/write databases.
All API creation subscription creation, token generation should happen here.
Once new API published it will be pushed to some servers like dropbox or file server(artifact server). Then read only nodes have to pick API config from there(we may not be able to use deployment synchronizer here).
That way only we can avoid API publishing call between data centers.


Read only data centers.
In this data canters we will have gateway and key management nodes and those will only serve API requests.
In this data center we will have database servers which are synch up with master data center databases. We can have replicated database cluster and replicate data.
Also we may not be able to enable clustering across data centers. Due to that data centers may keep their own throttle counters etc(which we cannot avoid).

Here is a sample deployment diagram for suggested solution.

​

How to use Authorization code grant type (Oauth 2.0) with WSO2 API Manager 1.8.0

1. Create API in WSO2 API Manager publisher and create application in API store. When you create application give some call back url as follows. http://localhost:9764/playground2/oauth2client
Since i'm running playground2 application in application server with port offset 1 i used above address. But you are free to use any url.

2. Paste the following on browser - set your value for client_id

Sample command
curl -v -X POST --basic -u YOUR_CLIENT_ID:YOUR_CLIENT_SECRET -H "Content-Type: application/x-www-form-urlencoded;charset=UTF-8" -k -d "client_id=YOUR_CLIENT_ID&grant_type=authorization_code&code=YOUR_AUTHORIZATION_CODE&redirect_uri=https://localhost/callback" https://localhost:9443/oauth2/token

Exact command:
http://localhost:8280/authorize?response_type=code&scope=PRODUCTION&client_id=O2OkOAfBQlicQeq5ERgE7Wh4zeka&redirect_uri=http://localhost:9764/playground2/oauth2client

3. Then it will return something like this. Copy the authorization code from:
Response from step 02:
http://localhost:9764/playground2/oauth2client?code=e1934548d0a0883dd5734e24412310

4. Get the access token and ID token from following

Sample command:
curl -v -X POST --basic -u YOUR_CLIENT_ID:YOUR_CLIENT_SECRET -H "Content-Type: application/x-www-form-urlencoded;charset=UTF-8" -k -d "client_id=YOUR_CLIENT_ID&grant_type=authorization_code&code=YOUR_AUTHORIZATION_CODE&redirect_uri=https://localhost/callback" https://localhost:9443/oauth2/token

Exact command:
curl -v -X POST --basic -u O2OkOAfBQlicQeq5ERgE7Wh4zeka:Eke1MtuQCHj1dhM6jKsIdxsqR7Ea -H "Content-Type: application/x-www-form-urlencoded;charset=UTF-8" -k -d "client_id=O2OkOAfBQlicQeq5ERgE7Wh4zeka&grant_type=authorization_code&code=e1934548d0a0883dd5734e24412310&redirect_uri=http://localhost:9764/playground2/oauth2client" http://localhost:8280/token

Response from step 04:
{"scope":"default","token_type":"bearer","expires_in":3600,
"refresh_token":"a0d9c7c4f96baed42da2c167e1ebbb75","access_token":"2de7da7e3822cf75fd7983cfe1337ec"}

5. Now call your API with the access token from step-4

curl -k -H "Authorization: Bearer 2de7da7e3822cf75fd7983cfe1337ec"
http://10.100.1.65:8280/test-api/1.0.0

How to add custom message to WSO2 API Publisher - Show custom message based on user input or selections

In API Manager we can add sub themes and change look and feel of jaggery applications.
Please follow below instructions. Here i have listed instructions to add new warning message when you changed API visibility.

(1) Navigate to "/repository/deployment/server/jaggeryapps/publisher/site/themes/default/subthemes" directory.
(2) Create a directory with the name of your sub theme. For example "new-theme".
(3) Copy /repository/deployment/server/jaggeryapps/publisher/site/themes/default/templates/item-design/template.jag to the new subtheme location "/repository/deployment/server/jaggeryapps/publisher/site/themes/default/subthemes/new-theme/templates/item-design/template.jag".

(4) Go to template.jag file in sub themes directory we created and find following code block.

        $('#visibility').change(function(){
            var visibility = $('#visibility').find(":selected").val();
            if (visibility == "public" || visibility == "private" || visibility == "controlled"){
                $('#rolesDiv').hide();
            } else{
                $('#rolesDiv').show();
            }
        });
Then change it as follows. You can change message if need.

        $('#visibility').change(function(){
            var visibility = $('#visibility').find(":selected").val();

            if (visibility != "public"){
            jagg.message({content:"You have changed visibility of API, so based on visibility subscription availability may change",type:"warn"});
            }

            if (visibility == "public" || visibility == "private" || visibility == "controlled"){
                $('#rolesDiv').hide();
            } else{
                $('#rolesDiv').show();
            }
        });


(5) Edit "/repository/deployment/server/jaggeryapps/publisher/site/conf/site.json" file as below in order to make the new sub theme as the default theme.
        "theme" : {
               "base" : "fancy",
                "subtheme" : "new-theme"
        }


Here i have listed generic instructions to change this using sub themes.

Update key stores in WSO2 API Manager and Identity server(production recommendation )


Here in this post i will discuss how we can generate keystores and include them to WSO2 products before they deploy in production deployment.

Most of organizations have their own crt file and keys. So lets see how we can use them to create certificates required for WSO2 servers and deploy them.

Step 1: Follow follow steps to update the keystore.

openssl pkcs12 -export -in /etc/pki/tls/certs/sanjeewa-com.crt -inkey /etc/pki/tls/private/private-key.key -name "wso2sanjeewa" -certfile /etc/pki/tls/certs/DigiCertCA.crt -out wso2sanjeewa.pfx
Enter Export Password:
Verifying - Enter Export Password:

/usr/java/default/bin/keytool -importkeystore -srckeystore wso2sanjeewa.pfx -srcstoretype pkcs12 -destkeystore wso2sanjeewa.jks -deststoretype JKS
Enter destination keystore password: 
Re-enter new password:
Enter source keystore password: 
Entry for alias wso2sanjeewa successfully imported.
Import command completed:  1 entries successfully imported, 0 entries failed or cancelled

 /usr/java/default/bin/keytool -export -alias wso2sanjeewa -keystore wso2sanjeewa.jks -file wso2sanjeewa.pem
Enter keystore password: 
Certificate stored in file

/usr/java/default/bin/keytool -import -alias wso2sanjeewa -file /opt/o2/wso2sanjeewa.pem -keystore client-truststore.jks -storepass wso2carbon
Certificate was added to keystore

Now we have all files we need to copy.

Step 2: We need to copy them to /opt/o2/WSO2Servers/wso2am-1.8.0/repository/resources/security
This file path change with product you use(normally its /repository/resources/security ).
We need to do this for all products deployed in this deployment.

Step 3: Then after that you need to find all occurrence of wso2carbon.jks( grep -rnw 'wso2carbon.jks') and replace them with wso2sanjeewa.jks file we generated in above steps.

Step 4:Then search for alias(grep -rnw 'alias') and KeyAlias(grep -rnw 'KeyAlias') in all files in wso2Server. If you found them as wso2carbon then only replace it with wso2sanjeewa.

We need to follow these steps very carefully. Here we have listed filenames and changed parameters for your reference.

While you carry out step 3 and 4 for IS you need to change following files and lines

repository/conf/security/application-authentication.xml:96:         
<Parameter name="TrustStorePath">/repository/resources/security/wso2sanjeewa.jks</Parameter>

repository/conf/identity.xml:244:               
<Location>${carbon.home}/repository/resources/security/wso2sanjeewa.jks</Location>

repository/conf/carbon.xml:302:            
<Location>${carbon.home}/repository/resources/security/wso2sanjeewa.jks</Location>

repository/conf/carbon.xml:308:            
<KeyAlias>wso2sanjeewa</KeyAlias>

repository/conf/carbon.xml:318:            
<Location>${carbon.home}/repository/resources/security/wso2sanjeewa.jks</Location>

repository/conf/carbon.xml:324:           
<KeyAlias>wso2sanjeewa</KeyAlias>


While you carry out step 3 and 4 for APIM you need to change following files and lines

repository/deployment/server/jaggeryapps/store/site/conf/site.json:14:       
"identityAlias" : "wso2sanjeewa",

repository/deployment/server/jaggeryapps/store/site/conf/site.json:16:        
"keyStoreName" :"/opt/o2/WSO2Servers/wso2am-1.8.0/repository/resources/security/wso2sanjeewa.jks"

repository/deployment/server/jaggeryapps/publisher/site/conf/site.json:14:        
"identityAlias" : "wso2sanjeewa",

repository/deployment/server/jaggeryapps/publisher/site/conf/site.json:16:        
"keyStoreName" :"/opt/o2/WSO2Servers/wso2am-1.8.0/repository/resources/security/wso2sanjeewa.jks"

repository/conf/security/secret-conf.properties:21:
keystore.identity.location=repository/resources/security/wso2sanjeewa.jks

repository/conf/security/secret-conf.properties:23:
keystore.identity.alias=wso2sanjeewa

repository/conf/security/secret-conf.properties:32:
keystore.trust.alias=wso2sanjeewa

repository/conf/carbon.xml:313:            
<Location>${carbon.home}/repository/resources/security/wso2sanjeewa.jks</Location>

repository/conf/carbon.xml:319:            
<KeyAlias>wso2sanjeewa</KeyAlias>

repository/conf/carbon.xml:329:            
<Location>${carbon.home}/repository/resources/security/wso2sanjeewa.jks</Location>

repository/conf/carbon.xml:335:            
<KeyAlias>wso2sanjeewa</KeyAlias>


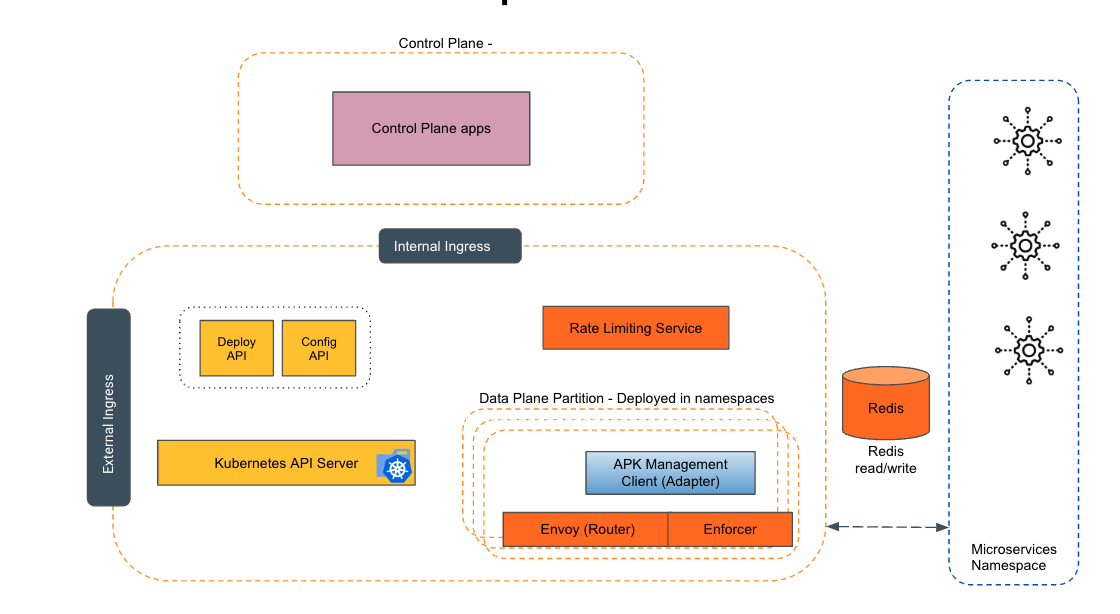
Empowering the Future of API Management: Unveiling the Journey of WSO2 API Platform for Kubernetes (APK) Project and the Anticipated Alpha Release

  Introduction In the ever-evolving realm of API management, our journey embarked on the APK project eight months ago, and now, with great a...