Simplest way to Display Pregressing bar - BlackBerry Java programming

You can create the instance of the  ProgressBar and you can pass the time out and display messages to progressing bar.

import net.rim.device.api.ui.UiApplication;
import net.rim.device.api.ui.component.Dialog;
import net.rim.device.api.ui.component.GaugeField;
import net.rim.device.api.ui.component.LabelField;
import net.rim.device.api.ui.container.DialogFieldManager;
import net.rim.device.api.ui.container.PopupScreen;

public class ProgressBar extends Thread 
{
    private int maximum, timeout;
    private boolean useful;
    private PopupScreen popup;
    private GaugeField gaugeField;
    public ProgressBar(String title, int maximum, int timeout)
    {
        this.maximum = maximum;
        this.timeout = timeout;
        DialogFieldManager manager = new DialogFieldManager();
        popup = new PopupScreen(manager);
        gaugeField = new GaugeField(null, 1, maximum, 1, GaugeField.NO_TEXT);
        manager.addCustomField(new LabelField(title));
        manager.addCustomField(gaugeField);
    }

    public void run() 
    {
        useful = true;
        UiApplication.getUiApplication().invokeLater(new Runnable() 
        {
            public void run() 
            {
                UiApplication.getUiApplication().pushScreen(popup);
               
            }
        });

        int iterations = 0;
        while (useful)
        {
            try 
            {
                Thread.sleep(timeout);
            } 
            catch (Exception e) 
            {
               
            }
            if (++iterations > maximum)
            {
                useful =false;
                UiApplication.getUiApplication().invokeLater(new Runnable() 
                {
                    public void run() 
                    {
                        Dialog.alert("Successfully  Completed");
                         System.exit(0);
                    }
                });
               
                iterations = 1;
            }
            gaugeField.setValue(iterations);
        }

        if (popup.isDisplayed()) 
        {
            UiApplication.getUiApplication().invokeLater(new Runnable() 
            {
                public void run() 
                {
                    UiApplication.getUiApplication().popScreen(popup);
                }
            });
        }
    }

    public synchronized void remove() 
    {
        useful = false;
    }
}

How to do POSTRequest (in a secured way) in BlackBerry Mobile device

If you need to do a secured post operation with server we can use Authentication token from the server side that obtained when we log into system. And do the server side implementation to check the authentication token per each request coming from the user(client). Its better if we can delete that token periodically. And ask user to re login if that key is expired.Here in this post i will show how to send request with the authentication token. Remember that we need to set APN unless we configured device properly. Here is the separate post on how to Get APN key without worrying about the service provider that we used(Which contains most of service providers in united states and Canada). If you operator not available there add it following format. Later i will add server side code also.

<MCC,MNC>APN-KEY</MCC,MNC>
Here is the example
<310,160>wap.voicestream.com</310,160>

Here is the code for process post request to server


/**
     * @param serviceUrl
     * @param authToken
     * @param requestData
     * @return String
     * @throws IOException
     * @throws ServerException
     * static String processPOSTRequest(String serviceUrl,String authToken, String requestData)
     */
    public static String processPOSTRequest(String serviceUrl,String authToken, String requestData) throws IOException,ServerException {

    HttpConnection httpConnection = null;
    OutputStream streamOutput = null;
    InputStream inputStream = null;
    StringBuffer strBuffer = new StringBuffer();
    String response = "";

    try {
 //Here getAPN() method gives you APN key for particular network operator
 //I have written separate blog post on getting APN key for any operator
        httpConnection = (HttpConnection) Connector.open(serviceUrl.concat(getAPN()), Connector.READ_WRITE);
        httpConnection.setRequestMethod(HttpConnection.POST);
        httpConnection.setRequestProperty("Content-Length", Integer.toString(requestData.length()));
        httpConnection.setRequestProperty("Content-Type", "text/xml");
        if (authToken.length() > 0) {
        httpConnection.setRequestProperty("Authorization",Base64OutputStream.encodeAsString(authToken
                .getBytes("UTF-8"), 0, authToken
                .getBytes("UTF-8").length, false, false));
        }
        streamOutput = httpConnection.openOutputStream();

        streamOutput.write(requestData.getBytes(), 0, requestData
            .getBytes().length);
        streamOutput.flush();

        int responseCode = httpConnection.getResponseCode();

        if (responseCode != 200) {
        ServerException getErrorExceptions = new ServerException(
            responseCode, httpConnection.getResponseMessage());
        throw getErrorExceptions;
        }

        inputStream = httpConnection.openInputStream();

        int character;

        while (-1 != (character = inputStream.read())) {
        strBuffer.append((char) character);
        }

        response =  strBuffer.toString();

    } finally {
        try {
        streamOutput.close();
        inputStream.close();
        httpConnection.close();
        } catch (Exception e) {
        //not related to user error if this exception happens due to
        //unavailability then connection assigns to null and then implicitly removes it
        }
        httpConnection = null;
        inputStream = null;
        streamOutput = null;
    }

    return response;
    }

How to detect transparent pixel in java and how change transparent pixels

In images we represent each pixel represent by 32 bits.Bit assignment is doing as follows. Normally in Buffered images if we used type TYPE_INT_ARGB we do this way.See the image shown below.


So you can see if we need to detect alpha part we have to consider bits 31 to 24 so we need to shift right side by 24 bits then color related bits will go out. Then we will have only Alpha bits at location 7 to 0 then we will do and operation with 0xFF (that means 11111111) so we will get only 0 to 7 bits.
Same way you can use to detect red ,blue and green components by shifting 0,8,16.

Next we will see how we can do this by programme using java language.Here below you can see how to load gif transparent image and how to store it after modification to transparent pixels.
import javax.imageio.ImageIO;
import javax.swing.*;
import java.awt.*;
import java.awt.image.BufferedImage;
import java.io.File;

public class test {
    public static void main() {
        // Get Image
        ImageIcon icon = new ImageIcon("/home/sanjeewa/Desktop/xparent.gif");
        Image image = icon.getImage();
        // Create empty BufferedImage, sized to Image
        BufferedImage buffImage =
                new BufferedImage(
                        image.getWidth(null),
                        image.getHeight(null),
                        BufferedImage.TYPE_INT_ARGB);
        Graphics g = buffImage.createGraphics();
        g.drawImage(image, 0, 0, null);
        //Dispose the Graphics
        g.dispose();
        //Here 2 for loops used for iterate through each and every pixel in image
        for (int i = 0; i < buffImage.getWidth(); i++) {
            for (int j = 0; j < buffImage.getHeight(); j++) {
                //signed bit shift right
                /*
                How to extract different color components
                blue = pix & 0xFF;
                green = (pix>>8) & 0xFF;
                red = (pix>>16) & 0xFF;
                alpha = (pix>>24) & 0xFF;
                 */
                int alpha = (buffImage.getRGB(i, j) >> 24) & 0xff;
                if (alpha == 0) {
                   //Now we will have pixel with Alpha 0 (Transparent pixel)
                   //As example If you need to fill transparent pixels with white color
                   //use this code 
                   //buffImage.setRGB(i, j, Color.white.getRGB());
                   buffImage.setRGB(i, j, 0);
                } else {

                }
            }
        }
        try {
             //Write back modified file to file system
            String file_name = "/home/sanjeewa/Desktop/sss.png";
            File file = new File(file_name);
            ImageIO.write(buffImage, "png", file);
        } catch (Exception e) {
        }
    }
}

How to do Load test against web service - Using java bench

write web service  and upload it to some web server

Then generate wsdl by type address as follows
http://appserver.cloud-test.wso2.com:9766/services/t/yyy.yyy/testB?wsdl

use soapui to generate soap message
Create new project and give wsdl to it


Then
get the request text
Copy it into request.xml file located inside the folder jababench folder

Then use the following command in command line to execute

java -jar benchmark.jar -p request.xml -n 100 -c 10 -k -H "SOAPAction: readResource" -T "text/xml; charset=UTF-8" http://appserver.cloud-test.wso2.com:9766/services/t/yyy.yyy/testB

usage: HttpBenchmark [options] [http://]hostname[:port]/path
-v Set verbosity level - 4 and above prints response
content, 3 and above prints information on headers, 2 and above prints
response codes (404, 200, etc.), 1 and above prints warnings and info.
-H
Add arbitrary header line, eg. 'Accept-Encoding:
gzip' inserted after all normal header lines. (repeatable)
-n Number of requests to perform for the benchmarking
session. The default is to just perform a single request which usually
leads to non-representative benchmarking results.
-T Content-type header to use for POST data.
-c Concurrency while performing the benchmarking
session. The default is to just use a single thread/client.
-h Display usage information.
-i Do HEAD requests instead of GET.
-k Enable the HTTP KeepAlive feature, i.e., perform
multiple requests within one HTTP session. Default is no KeepAlive
-p File containing data to POST.

here
http://appserver.cloud-test.wso2.com:9766/services/t/yyy.yyy/testB is my service endpoint
SOAPAction: readResource is my operation name
inside wsdl you will find operation name=readResource
here we used soap 1.1 wsdl then we must use -T "text/xml

then run your test
you will see following output


How to write xsd file (Enrich mediator) and use it with eclipse IDE

In general, a schema is an abstract representation of an object's characteristics and relationship. XSD specifies how to formally describe the elements in an Extensible Markup Language (XML) document.
Here i will briefly describe how to write simple XSD and use it with eclipse ide.

first we will consider simple xml file

<enrich xmlns:p="http://ws.apache.org/ns/synapse" xmlns:xsi="http://www.w3.org/2001/XMLSchema-instance">
<p:source clone="false" type="custom" xpath="/default/xpath"/>
<p:target action="replace" type="custom" xpath="/default/xpath"/>
</p:enrich>

Here is the XSd file to describe that XML file. Save this file as enrich.xsd

<xs:schema xmlns:xs="http://www.w3.org/2001/XMLSchema" elementFormDefault="qualified"
           targetNamespace="http://ws.apache.org/ns/synapse"
           xmlns="http://ws.apache.org/ns/synapse">
<xs:element name="enrich">
    <xs:complexType>
        <xs:sequence>       
    <xs:element name="source">
        <xs:annotation>
            <xs:documentation source="description">
                Source Configuration
            </xs:documentation>
        </xs:annotation>
                <xs:complexType>         
                    <xs:attribute name="clone" minOccurs="1" maxOccurs="1">
                        <xs:annotation>
                        <xs:documentation>
                             Weather message can be cloned or use as a reference during the enriching
                         </xs:documentation>
                        </xs:annotation>
                        <xs:restriction base="xs:string">
                     <xs:enumeration value="true"/>
                    <xs:enumeration value="false"/>
                 </xs:restriction>
                         </xs:attribute>
             <xs:attribute name="type" minOccurs="1" maxOccurs="1">
                         <xs:annotation>
                         <xs:documentation>
                            Type that the mediator use from the original message to enrich the modified message that pass through the mediator
                         </xs:documentation>
                         </xs:annotation>
                 <xs:restriction base="xs:string">
             <xs:enumeration value="custom"/>
                         <xs:enumeration value="envelope"/>
                        <xs:enumeration value="body"/>
                 <xs:enumeration value="property"/>
                        <xs:enumeration value="inline"/>
                 </xs:restriction>
                         </xs:attribute>
            <xs:attribute name="xpath" type="xs:string" use="optional"/>
            <xs:attribute name="property" type="xs:string" use="optional"/>
         </xs:complexType>          
        </xs:element>      
    <xs:element name="target">
            <xs:annotation>
                <xs:documentation source="description">
                Target Configuration
                </xs:documentation>
            </xs:annotation>
            <xs:complexType>
        <xs:attribute name="action" minOccurs="1" maxOccurs="1">
                    <xs:annotation>
                        <xs:documentation>
                            The relevant action can be applied to outgoing message.
                        </xs:documentation>                    </xs:annotation>
                <xs:restriction base="xs:string">
                        <xs:enumeration value="replace"/>
                       <xs:enumeration value="child"/>
                <xs:enumeration value="sibiling"/>
            </xs:restriction>
                </xs:attribute>
        <xs:attribute name="type" minOccurs="1" maxOccurs="1">
                    <xs:annotation>
                        <xs:documentation>
                           Type of enriching the outgoing message.
                        </xs:documentation>
                    </xs:annotation>
                <xs:restriction base="xs:string">
                        <xs:enumeration value="envelope"/>
                       <xs:enumeration value="body"/>
                <xs:enumeration value="property"/>
                       <xs:enumeration value="custom"/>
            </xs:restriction>
                </xs:attribute>
        <xs:attribute name="xpath" type="xs:string" use="optional"/>
        <xs:attribute name="property" type="xs:string" use="optional"/>
    </xs:complexType>
    </xs:element>
        </xs:sequence>
    </xs:complexType>
</xs:element>  
</xs:schema>
If you need to find more about enrich mediator you can visit
http://wso2.org/project/esb/java/3.0.1/docs/mediators/enrich.html


If you need more examples of xsd's written for various uses visit
https://svn.apache.org/repos/asf/synapse/trunk/java/repository/schema/mediators/filter/

Then we will see how we can use this with eclipse IDE
01.Open eclipse IDE
02.From window menu goto preferences
   Window>Preferences
   Then you will see image shown below


03.from the menu appearing you must select xml catalog as shown below


04.Then add xml catalog entry as shown in the figure shown in figure
05.browse your xsd file and save it
06.create new eclipse project and add new XML file
   from menu New > XML
07.Create new xml as shown in the below images.

   create xml from xml schema

select xml category and then point the xml


  Than you will get new xml file as shown below

Now you have created it successfully.

How to detect bundle starts faliure(WSO2 Carbon) and how to fix it simply

WSO2 Carbon is based on set of OSGI bundles. when server starts those bundles must starts. But in some cases those may not start due to some reason. In most of issues we ask people to check weather bundles started or not. here i will briefly describe how to detect bundle start  failure and how to fix it without having any previous knowledge about osgi(I'm also not expert in osgi)Most of cases bundles will not start automatically may be they depend on some other bundle that did not started successfully or they may not included in bundledef file.we will see how to detect it

01.start wso2server in diagnose mode with osgi console by typing following  command in the command line
 sh wso2server.sh -DosgiConsole

you can get all osgi bundles information by typing ss in command line so you will be able to view bundles infomation

check weather your bundles state in order to use it, it must be activated.In cases it installed only we can start them manually by typing start command


if you see dependency or not listed in bundles list you have to manually add them to bundleinfo file.

in this case you can see we cant start this bundle because it depend on some other bundle that not listed so we have to manually add them to bundleinfo file.
Now you can see where is the root of error and we can fix it now

you can see file inside this filder

wso2stratos-manager-1.1.0-SNAPSHOT/repository/components/configuration/org.eclipse.equinox.simpleconfigurator/bunldles.info
This file contains all bundles that should be started


org.wso2.carbon.tenant.reg.agent.client,1.1.0.SNAPSHOT,plugins/org.wso2.carbon.tenant.reg.agent.client-1.1.0.SNAPSHOT.jar,4,true
org.wso2.carbon.tenant.reg.agent.service,1.1.0.SNAPSHOT,plugins/org.wso2.carbon.tenant.reg.agent.service-1.1.0.SNAPSHOT.jar,4,true
org.wso2.carbon.tenant.register.stub,3.2.0.SNAPSHOT,plugins/org.wso2.carbon.tenant.register.stub-3.2.0.SNAPSHOT.jar,4,true


so we will add new bundle that need to start as follows and put corressponding jar file in to repositary/components/pluggings folder

then you can start server again and you can check weather bundles started or not

How to fix error in svn due to locking "error-folder is already under version control"

When i try to add folder to svn this gives following error
sanjeewa@sanjeewa-laptop:~/trunck/carbon/service-stubs$ svn add org.wso2.carbon.usage.meteringsummarygenerationds.stub/
svn: Working copy '.' locked
svn: run 'svn cleanup' to remove locks (type 'svn help cleanup' for details)

then tried to clean up. it also gives following error
sanjeewa@sanjeewa-laptop:~/trunck/carbon/service-stubs$ svn cleanup
svn: 'org.wso2.carbon.usage.meteringsummarygenerationds.stub' is not a working copy directory

then i removed that folder by deleting and add new folder and try to add it
sanjeewa@sanjeewa-laptop:~/trunck/carbon/service-stubs$ svn add org.wso2.carbon.usage.meteringsummarygenerationds.stub/
svn: warning: 'org.wso2.carbon.usage.meteringsummarygenerationds.stub' is already under version control

So finally i found the way to solve it
01.first copy that folder to some other location(remove all .svn files inside)
02.then type svn clenup
03.then type svn revert command
svn revert org.wso2.carbon.usage.meteringsummarygenerationds.stub/
04.Copy back that folder to the location that we need
05.then add to svn
svn add org.wso2.carbon.usage.meteringsummarygenerationds.stub/

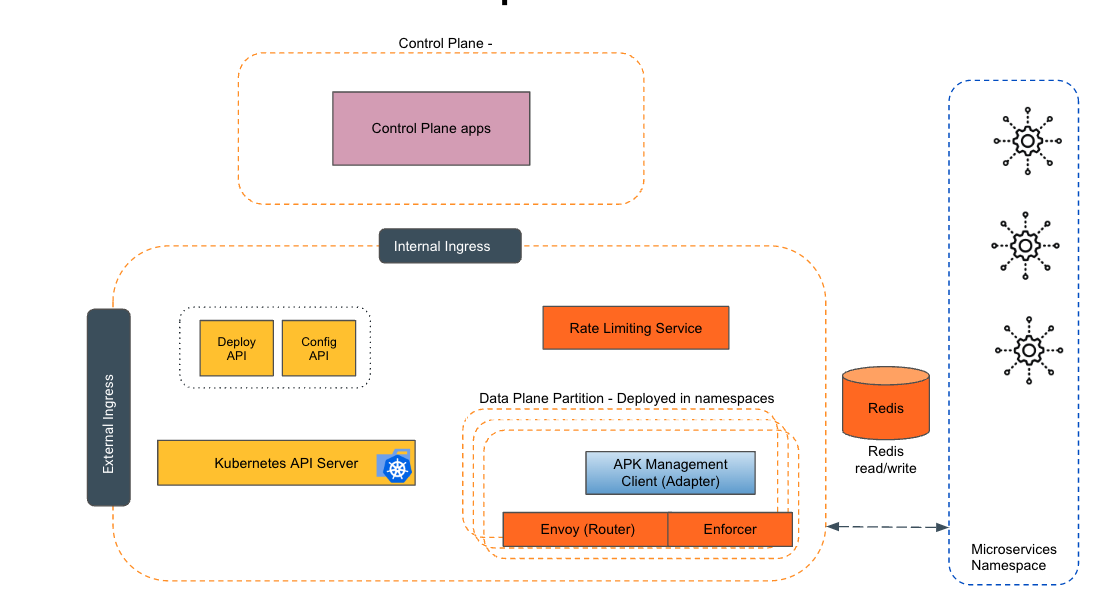
Empowering the Future of API Management: Unveiling the Journey of WSO2 API Platform for Kubernetes (APK) Project and the Anticipated Alpha Release

  Introduction In the ever-evolving realm of API management, our journey embarked on the APK project eight months ago, and now, with great a...