SMS OTP Two Factor Authentication for WSO2 API Manager publisher


In this post, I will explain how to use SMS OTP multi factor authenticator through WSO2 Identity server. We will be using Twilio SMS Provider which was used to send the OTP code via SMS at the time authentication happens. For this solution we will 2 WSO2 API Manager(2.1.0) and Identity server(5.3.0). Please note that we need to set port offset as 1 in carbon.xml configuration file available with identity server. So it will be running on https 9444 port.

First to to https://www.twilio.com and create account there. Then provide your mobile number and register that.

Then generate mobile number from twilio. Then it will give you new number for you to use.

curl -X POST 'https://api.twilio.com/2010-04-01/Accounts/({Account-Sid}/SMS/Messages.json'  --data-urlencode 'To={Sender SMS}' --data-urlencode 'From={generated MobileNumber from Twilio}' --data-urlencode 'Body=enter this code'  -H 'Authorization: Basic {base64Encoded(Account SId:Auth Token)}'

Please see the sample below.

curl -X POST 'https://api.twilio.com/2010-04-01/Accounts/fsdfdfdsfdfdsfdfsdfdsfdfdfdf/SMS/Messages.json'  --data-urlencode 'To=+94745345779' --data-urlencode 'From=+1454543535' --data-urlencode 'Body=enter this code'  -H 'Authorization: Basic LKJADJAD:ADJLJDJ:LAJDJDJJJJJJL::LMMIYGBNJN=='

Now it should send you message to your mobile number provided.

Now login to identity server and create new identity provider. When you do that provide following inputs in user interface.
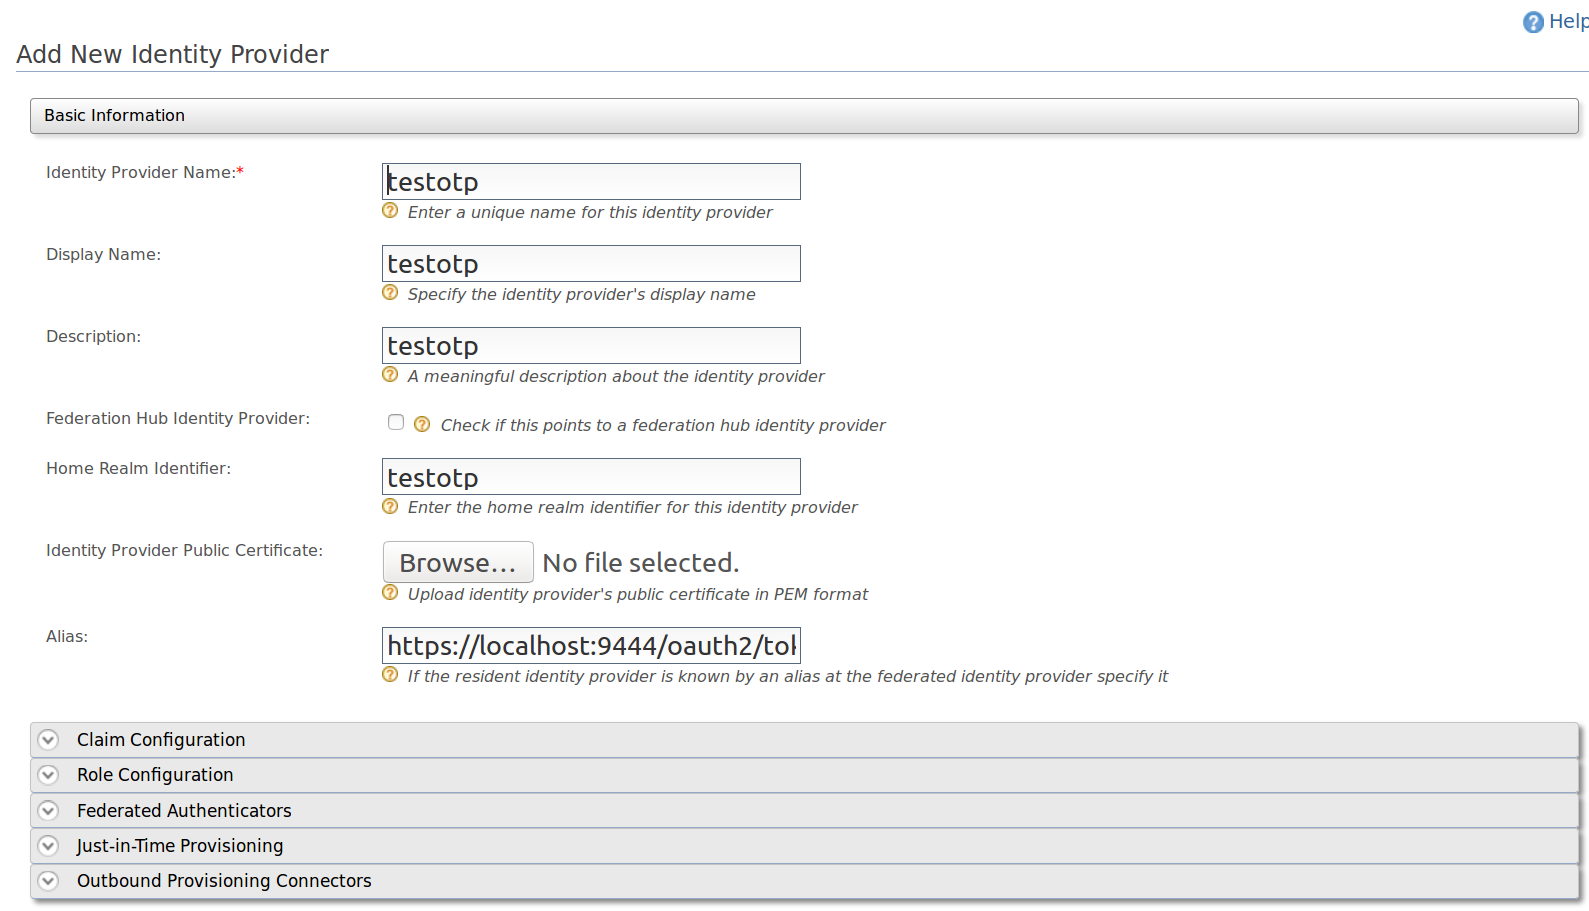
Screenshot from 2017-03-09 15-09-17.png

Then go to federated authenticator section and add SMS OTP Configuration as follows. Provide basic authentication credentials like we did for CuRL request.

Please fill following fields as below.
SMS URL: https://api.twilio.com/2010-04-01/Accounts/ACd5ac7ff9sdsad3232432414b/SMS/Messages.json   HTTP Method: POST    HTTP Headers: Authorization: Basic QUNkNWFjN2ZmOTNTNmNjMzOWMwMjBkZQ==HTTP Payload: Body=$ctx.msg&To=$ctx.num&From=+125145435333434

Screenshot from 2017-03-09 15-10-01.png


Then let's add service provider as follows. Provide service provider name as follows.
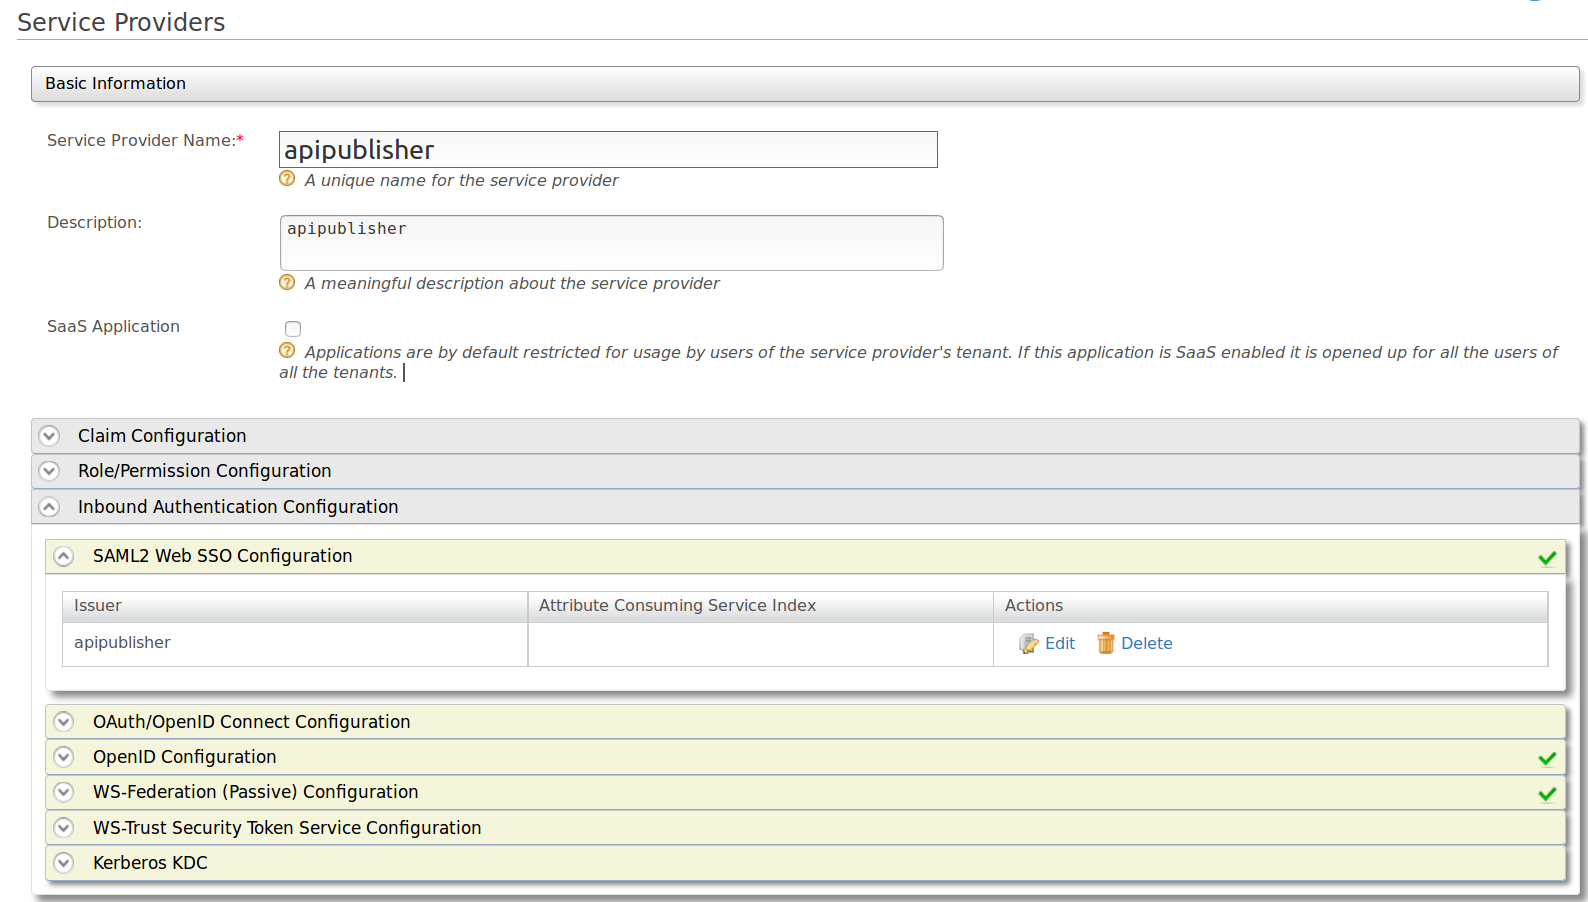
Screenshot from 2017-03-09 15-29-50.png


Then go to SAML2 web SSO configuration and provide following configurations. Then save it and move forward.
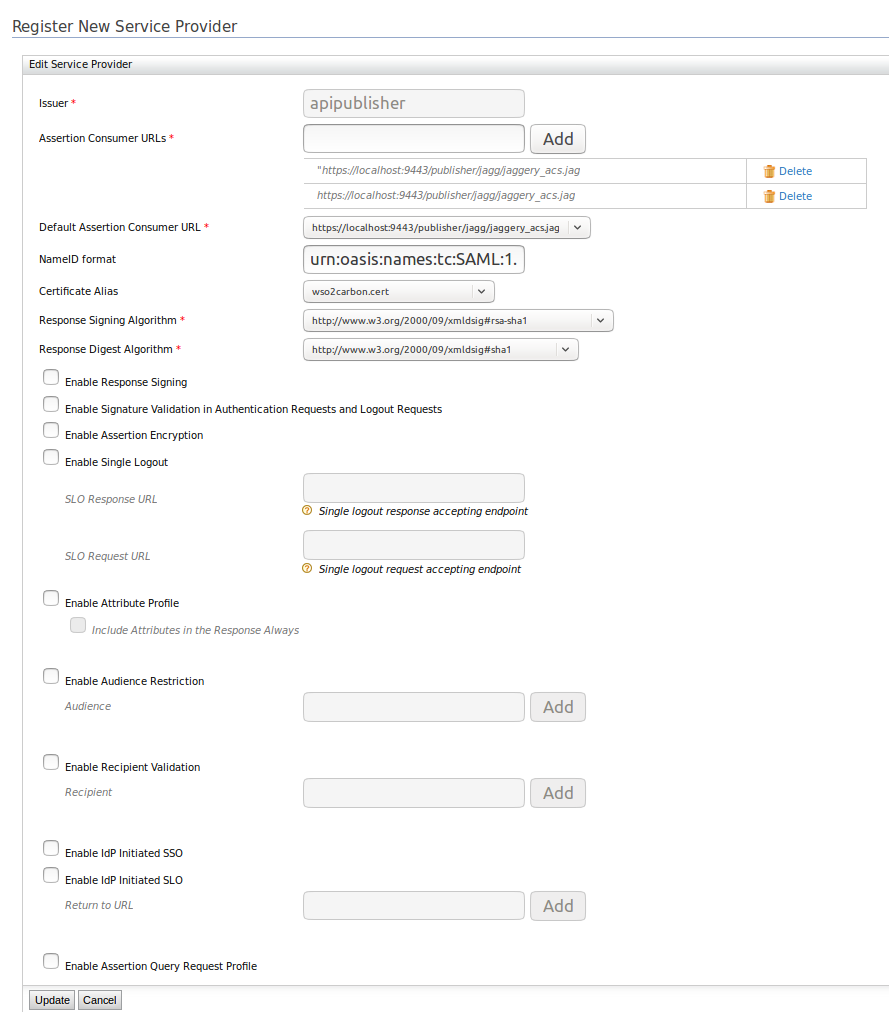

Screenshot from 2017-03-09 15-30-08.png

Now save this service provider and come back to identity server UI. Then we need to configure local and outbound authentication steps as follows. We need to configure advanced authentication configuration as we are going to configure multi step authentication.
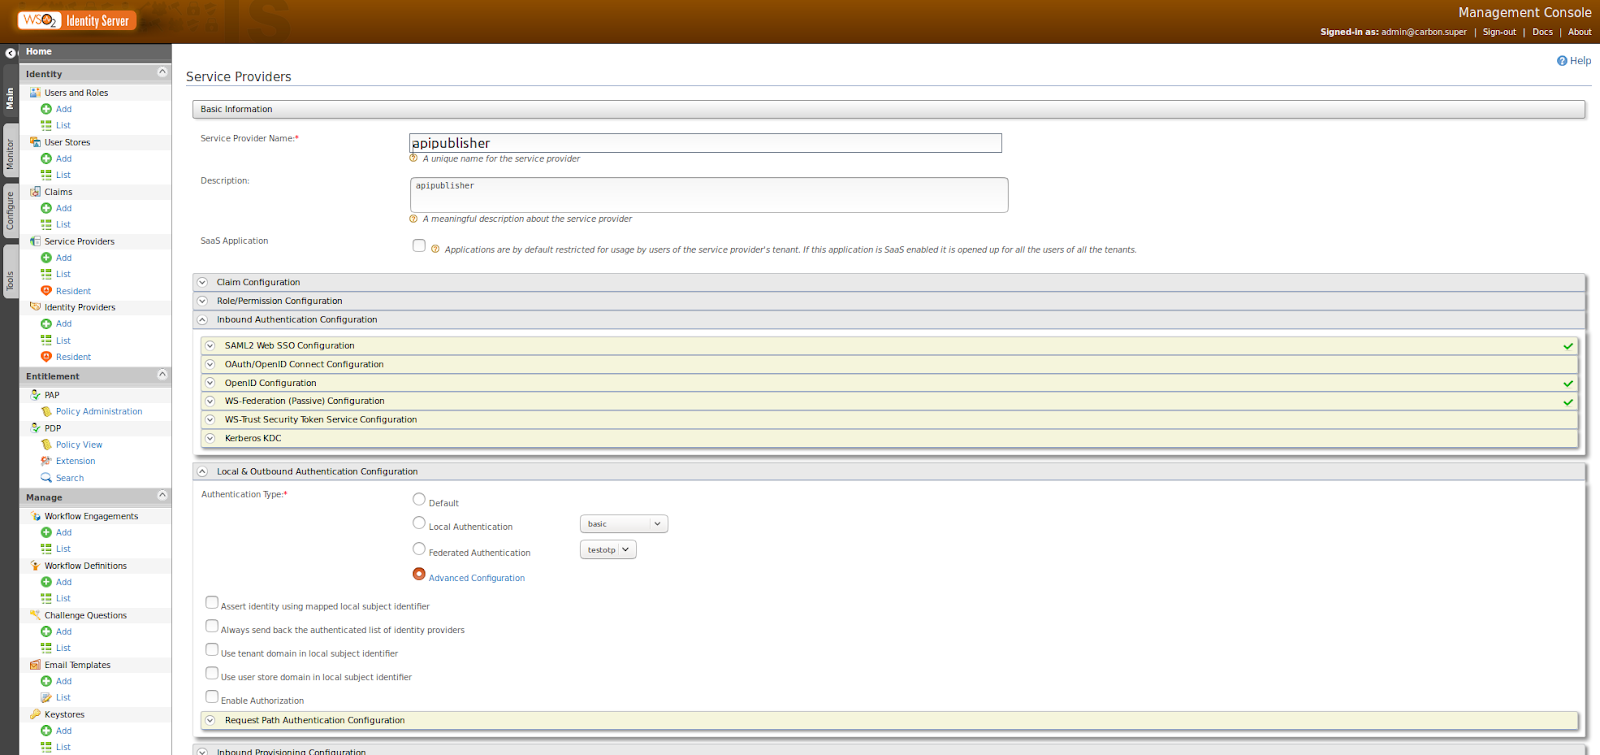
Screenshot from 2017-03-09 16-47-42.png

Then add username and password based local authentication as first steps and add out SMS otp as second authentication step. Now we can save this configuration and move forward.
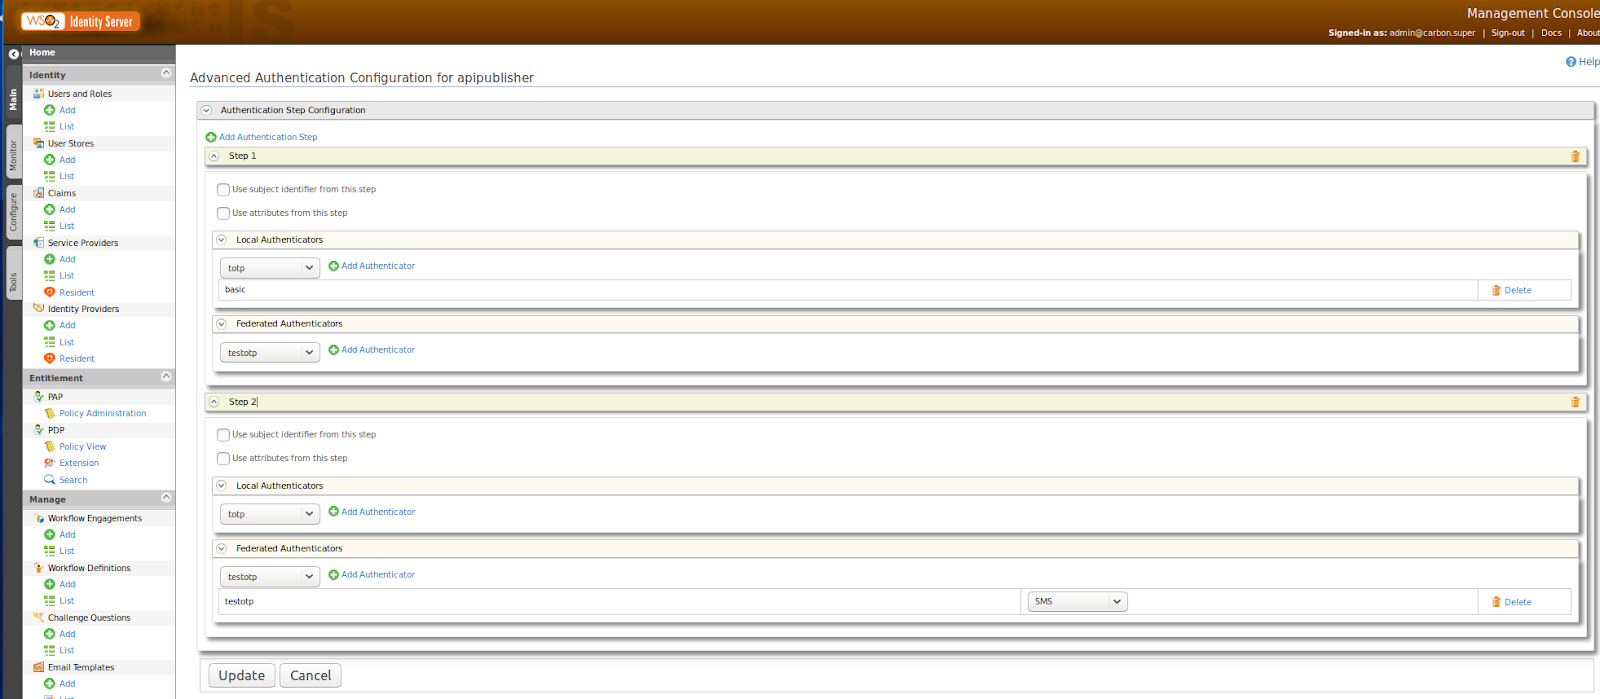
Screenshot from 2017-03-09 16-48-12.png

Also add following configuration to wso2is-5.3.0/repository/conf/identity/application-authentication.xml file and restart server.


<AuthenticatorConfig name="SMSOTP" enabled="true">
             <Parameter name="SMSOTPAuthenticationEndpointURL">https://localhost:9444/smsotpauthenticationendpoint/smsotp.jsp</Parameter>
             <Parameter name="SMSOTPAuthenticationEndpointErrorPage">https://localhost:9444/smsotpauthenticationendpoint/smsotpError.jsp</Parameter>
             <Parameter name="RetryEnable">true</Parameter>
             <Parameter name="ResendEnable">true</Parameter>
             <Parameter name="BackupCode">false</Parameter>
             <Parameter name="EnableByUserClaim">false</Parameter>
             <Parameter name="MobileClaim">true</Parameter>
             <Parameter name="enableSecondStep">true</Parameter>
             <Parameter name="SMSOTPMandatory">true</Parameter>
             <Parameter name="usecase">association</Parameter>
             <Parameter name="secondaryUserstore">primary</Parameter>
             <Parameter name="screenUserAttribute">http://wso2.org/claims/mobile</Parameter>
             <Parameter name="noOfDigits">4</Parameter>
             <Parameter name="order">backward</Parameter>
       </AuthenticatorConfig>


Now it's time to configure API publisher to configure, so it can work with identity server to do authentication based on SSO. Add following configuration to /wso2am-2.1.0/repository/deployment/server/jaggeryapps/publisher/site/conf/site.js file.

 "ssoConfiguration" : {
       "enabled" : "true",
       "issuer" : "apipublisher",
       "identityProviderURL" : "https://localhost:9444/samlsso",
       "keyStorePassword" : "",
       "identityAlias" : "",
       "verifyAssertionValidityPeriod":"true",
       "timestampSkewInSeconds":"300",
       "audienceRestrictionsEnabled":"true",
       "responseSigningEnabled":"false",
       "assertionSigningEnabled":"true",
       "keyStoreName" :"",
       "signRequests" : "true",
       "assertionEncryptionEnabled" : "false",
       "idpInit" : "false",
    }

Now go to API publisher URL and you will be directed to identity server login page. There you will see following window and you have to enter user name and password there.


Then once you completed it you will get SMS to number you have mentioned in your user profile. If you havent already added mobile number to your user profile please add by login to identity server. You can go to users and roles window and select user profile from there. Then edit it as follows.


Then enter the OTP you obtain in next window.


Ballerina connector development sample - BallerinaLang

Ballerina is a general purpose, concurrent and strongly typed programming language with both textual and graphical syntaxes, optimized for integration. In this post we will discuss how we can use ballerina swagger connector development tool to develop connector using already designed swagger API.

First download zip file content and unzip it into your local machine. Also you need to download ballerina composer and run time from the ballerinalang web site to try this.


Now we need to start back end for generated connector.
Goto student-msf4j-server directory and build it.
/swagger-connector-demo/student-msf4j-server>> mvn clean install

Now you will see micro service jar file generated. Then run MSF4J service using following command.
/swagger-connector-demo/student-msf4j-server>> java -jar target/swagger-jaxrs-server-1.0.0.jar
starting Micro Services
2017-02-19 21:37:44 INFO  MicroservicesRegistry:55 - Added microservice: io.swagger.api.StudentsApi@25f38edc
2017-02-19 21:37:44 INFO  MicroservicesRegistry:55 - Added microservice: org.wso2.msf4j.internal.swagger.SwaggerDefinitionService@17d99928
2017-02-19 21:37:44 INFO  NettyListener:68 - Starting Netty Http Transport Listener
2017-02-19 21:37:44 INFO  NettyListener:110 - Netty Listener starting on port 8080
2017-02-19 21:37:44 INFO  MicroservicesRunner:163 - Microservices server started in 307ms

Now we can check MSF4J service running or not using CuRL as follows.
curl -v http://127.0.0.1:8080/students
*   Trying 127.0.0.1...
* Connected to 127.0.0.1 (127.0.0.1) port 8080 (#0)
> GET /students HTTP/1.1
> Host: 127.0.0.1:8080
> User-Agent: curl/7.43.0
> Accept: */*
>
< HTTP/1.1 200 OK
< Connection: keep-alive
< Content-Length: 41
< Content-Type: application/json
<
* Connection #0 to host 127.0.0.1 left intact
{"code":4,"type":"ok","message":"magic!"}


Please use following sample swagger definition to generate connector(this is available in zip file attached).

swagger: '2.0'
info:
 version: '1.0.0'
 title: Swagger School (Simple)
 description: A sample API that uses a school as an example to demonstrate features in the swagger-2.0 specification
 termsOfService: http://helloreverb.com/terms/
 contact:
    name: Swagger API team
    email: foo@example.com
    url: http://swagger.io
 license:
    name: MIT
    url: http://opensource.org/licenses/MIT
host: schol.swagger.io
basePath: /api
schemes:
 - http
consumes:
 - application/json
produces:
 - application/json
paths:
 /students:
    get:
     description: Returns all students from the system that the user has access to
     operationId: findstudents
     produces:
       - application/json
       - application/xml
       - text/xml
       - text/html
     parameters:
       - name: limit
         in: query
         description: maximum number of results to return
         required: false
         type: integer
         format: int32
     responses:
       '200':
         description: student response
         schema:
           type: array
           items:
             $ref: '#/definitions/student'
       default:
         description: unexpected error
         schema:
           $ref: '#/definitions/errorModel'
    post:
     description: Creates a new student in the school.  Duplicates are allowed
     operationId: addstudent
     produces:
       - application/json
     parameters:
       - name: student
         in: body
         description: student to add to the school
         required: true
         schema:
           $ref: '#/definitions/newstudent'
     responses:
       '200':
         description: student response
         schema:
           $ref: '#/definitions/student'
       default:
         description: unexpected error
         schema:
           $ref: '#/definitions/errorModel'
 /students/{id}}:
    get:
     description: Returns a user based on a single ID, if the user does not have access to the student
     operationId: findstudentById
     produces:
       - application/json
       - application/xml
       - text/xml
       - text/html
     parameters:
       - name: id
         in: path
         description: ID of student to fetch
         required: true
         type: integer
         format: int64
       - name: ids
         in: query
         description: ID of student to fetch
         required: false
         type: integer
         format: int64
     responses:
       '200':
         description: student response
         schema:
           $ref: '#/definitions/student'
       default:
         description: unexpected error
         schema:
           $ref: '#/definitions/errorModel'
    delete:
     description: deletes a single student based on the ID supplied
     operationId: deletestudent
     parameters:
       - name: id
         in: path
         description: ID of student to delete
         required: true
         type: integer
         format: int64
     responses:
       '204':
         description: student deleted
       default:
         description: unexpected error
         schema:
           $ref: '#/definitions/errorModel'
definitions:
 student:
    type: object
    required:
     - id
     - name
    properties:
     id:
       type: integer
       format: int64
     name:
       type: string
     tag:
       type: string
 newstudent:
    type: object
    required:
     - name
    properties:
     id:
       type: integer
       format: int64
     name:
       type: string
     tag:
       type: string
 errorModel:
    type: object
    required:
     - code
     - textMessage
    properties:
     code:
       type: integer
       format: int32
     textMessage:
       type: string


Generate connector
./ballerina swagger connector /home/sanjeewa/Desktop/sample.yaml  -p org.wso2 -d ./test
Then add connector to composer and expose it as service.

import ballerina.net.http;
@http:BasePath("/testService")
service echo {
    @http:POST
    resource echo(message m) {
    Default defaultConnector = create Default();
    message response1 = Default.employeeIDGet( defaultConnector, m);
    reply response1;
    }
}
connector Default() {
    http:ClientConnector endpoint = create http:ClientConnector("http://127.0.0.1:8080/students");
    action employeeIDDelete(Default c, message msg)(message ) {
        message response;
        response = http:ClientConnector.delete(endpoint, http:getRequestURL(msg), msg);
        return response;     
    }
     action employeeIDGet(Default c, message msg)(message ) {
        message response;
        response = http:ClientConnector.get(endpoint, http:getRequestURL(msg), msg);
        return response;
    }
     action employeeIDPut(Default c, message msg)(message ) {
        message response;
        response = http:ClientConnector.put(endpoint, http:getRequestURL(msg), msg);
        return response;
    }
     action rootGet(Default c, message msg)(message ) {
        message response;
        response = http:ClientConnector.get(endpoint, http:getRequestURL(msg), msg);
        return response;
    }
     action rootPost(Default c, message msg)(message ) {
        message response;
        response = http:ClientConnector.post(endpoint, http:getRequestURL(msg), msg);
        return response;     
    } 
}

Then you will see relevant files in output directory.

├── test
  └── org
      └── wso2
          ├── default.bal
          ├── LICENSE
          ├── README.md
          └── types.json

Then you can copy generated connector code into composer and start your service development. How its appear in composer source view.

5qHg9h6fB0HmJoB9wQjYa7JMfNGiu3J5vkBS4ybVDkUfdA_tl6_xuXZcE0qz6vDmbZsTG2m9HhHfXwPTlPnTaLeTcyWvafZPCcGJOgU-AqHXtuhOxHDPx0Nz5NYFe31euoTPSQXZ (1160×796)

How its loaded in composer UI.
y3bhSlbBgD1u3cuhfJrBtt4aPZwIFGd-ASSGvPlOvaenekA4RLNVGhXa6WWpkSs1iDRUwFiUqU6ZH9m-b3xrb2UJ55Jvyg7zR_TcBfbjMHE2yHgdmQVJIoTcEwzhDiWDekOCh5Yj (1207×937)
Then run it.
 ./ballerina run service ./testbal.bal

Now invoke ballerina service as follows.

curl -v -X POST http://127.0.0.1:9090/testService

*   Trying 127.0.0.1...
* Connected to 127.0.0.1 (127.0.0.1) port 9090 (#0)
> POST /testService HTTP/1.1
> Host: 127.0.0.1:9090
> User-Agent: curl/7.43.0
> Accept: */*
>
< HTTP/1.1 200 OK
< Connection: keep-alive
< Content-Length: 49
< Content-Type: application/json
<
* Connection #0 to host 127.0.0.1 left intact
{"code":4,"type":"ok","message":"test-ballerina"}

Empowering the Future of API Management: Unveiling the Journey of WSO2 API Platform for Kubernetes (APK) Project and the Anticipated Alpha Release

  Introduction In the ever-evolving realm of API management, our journey embarked on the APK project eight months ago, and now, with great a...